During the last couple of weekends I have been playing with Microsoft Azure. Once I was up to speed with the basics and concepts involved I was surprised how easy it was to set up a small test lab environment. Without using any automated setup and/or configuration scripts, it only took me a few hours to set up a fully functional test environment including Active Directory, DNS, a Certificate Authority, a XenApp/XenDesktop/Director Site, StoreFront/Receiver, Control-up and a few in place policies. Best of all, during the first 32 days it’s completely free of charge, at least for the first 150 euros. And I can tell you; those 150 can get you a long way if spend wisely. Make sure to check my 20+ takeaways and lessons learned near the end.
What I’ll do
Throughout this article I’d like to share some of my findings with regards to installing and configuring your own Azure test environment, getting you up to speed quickly so you can enjoy that free 150 even longer :) And since I’m still sort of a newbie to Azure, if any of you out there feel I left anything out or perhaps you know of a ‘smarter’ approach, do share!
Some basics and terminology first
Before you start configuring and deploying any VM’s on Azure you need to make sure that you understand the basics and the terminology involved. Know what is what, and when what is needed. I won’t provide you with a complete detailed overview myself, just turn to azure.com they have done a nice job in explaining everything step by step. However, what I will do is provide you with a short list of concepts to explore first, to get you started. Don’t worry, it isn’t that complicated, you just need to spend a few minutes on each topic before proceeding, or that’s my advice anyway.
- Learn / read about Azure storage (storage accounts) and how it is charged.
- You need to understand the concept of a Cloud Service and how multiple VM’s (max 50) can be configured to ‘fall’ under the same Cloud Service.
- Get to know Virtual (your own private network on Azure) and Local Networks, this is important, including DNS.
- Have a look at the different VM configurations available.
- Also make sure to understand the costs involved. Knowing what a certain VM configuration will cost you per hour helps during your VM selection / configuration process. You really don’t need blazing fast machines, trust me.
- Although not a necessity, have a look at the site-to-site and the point to site VPN functionality if you are interested.
The above will be enough to get you started and is basically all you need to know to get a test lab up and running quickly. Of course there is also SQL, BizTalk, the Market place, RemoteApps, Traffic Manager, all sorts of Automation scripts that you can use and more to have a look at, but that is of a later concern. All services and concepts mentioned come with a clear and easy to follow wizard directly from the Azure management portal as we’ll soon find out.
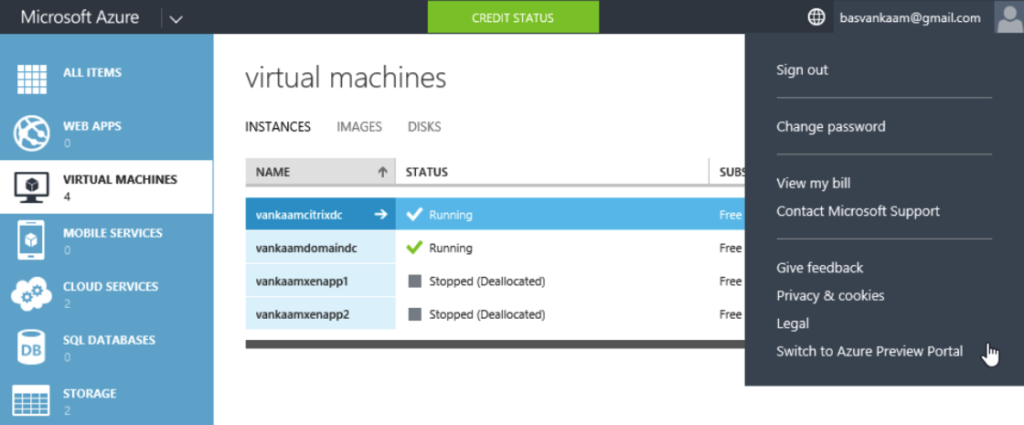
A quick way to get access to Azure documentation is to use the Azure menu from within the management portal, see below. It will basically tell you everything you want / need to know.
After signing up
Once you signed up with Azure you go to manage.windowsazure.com and sign in to your own personal azure space where you can start to configure your environment. Now without telling you what to do, you’ll probably end up on the Virtual Machine tab trying to spin up a few VM’s, but hold on for a minute. Without going into to much detail I’ll show you the correct order of steps you need to take, since simply spinning up VM’s won’t get you anywhere, well, not far anyway.
The two portals
Before I continue, I’d like to point out that there is a new Azure management portal available as well which is still in preview. Below you’ll find a general screenshot of the current Azure management portal and how to get to the preview portal from there. I mention this because the preview portal also offers some additional functionality not found in the current management portal, something I’ll cover a bit later on. Again, I’m focusing on the steps needed to get our test lab set up quickly.
1. Create an Azure Cloud Service
The first thing you need to do is to create an Azure Cloud Service. I suggest that you start by reading this MSDN blog post it’s very detailed and will tell you exactly what a Cloud Service is and how it works, including a bit of history. Later on you will see that when you spin up a new VM you will select (this is optional) the earlier created Cloud Service, which is also mentioned in the MSDN article.
It is therefore important to note that when you create a Cloud Service you select the appropriate Azure datacenter location, which in my case is West Europe, since you can’t change this afterwards and this is where your VM’s will be created.
Although it might not be that interesting from a test lab perspective, make sure to read up on availability sets as well (sub feature of an Azure Cloud Service). Especially when dealing with multiple Domain controllers or Web servers for example.
2. Create a virtual network
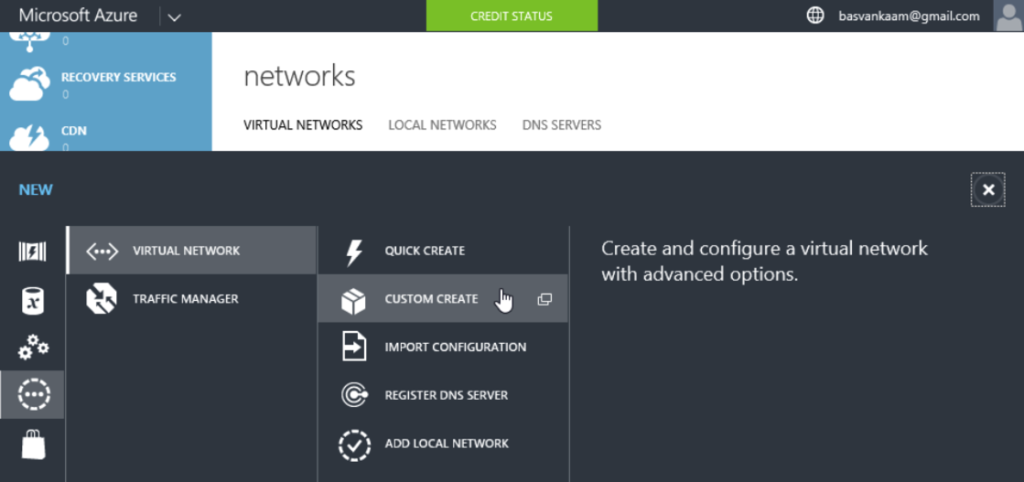
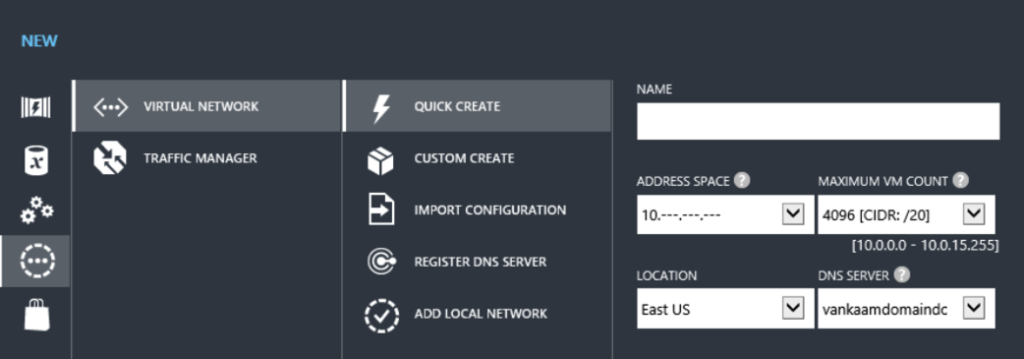
Step two is creating a virtual network. Have a look here for some more information and prizing. I copied this in from Azure.com: Virtual network provides an isolated and secure environment to run your VMs and applications. You can bring your private IP addresses, define subnets, access control policies and much more. When creating a new virtual network you have several options as you can see below.
To give you an idea, I also included a screenshot on the Quick Create option. Again, just as with the Cloud Service, when you create a new VM you can select the virtual network it needs to connect to. As soon as you have an active DNS server set up you need to go back into the properties of your virtual network and fill in the name and IP address of your DNS server, I’ll show you how and where in a minute.
After you select ‘New’ you have a few options.
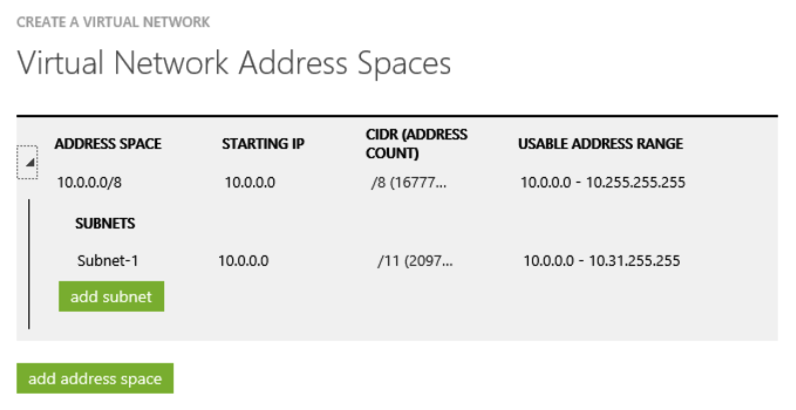
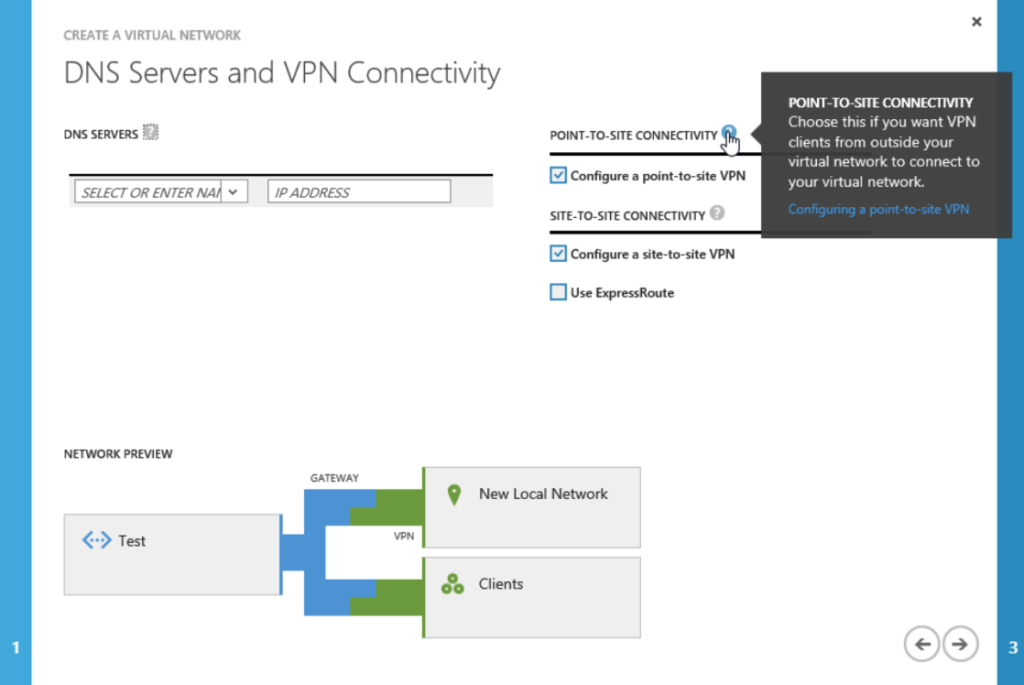
Once you have selected the ‘Custom Create’ option you give it a name and you will have to select the datacenter to create the network in, in my case, West Europe (there actually is an Azure datacenter in the Netherlands). Next you have the option to fill in a DNS server (name and address) although this is probably something that you will do at a later stage (as mentioned), you can select a site-to-site or a point to site connectivity network, which I will cover a bit later on. Next up is configuring your address range / space etc. as you can see below.
Below is an example of the Quick Create option.
3. Create an storage account
As with the above-mentioned Cloud Service and the virtual network, you also need to select a storage account when creating new virtual machines or other storage related services. Simply put this is where your VM vhd’s will be stored. Due note however, that besides the vhd’s of your VM’s there are a few other types of storage objects that you can purchase and manage within Azure. This and this article will tell you everything you need to know and more with regards to the different types of storage and storage accounts available within Azure.
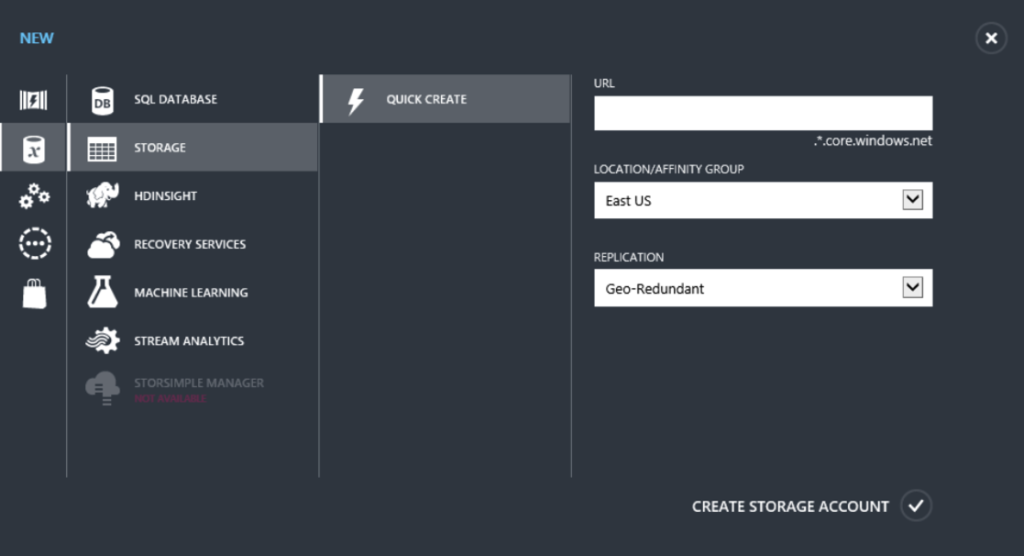
Also make sure to read up on some of the storage replication options you can choose from. From there you will also have easy access to any storage related prizing information you might need. Storage accounts are easy to create. Simply select ‘Storage’ from the left-hand side menu and click on ‘New’ near the bottom, the below screen wil pop up.
Once you have a few VM’s up and running (creating VM’s is up next) your storage account properties will look something like this.
4. Creating virtual machines
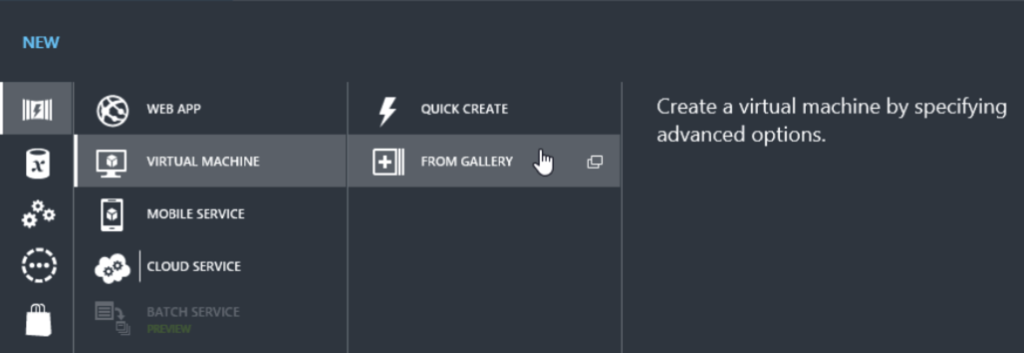
Finally, let’s start building. From the main Azure management portal, on the left-hand side of the screen, you select Virtual Machines, which will give you an overview on your current configured VM’s, running and stopped. In this case I assume it will be empty. By clicking on the ‘New’ button on the bottom left a menu will pop up providing you with several options, see the screenshot below.
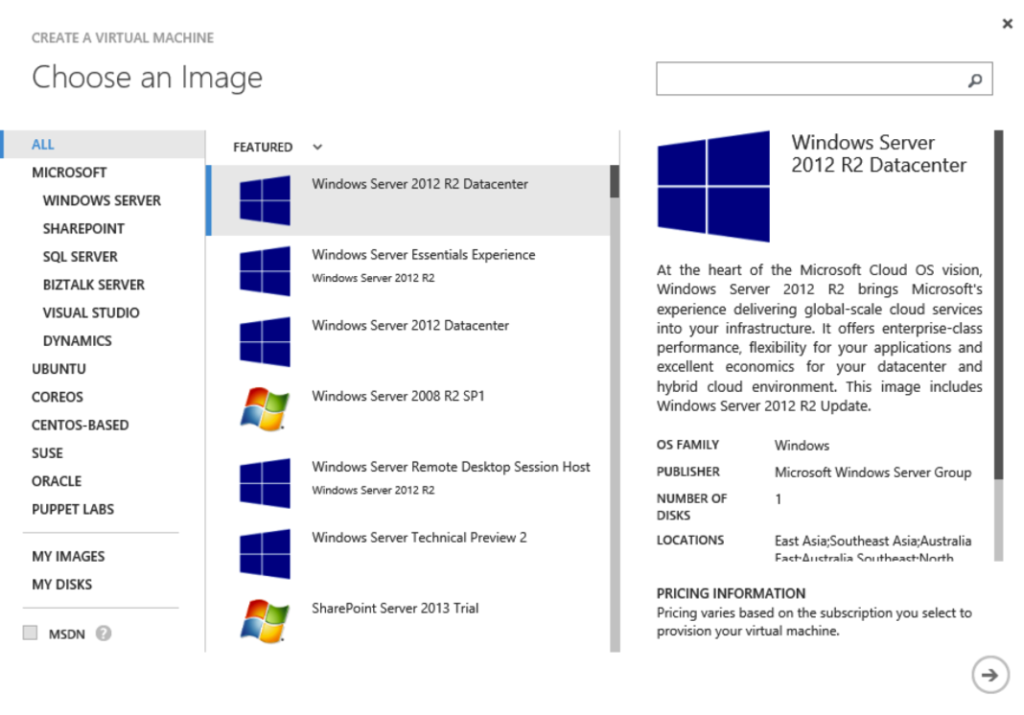
To be able to select the appropriate Cloud Service, virtual network and storage account while creating a new VM you need to select the ‘From Gallery’ option. Below you’ll find screenshots on the various steps involved.
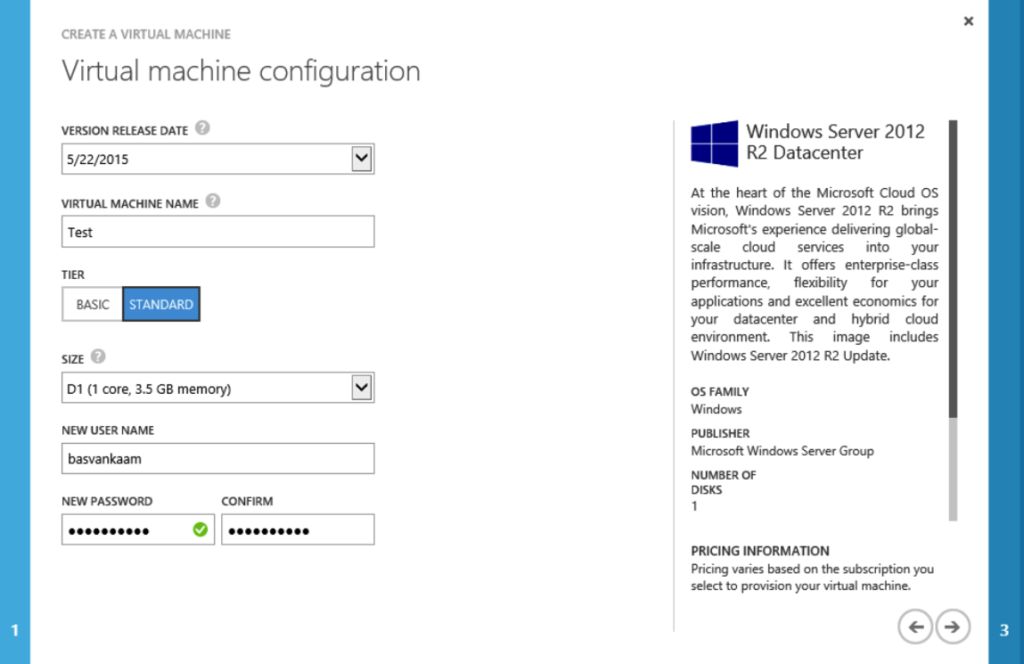
The first step is to select the appropriate template to base your VM on, see above.
You need to give it a name, select the ‘Tier’ and what ‘size’ the VM should have. You also need to fill in a local admin user account name and password.
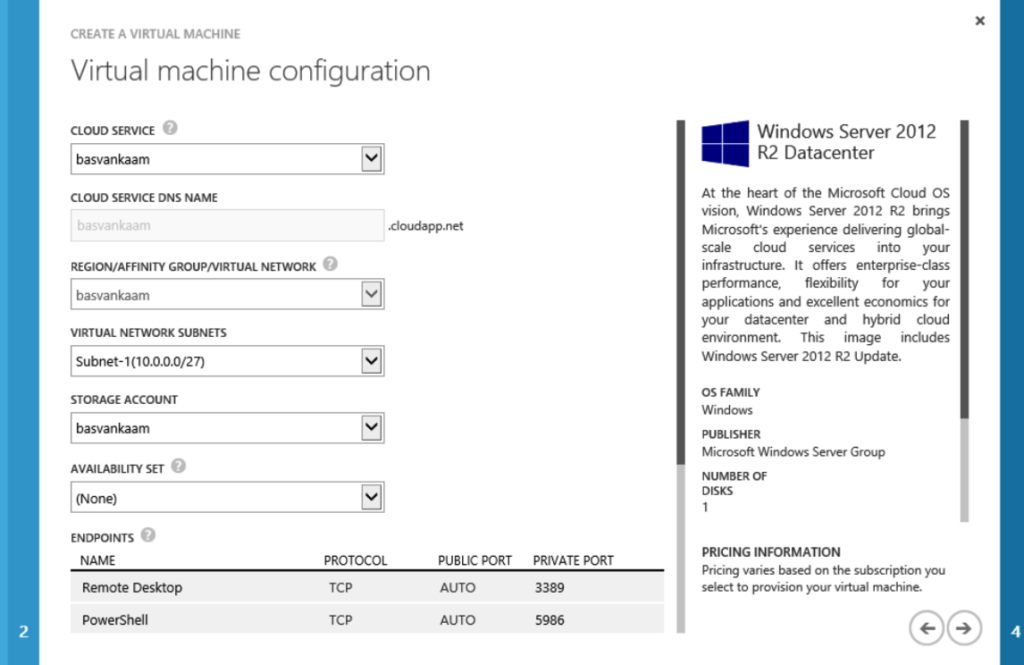
As you can see in the above screenshot you need to select an Azure Cloud Service, a virtual network and a storage account. We haven’t covered availability sets, and the endpoints will be discussed a few paragraphs down.
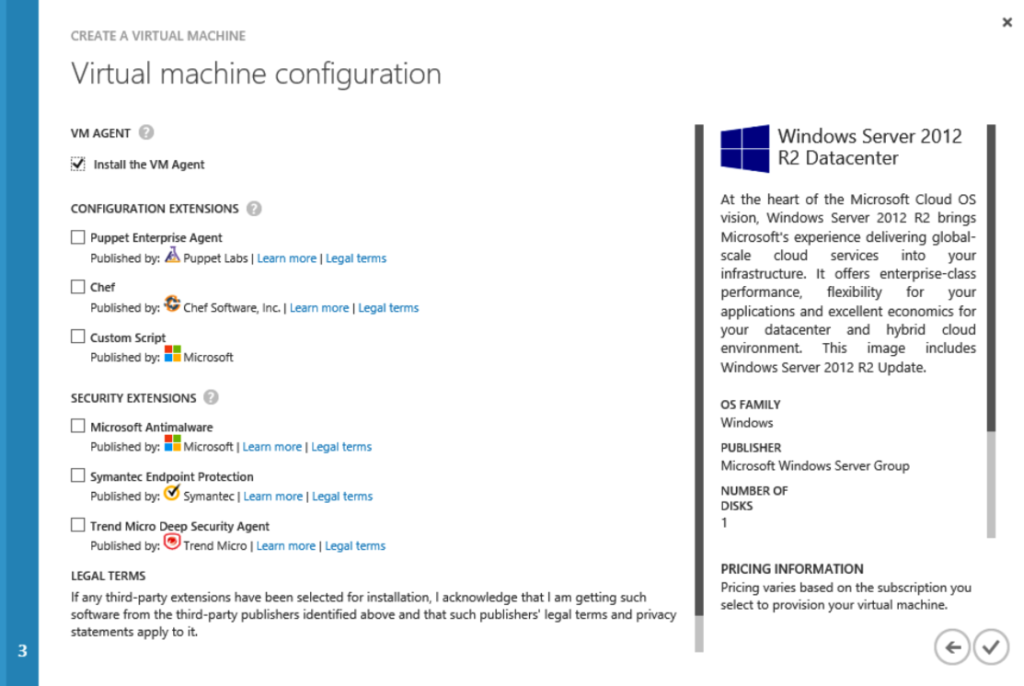
Finally you can select some specific software that you may or may not want to make use of. When ready you click the check mark at the right and your VM will get provisioned.
Note that if you don’t select an existing Cloud Service, virtual network and/or storage account while creating a new VM, separate ones will get created automatically specific to that VM. This is also what happens if you choose the Quick Create option when provisioning a new VM. This may or may not be what you need.
Once you have your VM’s up and running
From here on it is business as usual, sort of anyway. Install your domain controller, set up your root forest, DNS etc. You won’t need a DHCP server, Azure will take care of this for you, remember the earlier created virtual network?
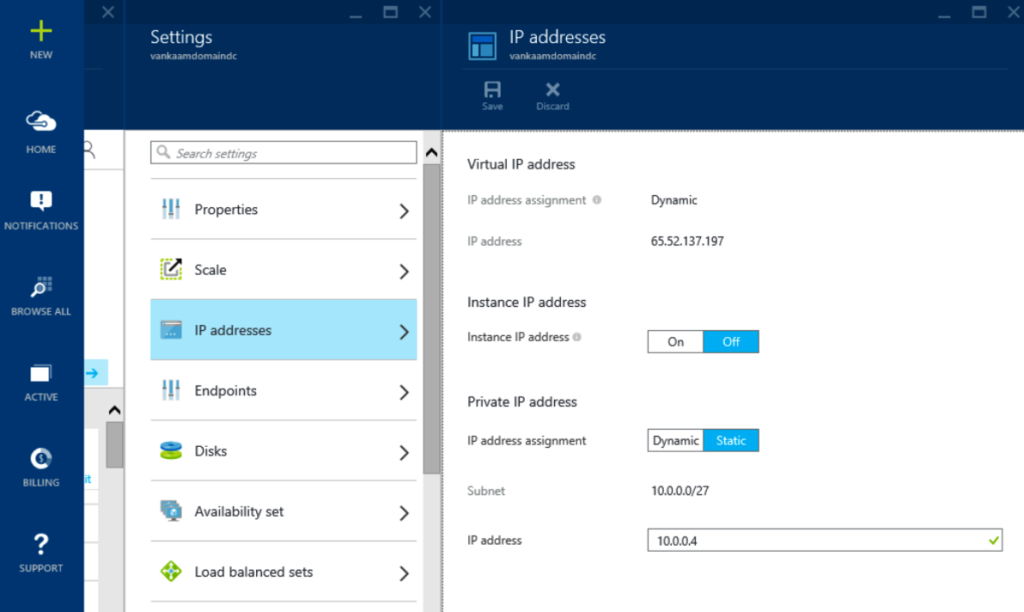
When you are done installing / configuring your DC / DNS roles you probably want to give your DC a static IP address. Don’t configure one manually; you won’t be able to get to your machine. Instead, go to the Azure preview portal mentioned at the beginning of the article. Look up your Domain Controller, go to ‘All Settings’ and select ‘IP Addresses’. Here you can select if the IP address needs to static or dynamic simply by wiping a button, easy peasy. If you prefer, this is also something that can be done using PowerShell, which, I guess, goes for almost everything mentioned in this article :)
Management through RDP / PowerShell (Endpoints)
When your VM’s are provisioned they are, by default, reachable through RDP and PowerShell, assuming you have the proper ports open in your firewall. During the creation process of a VM so called Endpoints are automatically created and configured which make this possible. See below. You can change the port numbers to whatever might fit your needs. Due note that this is the only external connection you’ll have, if you want external machines to able to connect up to your Azure domain / network you will have to set up point to site or site-to-site connectivity networks, read on.
DNS
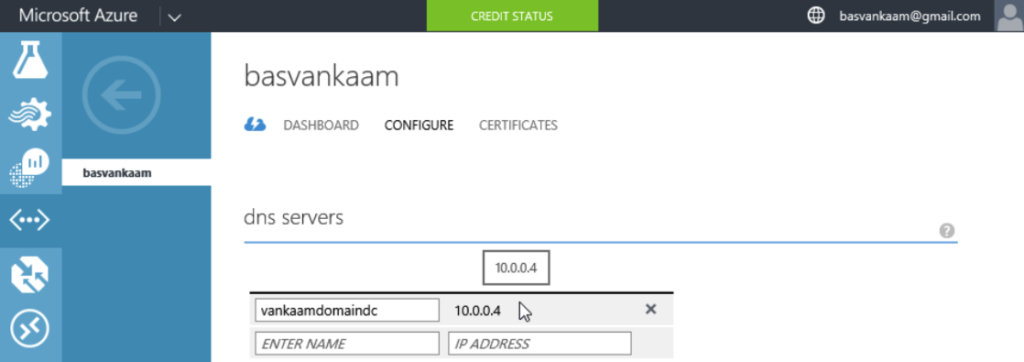
Again, when you are done setting up AD and DNS you need to register you DNS server on your azure virtual network. This is easily done by going to its properties and filling in the DNS server name and IP address. As shown below. Also have a look at this article, scroll near the end where it says ‘Reset the DNS server for the Azure virtual network’ it will tell you to delete the current configured forwarder on your DNS server. After this you are good to go. Don’t forget to add your other Azure VM’s to your new Domain.
A bit more on networks
So far we only discussed the Azure virtual networks, creating your own personal private space on the Azure platform, and of course you can create multiple if needed. I also briefly highlighted how you can manage your machines using RDP and/or PowerShell.
This basic setup will probably be enough to test most scenarios, within your private Azure network everything works as if you were connected to your office network for example. You can only use the machines within your Azure virtual network to communicate with each other; no external connections are set up by default, which makes sense.
However, if you go to the network section, where you also configured your Azure private network, you will see that you have a few more options. For example, you can add in a Private Network, this will be used when you configure a site-to-site connectivity network, connecting one of your private office networks into your Azure environment. Just read on and I’ll explain what I mean by this.
If you go to the properties of your existing virtual network, or create a new one, you can select the option to create a point to site connectivity network. This way you can give external VPN clients access to your Azure domain / network. Also, when creating a complete new virtual network, next to the point to site connectivity network, you also have the option to create a site-to-site connectivity networks, and this is where the above-mentioned private network comes into play. If you haven’t configured one, you can do so at this point. As you can see below, when creating a new virtual network this is where you can fill in your DNS server name and IP address.
I know this all may sound a bit abstract, but go and have a look, it will make sense, trust me.
And still there is so much more
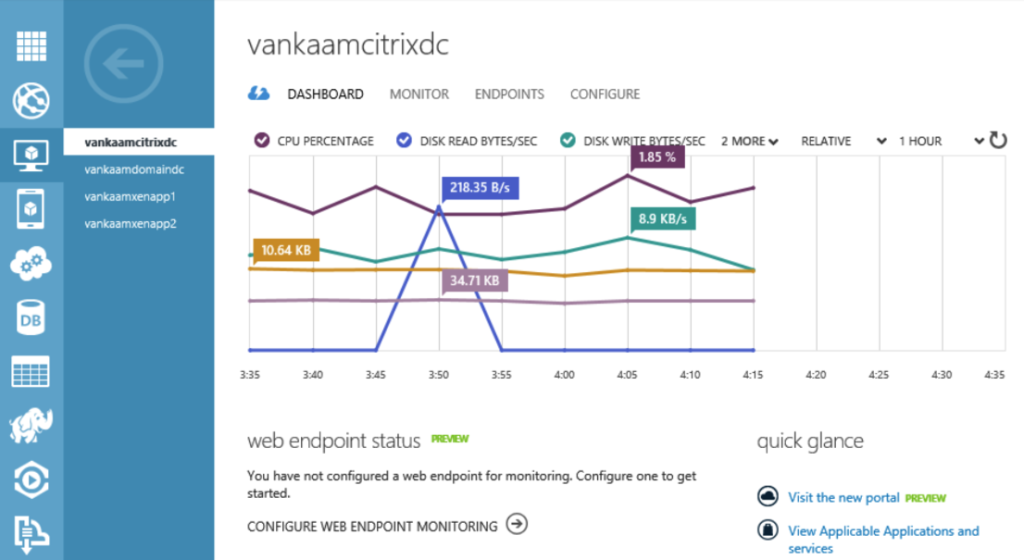
If time permits, and the above doesn’t give you to much trouble, make sure to check out some of the other available feature sand services as well. You’ll see that most of them will only be of interest in real-world scenarios, however, they’re there if you want to give them a go. We also haven’t discussed all the configuration options per service / feature, to view these all you need to do is highlight the service or feature you want to have a closer look at, click on it and the accompanying properties (dashboard) will appear, have a look below, this is a dashboard view of one of my VM’s.
It doesn’t show all option and information but if you could scroll down there would be a lot more for you to observe. Also, if you select the configure tab, there you would be able to change the VM’s configuration profile from D1 to A1 or A0 for example. Unfortunately it’s not doable to discuss all features and possibilities available through the Azure portal, just know that you have a lot of options.
The same applies to PowerShell by the way; there is a separate Azure PowerShell SDK available for download. Learn more here, the possibilities are almost endless. If you are into PowerShell, and a lot are, also check out this GitHub section on Azure PowerShell scripts, it’s loaded with goodies.
Resume
Let’s go over the steps needed to get you up and running one more time.
- The basics and terminology involved.
- Create an Azure Cloud Service.
- Next up is your virtual network.
- Create your personal storage account.
- Virtual machine creation.
- Domain / DNS creation.
- Register / configure DNS on virtual network.
- Create more VM’s / join domain.
- Go on and have some fun.
Takeaways, lessons learned and nice to knows
- Name your VM’s correctly, you cannot change their names afterwards.
- The same applies to your vital networks.
- When creating an Azure Cloud Service make sure to select the correct datacenter location, this cannot be changed afterwards.
- This also goes for your DNS server in your virtual network. Once I registered a DNS server under a certain name I was unable to change its IP address in the virtual network properties.
- You can purchase extra hard disks to attach to your VM’s. For example, A so-called D1 machine profile has a standard base disk of 50 GB, which is large enough to store all kinds of software etc. especially when using multiple machines, and it’s persistent. I won’t purchase any additional storage unless you have a real need to do so.
- They also offer an import/export feature to handle large amounts of data that need to be copied into your Azure environment, which is way more efficient than copying it via the Internet, something you could consider having a look at if applicable. The same applies for backup and Azure site recovery services.
- Note that some machines do have extra disks, but these will be erased when shut down or rebooted, this does not apply to the system disks holding the operating system.
- Your machines will only be billed if they are running or in a stopped state. If they are in a stopped (de-allocated) sate, than they are not charged. The status of your machines is shown in the Azure management portal.
- To get your machines in a ‘stopped (de-allocated)’ state you need to shut them down from the Azure management portal. Shutting your machines down from within the VM itself isn’t sufficient.
- There are also PowerShell scripts available to help you with this. Using these scripts you could schedule your machines to go offline during certain off-peak hours for example.
- Azure also charges for network traffic, but… all internal traffic is free of charge. The same applies to all inbound traffic, only outbound traffic is charged. Downloads from the Azure platform are pretty fast.
- The first 5 GB’s of outbound traffic are free of charge as well.
- Although when your VM’s won’t be charged when they are in a ‘Stopped (de-allocated) state, as mentioned above, this only applies to the compute. The storage needed for the actual vhd’s holding the operating systems will still be charged. It isn’t much though.
- When configuring your Domain Controller make sure it has a more then average compute profile, I liked the D1. This helps with installing and configuring all roles and software. Once you are done you could consider downscaling it to one of the lowest profiles available, A0 for example. By doing this you can leave your Domain Controller up and running 24×7 and it will only cost you around 10 euro’s a month, or 9.98 if I’m not mistaken.
- Having all the proper firewall ports open is important to be able to manage all your machines using RDP for example. Azure will assign each VM a different port (Endpoint) for RDP and PowerShell management purposes, so if these are not open you won’t be able to get to your machines. So when you are at a customer site and you are trying to RDP into one of your Azure machines, it will probably not work. Changing the default RDP port to 443 for example might do the trick since these are mostly allowed. However, this will only work for one machine at the time since every machine will need a separate RDP (Endpoint) address.
- Have a look at the ‘Automation’ section from the main Azure management portal. You will find a whole bunch of predefined scripts helping you set up a complete test environment / domain within a few clicks, that, and much more.
- If you want to experiment with XenApp for example, make sure to choose the RDS template when creating a custom VM. This will automatically install and configure the RDS role for you.
- I primarily used the standard D1 (profile) machines. These consist out of 1 core, 3.5 GB of memory and they include 50 GB of SSD storage. Of course I made sure to stop and de-allocate my machines when no longer needed, done within a few clicks. These will only cost you around 14 euro cents per hour per machine.
- If you have a MSDN account you also have (free) monthly credits for Azure, check out this post to learn more.
- With a valid MSDN account you will also have access to Windows 8 and 8.1 images directly from azure, for testing purposes only of course. A nice to have when experimenting with XenDesktop for example.
- You can also set up a direct site-to-site VPN connection to your Azure XenDesktop environment and test it from your local desktop OS, or a VM.
- NetScaler VPX is also supported and available on Azure. To find it you will have use the earlier mentioned Azure preview management portal; you won’t find it in the current portal.
- Don’t forget about the PowerShell SDK.
- Use PowerShell or the preview azure management portal to give your machines a static IP address. Don’t try to do this manually.
