I will be the last one to tell or promise you that moving to the Cloud will save you money. It definitely could, but it’s not a certainty by any means. In fact, if that’s you’re only objective and short-term focus/strategy (saving money, that is) you might want to reconsider. Having said that, Cloud computing does give us an almost unlimited amount of options (services) to choose from, which can help in getting work done more efficiently. Making the right decisions on what, where to use, and how to implement and configure is often the tricky part… Read on.
For now, let’s assume you’ve got a reasonable amount of resources running in AWS, how can you further optimize what you already have while saving some money along the way?! Here are 30 tips to help you achieve just that!
If you haven’t done so already, make sure to check out my Cloud Services Cheat Sheet – of course, it includes AWS as well.
Since this turned out to be quite an extensive article (over 5200 words) I’ve included a Table of Contents (ToC), something I normally don’t do. Click your subject of choice and you’ll be taken to it directly. Each item/tip will include a direct link back to this ToC as well.
Let’s start with a couple of the standard tools – includes tip 1 to 6
- Tip 1 – The AWS Total Cost of Ownership (TCO) Calculator
- Tip 2 – AWS Budgets
- Tip 3 – Cost Explorer
- Tip 4 – AWS Trusted Advisor tool
- Tip 5 – Consolidated billing
- Tip 6 – AWS well-architected tool
- Tip 7 – Using the AWS CLI to discover unused items/services
- Tip 8 – Knowing what to do, and how to use – free training
- Tip 9 – AWS Free Tier – up to twelve months
- Tip 10 – CloudWatch billing alarms
- Tip 11 – CloudWatch automated actions
- Tip 12 – AWS instance schedular
- Tip 13 – CloudFormation templates – automation
- Tip 14 – Various EC2 and Storage money savers
Reserved, scheduled, and spot instance types – includes tip 15 to 17
- Tip 15 – Reserved Instances
- Tip 16 – Scheduled instances
- Tip 17 – Spot instances (save big)
- Tip 18 – The Spotinst Elastigroup Platform
- Tip 19 – ARM-based EC2 instances (Linux only)
- Tip 20 – Hibernation for EC2 (Linux only)
Storage cost-saving options – includes tip 21 to 24
- Tip 21 – S3 intelligent Tiering and S3 lifecycle policies
- Tip 22 – Glacier archival storage for the win
- Tip 23 – EFS Infrequent Access (IA) storage (Linux only)
- Tip 24 – S3 without an EC2 instance
- Tip 25 – Auto Scale Groups – easy peasy
- Tip 26 – Tagging your AWS resources
- Tip 27 – Making clever use of regions
- Tip 28 – Consider serverless computing options
- Tip 29 – Disaster Recovery and back-up options
- Tip 30 – Getting more out of Nutanix Xi Beam and AWS
Let’s start with a couple of the standard tools
AWS offers a bunch of standard built-in tools that can help you make more efficient use of your AWS services. Even though there is some overlap here and there, it’s still worth checking them out one by one.
The AWS Total Cost of Ownership (TCO) Calculator
Tip 1 – Its main purpose is to compare the costs of applications, or traditional (I like that they call it that) hosting environments to the various AWS alternatives/options available. The TCO calculator allows you to estimate the total cost savings when using AWS while providing you with a detailed set of reports that can be used in executive presentations.
The calculator also gives you the option to modify some of the assumptions that best meet your business needs. Of course, it’s not always as straight forward as they make you believe and some details are left out in certain comparisons, but it does give a good indication of what to expect. More info here – Back to ToC
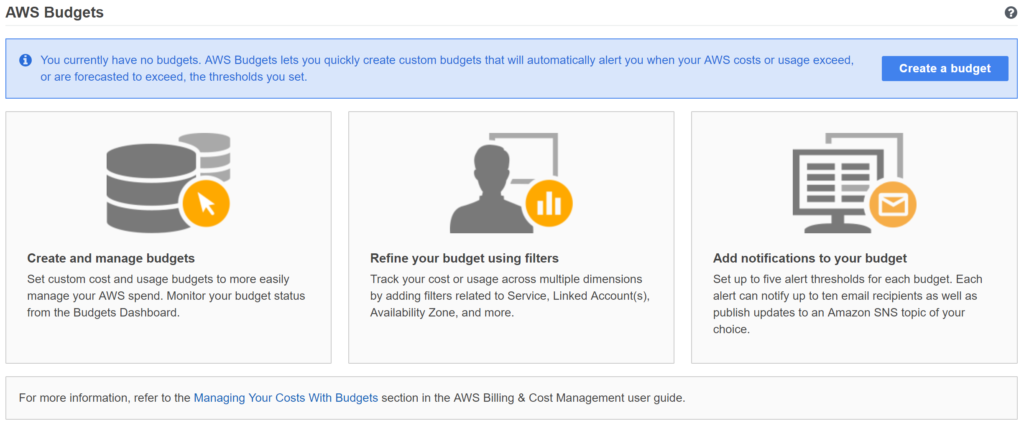
Tip 2 – This tool helps you plan your services usage, costs, and instance reservations. It includes:
- Cost budgets– Plan how much you want to spend on a service.
- Usage budgets– Plan how much you want to use one or more services.
- RI utilization budgets– Define a utilization threshold and receive alerts when your RI usage falls below that threshold. This lets you see if your RIs are unused or under-utilized.
- RI coverage budgets– Define a coverage threshold and receive alerts when the number of your instance hours that are covered by RIs fall below that threshold. This lets you see how much of your instance usage is covered by a reservation.
Information is updated up to three times per day. You can create up to 20.000 budgets per standalone account, which will cost you $0,02 per budget, per day. Budgets can also help with creating alerts for use with the AWS free tier, for example. It’s a notification only tool, no automated actions. More info here – Back to ToC
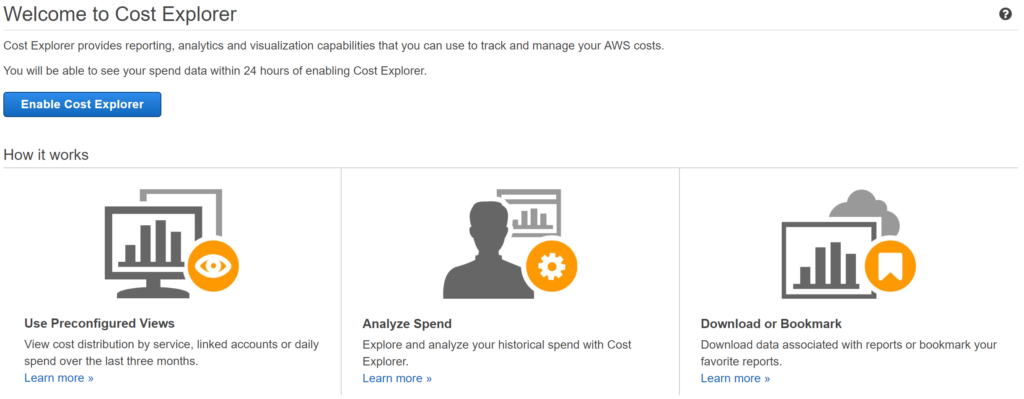
Tip 3 – Use this tool to track costs, usage, and trends over time. It’s the tool you use to pay your AWS bill, monitor your usage, and budget your costs. Analyze your usage pattern, create budget (cost and usage) reports, and such. You can view data from the last 13 months, forecast how much you’re likely to spend for the next three months, and get recommendations for what Reserved Instances to purchase. Just to name a few options. More info here – Back to ToC
Tip 4 – An online resource to help you reduce cost, increase performance, and improve security by optimizing your AWS environment. Trusted Advisor provides real-time guidance to help you provision your resources following AWS best practices.
Check out this section for more information on some of its core checks and the added benefits of the paid business and/or Enterprise support plans – Back to ToC
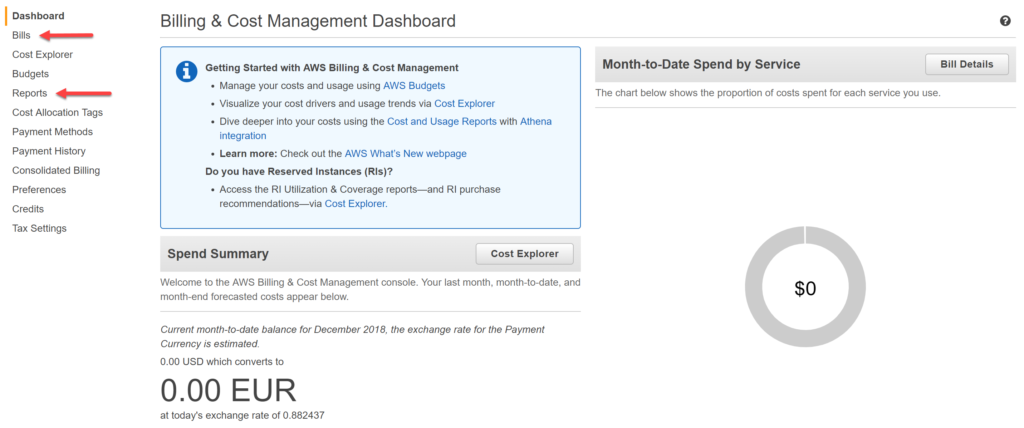
Tip 5 – Not a tool per se, but it sort of falls in the same category. In short, it’s all about the potential combined usage of resources. You can combine service usage across all AWS accounts within your organization (from multiple accounts) to share volume pricing discounts and Reserved Instance discounts. This can result in a lower charge for your project, department, or company when compared to individual standalone accounts. More info here
By the way, the AWS billing management console (see the above image) offers some additional option you might want to have a look at, like the bills and reports sections, for example – Back to ToC
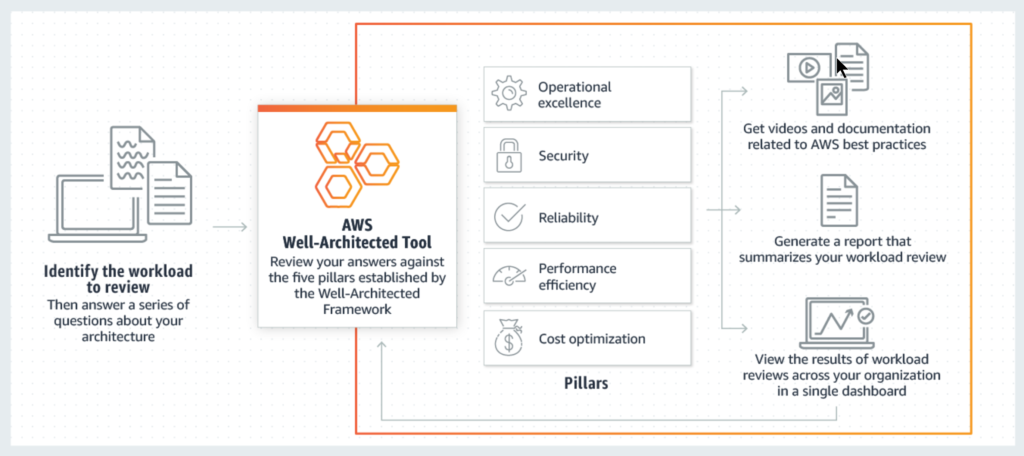
Tip 6 – Is based on the AWS Well Architected Framework, which is made up out of five main pillars (Operational Excellence, Security, Reliability, Performance Efficiency, and Cost Optimization), various core strategies and best practices for architecting systems in the Cloud. It’s used by AWS and their Solutions Architects to perform Well-architected (as AWS likes to call them) reviews on customer infrastructures throughout the year – thousands of them.
The Well Architected Tool is a self-service tool. This way customers can assess and evaluate their own AWS environments and workloads to further fine-tune, apply best practices where applicable (as part of the five pillars mentioned earlier), and perhaps to save some money along the way. Not a bad idea to do this from time to time, let’s say at least twice a year?!
More information can be found here – Back to ToC
So, that’s the ‘tool’ section done, lets continue.
Using the AWS CLI to discover unused items/services
Tip 7 – Removing unused resources/services from your AWS account will lower overall costs, no surprises there. Here I’m talking about things like detached elastic IP addresses, unused block storage, Load Balancers, and more. Finding these resources is something different. While CloudWatch can help with some of this, like detecting unused EC2 instances, for example (will be touched on later), it won’t cover everything.
Using the AWS Command Line Interface will enable you to find (and remove/delete) just about everything within your AWS environment/account, active as well as non-active. Of course, you’ll need to be, or become familiar with the proper commands, but it will be time well invested – Back to ToC
Knowing what to do, and how to use – free training
Tip 8 – Knowing how to use AWS is an important part of the bigger picture. Your employees need to get up to speed with the basics as well as more advanced topics. AWS offers a ton of free training material for you to take advantage of. In fact, they just added hundreds of free digital training courses to their Learning Library.
If you are, or your company is a partner there are multiple learnings paths to follow. You will need to login with a company linked account.
Often technologists are looking for ways to get certified, I know I usually do. AWS offers a bunch of free Digital Exam Readiness training courses as part of their earlier mentioned Learning Library.
The Cloud Practitioner exam is a perfect way to get started with, and learn about AWS, I know, because I did just that. AWS offers a complete free training course of 7 hours named: AWS Cloud Practitioner Essentials.
Self-Paced Labs are another great resources to get some real hands-on experience with AWS services. Go here, they offer multiple free labs to get you started – Back to ToC
AWS Free Tier – up to twelve months
Tip 9 – is Free for 12 months after sign-up and a great way to get (some more) hands-on experience and to put your gained knowledge to the test. Also, the AWS Marketplace offers free and paid for software products that run on the AWS Free Tier, like WordPress and Chef, for example. There are even services that do not expire after 12 months. As mentioned, other AWS services, like AWS Budgets, and CloudWatch as well can help you to monitor your AWS Free Tier usage. Have a look here, for more information on all of the above and more – Back to ToC
Tip 10 – A swiss pocket knife for monitoring and managing your AWS services. CloudWatch collects monitoring and operational data in the form of logs, metrics, and events, providing you with a unified view of your AWS resources, applications and services that run on both AWS, as well as on-premises servers.
You can use CloudWatch to set high resolution alarms, visualize logs and metrics side by side, take automated actions, troubleshoot issues, and discover insights to optimize your applications, and ensure they are running smoothly.
Billing alarms are a handy feature to let you know when your AWS services reach a certain ‘spending’ threshold, and help you monitor your overall service charges and recurring fees. More information can be found here – Back to ToC
Tip 11 – As mentioned, CloudWatch can be used for many things. Unlike most (AWS) tools (like the ones mentioned above), which are mainly informative, CloudWatch offers so-called automated actions, enabling us to take immediate action when a certain threshold has been reached or breached.
With these types of actions, Lambda (AWS’s main serverless service) often comes into play as well – running automated code without needing to think about servers, compute, storage, and such, easy peasy.
CloudWatch can detect machines/instances which are not being used or are underutilized. If you want, making use of automated CloudWatch actions you can tell the system what to do, like shutting down these machines, for example. Completely terminating EC2 instances is also optional. Thresholds can be set to a certain resource (CPU, Memory, etc.) utilization threshold, or based on preset start and stop times, and more.
This way you can make sure that you are not paying for unused resources, which is, well, a waste of money basically. Of course, CloudWatch can do much more when it comes automated actions, monitoring, alerting and such, this is just meant to give you an idea of how simple it can be to save a few bucks – Back to ToC
Tip 12 – EC2 is main compute service on AWS, they’re your (Windows and Linux) virtual machines. Running compute resources costs money, simple as that. A machine, never mind what it’s doing, that runs for 24 hours will cost you three times as much as that same machines running for 8 hours, I’m sure we all agree on that. By the way, I’ll get to various options (on-demand, sport- reserved, etc) we have when selecting an EC2 instance in just a minute.
In short, paying only for the resources you actually need and use can save you a LOT of money, this is where the AWS instance scheduler can help. It lets you configure start and stop schedules for EC2 instances as well as Amazon RDS (Relational Database Service) instances – makes sense, right?
Have a look here. You’ll find common best practices, FAQ’s, and a ready to go CloudFormation template (automation, see below) you can rollout with the push of a mouse button to get you up and running quickly – Back to ToC
CloudFormation templates – automation
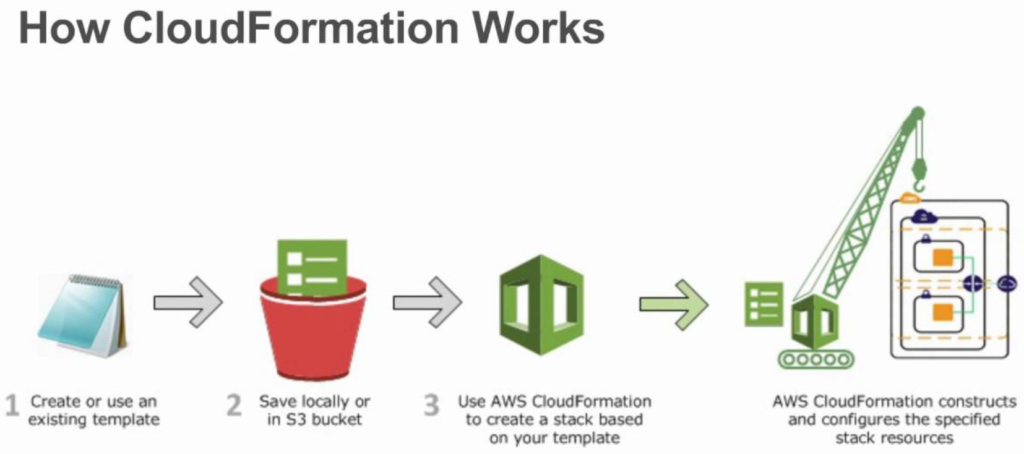
Tip 13 – Is all about automation. Create your own template (s) or go with one (or multiple) provided by AWS, they have tons to choose from. How this will save you resources (money being one of them)? Automation, especially using CloudFormation saves time, it standardizes your infrastructural components throughout your organization, making things like documenting, troubleshooting, and overall maintenance a lot easier and less time consuming as well.
If you are serious in becoming an AWS architect than CloudFormation is definitely a service to become very familiar with.
Templates are written in either JSON or YAML. There is no additional charge for using CloudFormation, you will only pay for the resources you create/use. Go here for more detailed information. Also, I used @aCloudguru to study for my AWS exams, they offer a separate extended training on CloudFormation as well – Back to ToC
Various EC2 and Storage money savers
Tip 14 – First of all, the type of compute and storage you choose heavily impacts your overall budget. Here I’m talking about the amount of memory an instance holds, the number of vCPU’s, type of Storage, if it’s HDD, SSD, IOPS optimized, GPU powered, etc. Unfortunately, there’s no ‘click and ready’ tool for that, except for perhaps the TCO calculator when moving from on-premises to AWS, as mentioned at the beginning.
![]() Choosing the right instance type will come down to understanding your workloads, what they need in terms of compute and storage, together with some knowledge of what AWS has to offer. I won’t go over all options, of course, but what follows are a couple of tips you might want to consider having a look at when putting together your technical design, or something similar. This page holds an overview of all EC2 types available on AWS (compute optimized, Storage optimized, GPU optimized, etc…) – it’s an extensive list – Back to ToC
Choosing the right instance type will come down to understanding your workloads, what they need in terms of compute and storage, together with some knowledge of what AWS has to offer. I won’t go over all options, of course, but what follows are a couple of tips you might want to consider having a look at when putting together your technical design, or something similar. This page holds an overview of all EC2 types available on AWS (compute optimized, Storage optimized, GPU optimized, etc…) – it’s an extensive list – Back to ToC
Reserved, scheduled, and spot instance types
On-demand EC2 instances are the most common form of instances. You pay per minute or hour, depending on if it’s Windows (hourly), or Linux (per minute), and they’re up and running (often within minutes) with a few mouse clicks. Very flexible and by far the most popular type of instance available today.
They will cost you money from the moment you provision them till the moment you shut them down or terminate them (for which the earlier mentioned CloudWatch options and the AWS instance scheduler can be used, amongst others). This isn’t a bad thing per se, not at all, just something to keep in mind. However, there might be situations where another type of provisioning mechanism will be a better fit, reserved, scheduled, or spot, for example – Back to ToC
Tip 15 – Provide you with a significant discount compared to On-Demand Instance pricing. Reserved Instances are not physical instances, but rather a billing discount applied to the use of On-Demand Instances in your account. These On-Demand Instances must match certain attributes in order to benefit from the billing discount.
Reserved instances can be purchased in one of the following ways, see below. Depending on the payment option of your choosing more or less discount will be given. This page will provide you with more detailed information, since I won’t cover all the options listed.
- Payment option: No Upfront, Partial Upfront, or All Upfront.
- Term: One-year or three-year. A year is defined as 31536000 seconds (365 days). Three years is defined as 94608000 seconds (1095 days).
- Offering class: Convertible or Standard.
Did you know that after purchase it is optional to sell any reserved instance you no longer use/need? There’s a separate marketplace for that – Back to ToC
Tip 16 – Also part of the Reserved Instance family. Scheduled Reserved Instances enable you to purchase capacity reservations that recur on a daily, weekly, or monthly basis, with a specified start time and duration, for a one-year term. You reserve the capacity in advance, so that you know it is available when you need it. You pay for the time that the instances are scheduled, even if you do not use them.
So, a bit more restrictive, but yet another option for you to consider. Check out this page for some more details – Back to ToC
Tip 17 – A really cool option if you ask me, especially when combined with other AWS marketplace services like the Spotinst Elastigroup Platform, which I’ll cover in a bit.
Spot instances are by far the cheapest option you can get your hands on. However, they also come with a few specific characteristics. A Spot Instance is an unused EC2 instance for which AWS determines the so-called sport price. The Spot price is determined by long-term trends in supply and demand for EC2 spare capacity. You pay the Spot price that’s in effect at the beginning of each instance-hour for your running instance, billed to the nearest second.
With Spot Instances, you never pay more than the maximum price you specify. If the Spot price exceeds your maximum price for a given instance or if capacity is no longer available, your instance will automatically be terminated (or be stopped/hibernated, if you opt for this behavior on persistent request).
This means that spot instances can be shut down, or terminated by AWS without you knowing or being aware – you might get a two minute notice, but I’m not a 100% sure on that. In other words, your workload has to be flexible, that’s why in most cases spot instances are not used for production use-cases.
Luckily, there are solutions that can help with that – Back to ToC
The Spotinst Elastigroup Platform
Tip 18 – Is a SaaS based EC2 management solution. It uses predictive analytics and proprietary algorithms to leverage AWS’ Spot Market and reduce EC2 Cloud computing costs by 60% to 80%.
If you are running high demand, persistent workloads, spot instances that can get rebooted or terminated at any given time is not what you are looking for.
This is where the Spotinst Elastigroup Platform shines. When Elastigroup identifies a Spot Instance that is about to be “interrupted,” the platform dynamically and transparently transitions to an “available” Spot Instance with absolutely no degradation in application performance. In the event that a new Spot Instance is not available, Elastigroup falls back to AWS’ On Demand or Reserved Instances to guarantee 100% application reliability.
I learned about this solution around two weeks ago but I already think this is probably one of the best ways to save big on compute resources. Do any of my readers have hands-on experience with this platform? Go here and here for more information on respectively spot instances and the Spotinst Elastigroup Platform – Back to ToC
ARM based EC2 instances (Linux only)
Tip 19 – If they fit your use-case you can save considerably.
Arm processors are produced by the ARM Holdings PLC. They’re also known as Reduced Instruction Set Computing (RISC) processors, able to produce high-performance quality even though the units themselves are of a much simpler design when compared to Intel processors, for example.
They are often used in mobile phones, tablets, gaming systems, and numerous other types of (smaller) electronic devices. They are cheap, low on power consumption, but still powerful enough to handle complex calculations. On the downside, they are not compatible with x86 based architectures, so no Windows on top. Intel processors consist out of more complex designs primarily meant to be compatible with the different types of desktop and laptop computers out there.
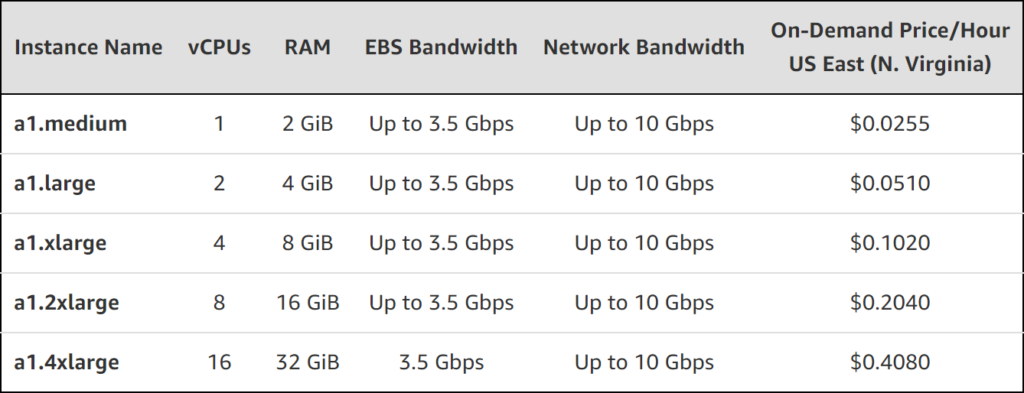
On November the 26th AWS introduced their own Arm-based Gravitation processors. To go with it they also launched a series of A1 EC2 instances optimized for performance and costs, all fully based and built around the Gravitation Arm cores – see the overview below. My guess is that this is only the beginning.
More information can be found here – Back to ToC
Hibernation for EC2 (Linux only)
Tip 20 – Another potential cost saver. Next to new network optimized instance types, which also got announced here (during re:Invent) you now have the ability to hibernate certain EC2 machines, after boot and configuration. When a hibernate command is given the in-memory state of the machine will be written to a file stored on the root EBS volume, before shutting down – so at least compute wise, it won’t cost you any money.
Today, this feature is available for Amazon Linux 1 machines – M3, M4, M5, C3, C4, C5, R3, R4, and R5 instances. Currently, support for Linux 2 machines is being worked on. No word on Windows (just) yet. Before getting started, there are some things to consider, have a read here – Back to ToC
Storage cost saving options
With EC2 instances, never mind which type, comes storage. The various storage options available on the AWS platform are out of scope for this article but I would like zoom in on a few storage related technologies, which might help in running things a bit more efficient – Back to ToC
S3 intelligent Tiering and S3 lifecycle policies
Tip 21 – Throughout the last couple of months I’ve been studying AWS (successfully took two exams along the way). Throughout the various courses/lectures that I have been watching/listening to/reading, I learned a great deal about the various storage options available within AWS, amongst other things. For those of you that don’t know, S3 is one of the main (object-based) storage options available as part of AWS. The S3 units that you configure are called ‘Buckets’, and they have been around for over 12,5 years now.
They’re used for data archiving purposes, backup and restore, DR scenario’s, big data (lake) solutions, and more. Currently, these are the options to choose from:
- Standard– Designed for frequently accessed data.
- Standard-IA– Designed for long-lived, infrequently accessed data.
- One Zone-IA– Designed for long-lived, infrequently accessed, non-critical data.
- Glacier– Designed for long-lived, infrequent accessed, archived critical data.
Besides the above, S3 Buckets also come with optional lifecycle policies for you to configure. Using lifecycle policies you can tell S3 to transfer data from one type of S3 Bucket to another type of S3 Bucket after a certain amount of time – 30 days by default. From Standard, to Standard-IA, for example, or from Standard to Glacier (archival) storage, saving you money.
There is also a so-called Storage Class Analytics tool available to help you identify which objects might be suitable to move to a, perhaps lower and thus cheaper class of storage tier. Do note that this is (still) a manual process and takes time. Enter S3 intelligent Tiering.
S3 intelligent Tiering takes care of moving data between S3 buckets automatically, back and forth. It does this by closely monitoring the access patterns of your data. What this means is, when data is infrequently accessed (left alone for 30 days) it will be moved from a ‘frequent access’ tier to an ‘infrequent access’ cheaper tier.
The other way around is also true. When the system notices that data which has been moved to an ‘infrequent access’ tier is being accessed again it will automatically be moved back to the, or a ‘frequent access’ tier. With S3 intelligent Tiering there is no change in availability and durability numbers, latency included. Pretty neat stuff and something they will continue to build on in the (near) future, I’m sure.
As you can see, picking the right type of storage (I know I haven’t listed any prices, go here to find out more) can make a lot of difference. Always consider using/configuring S3 lifecycle policies to move data to a cheaper storage tier – Back to ToC
Glacier archival storage for the win
Tip 22 – Already mentioned, Glacier storage is used for archiving purposes and is the cheapest form of storage around. Do note though, that there is a retrieval fee in place – S3 Glacier provides three retrieval options that range from a few minutes to hours, which differ in price. You can upload data directly, or make use of lifecycle policies as explained earlier. If you have any data that doesn’t need to be accessed any time soon, this is your pick – Back to ToC
EFS Infrequent Access (IA) storage (Linux only)
Tip 23 – Amazon Elastic File System (Amazon EFS) provides a simple, scalable, elastic file system for Linux-based workloads for use with AWS Cloud services and on-premises resources. As with some of the earlier highlighted IA options (Standard and One Zone) the EFS IA option offers a cheaper storage class for data that is less frequently accessed. It’s that simple. EFS IA reduces storage costs for files not accessed every day, with savings up to 85% compared to the EFS Standard storage class – Back to ToC
Tip 24 – S3 Buckets can be used in many different ways. Just remember that if you need a place to store data you don’t necessarily need an EC2 instance attached to it. S3 Buckets can be accessed globally, by everyone, if that’s what you need – Back to ToC
Auto Scale Groups – easy peasy
Tip 25 – Can be used together with Load Balancers as well as CloudWatch. With Auto Scale Groups combined with CloudWatch automated actions (there they are again) you can automatically and dynamically scale the number of EC2 instances up or down based on resource utilization, for example. This way you’ll never have to many, or to little machines running – cost efficient – Back to ToC
Tip 26 – Resources within AWS, almost all of them, can be tagged. Tags (you can use any word, or combination of words) help to identify resources, which can be leveraged in multiple ways. CloudWatch can use tags to identify resources to apply automated actions to, for example.
Tags are also used to make more sense out of your monthly bills. Resources will be easier to identify, this way you can more easily pick out the most demanding resources, budget wise. In general, tags also allow for easier filtering, modification, and troubleshooting according to the categories that you define. Yes, don’t underestimate the power of tags – Back to ToC
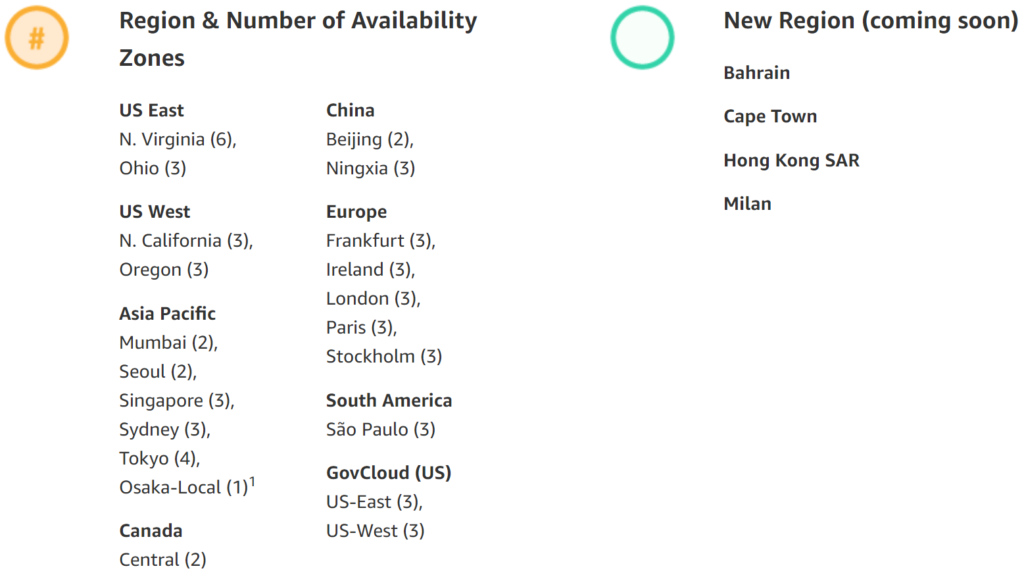
Tip 27 – AWS spans the globe offering up to 18+ regions already, with more on the way. Believe it or not, but different regions offer the same type of resources at different costs. Some are more expensive, some are cheaper. You might want to consider picking a cheaper region, even if it’s further away, for non-production workloads, testing purposes, or workloads that do not depend on low latency numbers, to name a few. Worth thinking about – Back to ToC
Consider serverless computing options
Tip 28 – I already briefly mentioned AWS Lambda, AWS’s nr 1 serverless service. With serverless, there are no machines or other compute resources to worry about, and you only pay for the code that is being executed (code can run for up to 15 minutes). In some cases, this can be very lucrative. For example, A Cloud Guru, the online training company uses it for just about everything that happens on their platform. Because of the way the technology works and how they are billed, it’s insanely cheap – Back to ToC
Disaster Recovery and back-up options
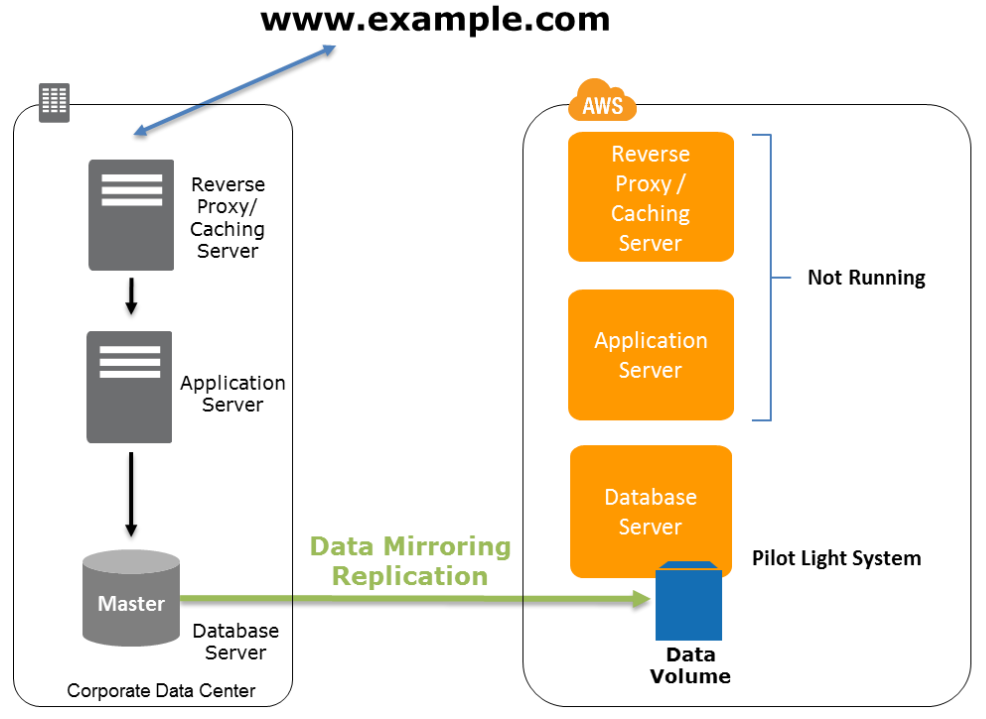
Tip 29 – I won’t bore you with the ‘traditional’ investments needed to build out a proper DR infrastructure, or back-up strategy for that matter. It’s obvious, to most anyway that hosting your DR and/or backup and recovery solution (s) in AWS, or any other type of Cloud for that matter, can potentially save you a lot of money.
AWS has an excellent whitepaper on their DR and Backup and recovery solutions – you’ll find it here. Personally, I think this an excellent example of how Cloud can be truly beneficial. The well-known ‘you only pay for what you use’ phrase that comes to mind when discussing Cloud-based services is spot on when talking about these types of solutions – Back to ToC
Getting more out of Nutanix Xi Beam and AWS
Tip 30 – Ok, this one should probably be put under the ‘tools’ section at the top of this article. However, I came across it after I had put together my table of contents, and since I didn’t want to manually update it (again), it’s now tip number 30 :)
It was this article on LinkedIn that pointed me to Nutanix Xi Beam (though I had heard and read about it earlier), their Multi-Cloud Optimization to Reduce Cost & Enhance Cloud Security SaaS solution. Here’s a short quote from the article (make sure to read the comments as well).
So, why not test our own Xi Beam on my AWS account? I opened a SAAS Xi Beam account via the portal of Nutanix, I linked my AWS account, and … wow… full insight in the financials of my AWS account. It just took me 5 minutes to configure and link Xi Beam with my AWS account. Xi Beam even advices me on how to cut the costs by pointing out these hidden money hungry leftover services created during my AWS Labs.
In other words, it can be tricky to get rid of automated created AWS services by hand, Xi Beam can help – Back to ToC
Concluding
Quite an extensive list. I could continue and add more, but I think this gives you plenty to play with and think about for now. Please, do let me know if you have any suggestions, I’m always on the lookout for useful feedback.
