When I was working on my ultimate Citrix XenDesktop internals cheat sheet just a couple of weeks ago I also got asked (thanks, Jamie) if I would consider updating my printing internals cheat sheet. After giving this some thought – which took me about a minute – I decided this was a great idea and got right to it. Although printing, especially on SBC environments is quite stable, in the sense that not a lot has changed throughout the last couple of years when it comes to the architecture, pathways, traffic flow and so on, I managed to rewrite a great deal (almost all) of the material published earlier and to include a bunch of new facts, figures and ‘nice to knows’ along the way. All this, together with the renewed look and feel, freshly created images and the addition of a Table of Contents will greatly enhance your reading experience, I’m sure. If you download a .PDF copy that is.
Download your .PDF copy by clicking the button below
I like printing. There, I’ve said it. It’s not that I have implemented dozens of complex print architectures, no, a couple, but far from many. I just like the technology and processes behind it. Especially since printing is considered business critical at almost all customers I have visited. While the reasons for this may vary, imagine this, and I’m sure you’ve seen it as well; a user receives an important e-mail, or perhaps he or she has come across an interesting white paper or another type of document, what will be one of the first things they’ll do? They will print it. Next, they’ll read it, use it as a reference, make notes, they’ll take it home with them, save it on their desks and so on. Not everybody, but it sure does happen a lot. I know I do it. Though I prefer pen and paper over a keyboard as well, so perhaps I’m not the best reference.
In the past, I have written multiple blog articles about printing, Citrix native printing (no third-party tooling) to be precise. In fact, when I started blogging on basvankaam.com over four years ago (time flies), my second article ever was on native Citrix printing and the printing pathways involved.
Back then it was based on a couple of disappointing real-world experiences (and the answer I was trying to find) plus what I could find on the Citrix E-Docs pages. While researching multiple potential presentations topics, I got more interested in the subject of printing. One thing led to another, so I wrote various articles on printing, including version 1.0 of the ultimate Citrix printing internals cheat sheet and did a couple of more in-depth presentations, of which one was during Citrix Synergy of last year.
The thing I liked most about all this, is that while writing and presenting about Citrix printing I was able to help multiple community members with various print issues, though most were related to the pathways involved, default behavior and the physical set up of the print and server components involved. Just recently I spoke to someone who fixed a print issue with the help of my printing cheat sheet, how cool is that?!
When Citrix is thrown into the mix, things work a bit differently. Although the Microsoft print basics still apply, and I’ll discuss them shortly, the way that print traffic will, or can be routed throughout your environment depends on, one: the physical set-up of your machines; and, two: the Citrix (print) policies configured. Do note that I will only focus on native Citrix printing, and won’t go over any of the third -party solutions out there.
Microsoft print file formats
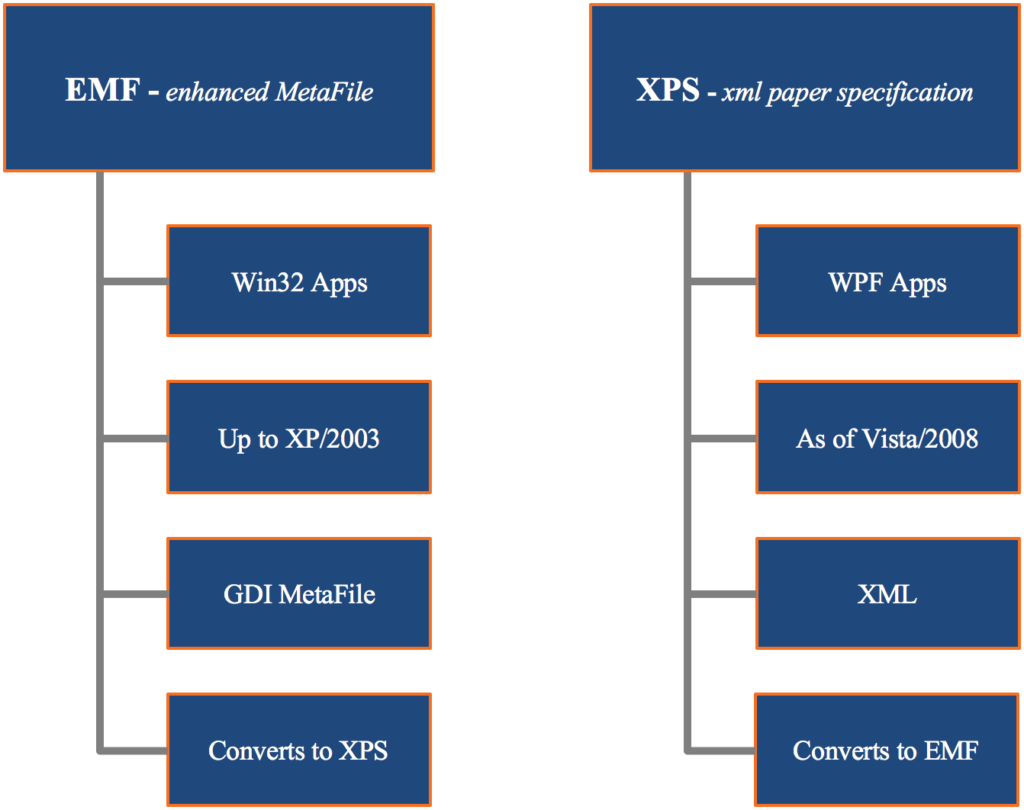
Microsoft supports two so-called print file formats, EMF and XPS. EMF stands for Enhanced MetaFile, and XPS stands for XML Paper Specification (often thought of, and referred to as Microsoft’s less-compatible version of PDF) – In the XPS print path, available as of Windows Vista, Windows 7 and upwards, printer drivers are based on the XML Paper Specification (XPS). A print file format refers to the type of print output an application produces and how it will be handled (routed and rendered) afterward by the print subsystem. Although considered legacy, EMF is still widely used today, perhaps the most, even.
Up till Windows XP and Server 2003, this (EMF based applications) is all we had. Because of this, you can probably imagine the number of applications that still depend on the EMF format today. Though, with the rise of Universal Windows Platform (UWP) applications and Windows 10 and Server 2016, I’m guessing the EMF standard will become less and less relevant going forward. XPS got introduced with the release of Windows Vista and Server 2008 and is supported in later versions, like Windows 7,8 10 and Server 2012, 2016.
The way an application is written, coded, or compiled, etc. will determine which print file format will be used. Win32 GDI applications, meaning that they are based on a C-based framework for creating applications, depend on and leverage the EMF print file format (and rely on the Graphics Device Interface as you will find out shortly). WPF applications (Windows Presentation Foundation) however, represents a graphical subsystem (a more modern graphics format) for rendering user interfaces in Windows-based applications and uses the XPS print file format. The same applies to Win32 XPS applications. As you would expect both formats, EMF and XPS behave somewhat differently.
Some more differences between the two
XPS applies compression by zipping the print data into a .zip file. EMF does not use compression at all. Also, EMF needs to separately draw each image it encounters, even if it’s used multiple times within the same document. XPS, however, can reference a single image multiple times.
As a result, EMF print jobs turn out to be a bit bigger as opposed to XPS. All in all, XPS is better suited for handling graphic rich documents. On the other hand, EMF is usually perceived as being ‘faster’ because printing can begin after the first page of the print job has been spooled. XPS waits till all pages have been received.
For XPS to be used, assuming your (Windows) application supports it, both the print driver (remember that print drivers are also specifically designed for either EMF or XPS), as well as the physical print device, need to support XPS (GDI/EMF is the standard). Otherwise, it will be converted back to EMF – When the XPS file is printed to a GDI device, it is converted to an EMF file through the XPS to GDI Conversion Module.
It is then sent through the GDI print path in a manner like other Win32 GDI applications (will be handled later).n to an XPS capable device, the GDI print commands are converted through the GDI to XPS conversion component, and the print job is sent down the XPS print path.
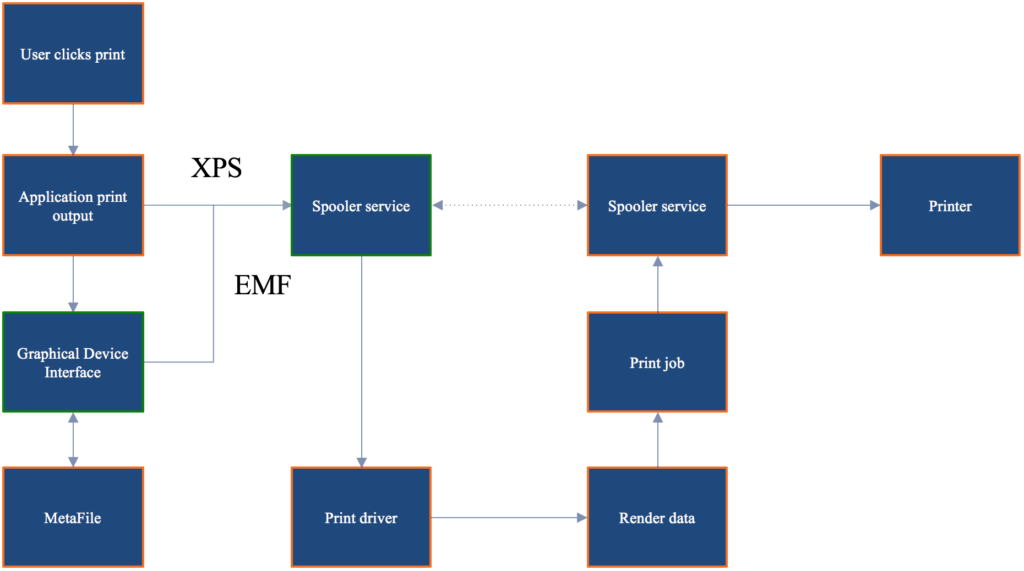
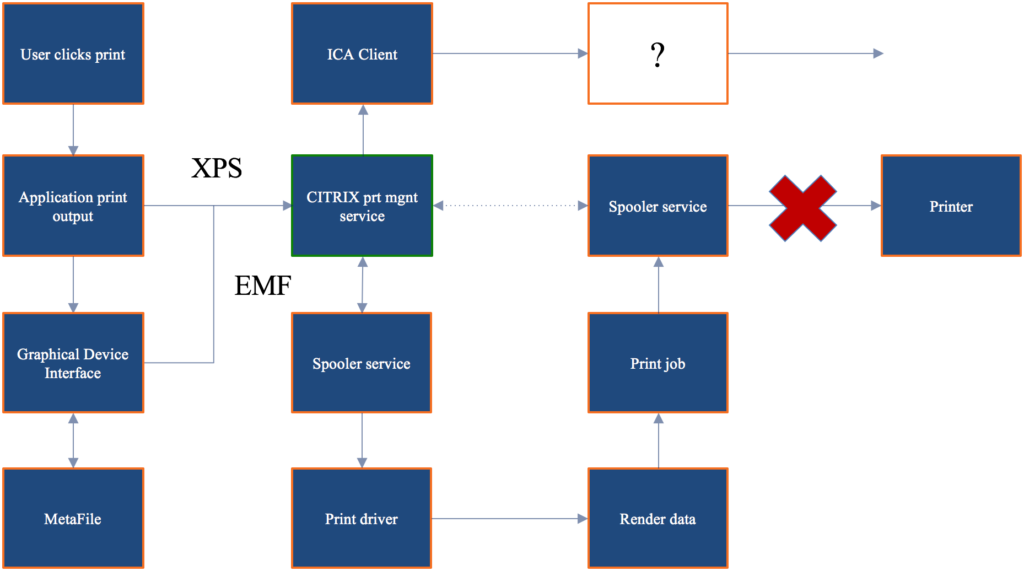
Again, this is still from a Microsoft (Windows) printing perspective. Once a user clicks ‘print’ the application will produce some form of print output, a.k.a. print data. This data will contain all characters, fonts, color schemes, images and so on, which will then need to be ‘translated’ into something that the physical print device can understand and handle. As explained earlier, depending on how the application is written/coded, this data will be either GDI/EMF- or XPS-based.
With EMF, the print output will either be processed or rendered by the GDI (Graphics Device Interface) – It calls GDI functions in the Win32 API, passing it on to the GDI graphic engine and spools it in the EMF format – turning it into a metafile (XML-based). Or it will, together with a locally installed print driver, render the data into a printable format before handing it over to the (local or remote) print spooler service. However, with the EMF format, the mentioned GDI intervention is more common since most traditional Windows applications (up to Windows 7) are built on top of GDI.
When dealing with a Microsoft Win32 XPS application, it calls XPS functions in the XPS Print API. In Windows Vista, Windows 7 and beyond, Windows Presentation Foundation (WPF) applications call WPF print support services to spool XPS documents to the spooler in the XPS spool file format.
One of the main differences when compared to the Graphics Device Interface, is that with Windows Presentation Foundation, or XPS based applications (these two are different, see the ‘Microsoft print file formats’ section above) the spooler service will directly send the spooled file (in its original format) over to the print device for rendering and output, without any interruptions. Also, as opposed to EMF based applications, there is no need for the GDI to interfere, the application print output will be sent over to the (local or remote) print spooler service right away.
As highlighted above, when dealing with an XPS based application, and thus print output, the data travels directly from the application to the (local or remote) print spooler service, bypassing the GDI on to the print device for rendering and output, without any interruptions. With GDI/EMF based application/print output, once handled by the GDI and send over to the (local or remote) print spooler service, the data will (again) be handed over to a locally installed print driver (which can be local on the XenApp server or VDI VM, for example, or remote on the print server) further rendering the data (if needed), which will turn it into an actual print job before sending it back to the print spooler service.
During this phase, it will also determine if the target printer is locally attached or remote through a print server before sending it over to the actual physical print device – a distinct difference between the two, EMF and XPS.
FMA fact: The markup in the XPS spool file to describe XPS Documents is compatible with the Extensible Application Markup Language (XAML) markup in Windows Presentation Foundation (WPF). Therefore, documents that are outlined in the XPS spool file can be rendered natively in WPF without data or fidelity loss because no conversion is necessary.
Print Spooling
 The process where the application print output is received by the spooler service (it interprets EMF files, and can insert page layout information and job control instructions into the data stream, in the case of GDI/EMF), which hands it over to a print driver, rendering it into a print job, before sending it back to the spooler service, over to the physical print device, is what we refer to as print spooling. Of course, this is still somewhat high-level, but it does give you a good indication of what is taking place under the hood.
Local and remote print spooling
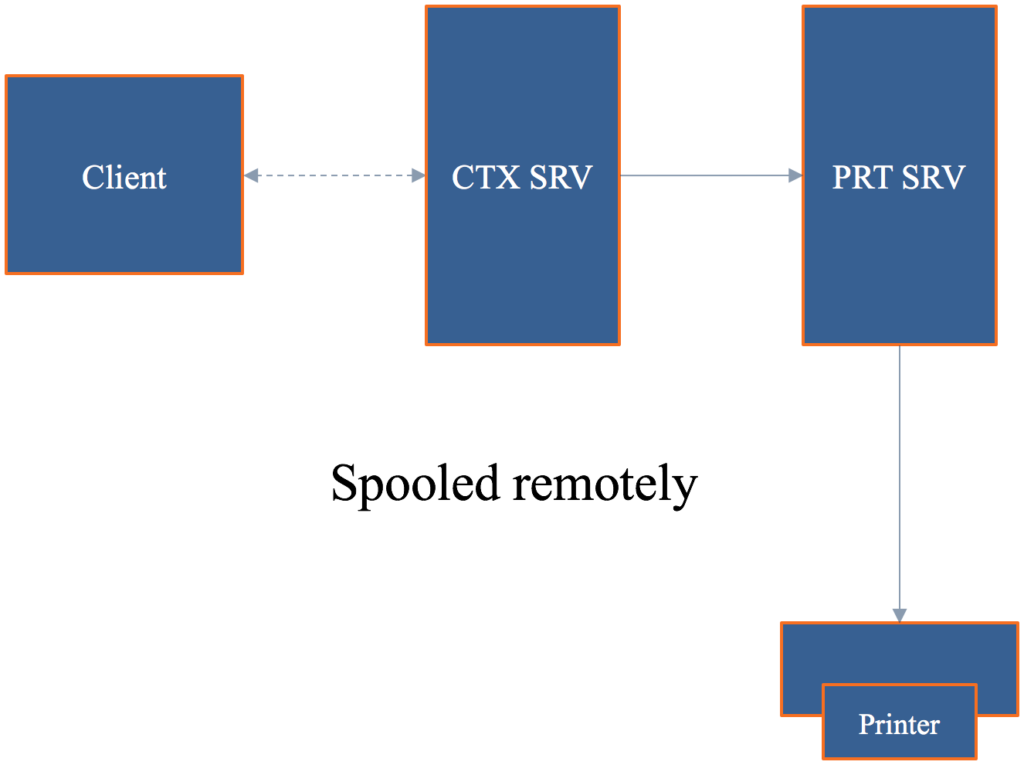
When, from a client perspective, print spooling takes place locally, local compute resources will be consumed (CPU and memory). On a PC with a locally attached printer, spooling will be local to the client. When that same PC uses a network-provisioned printer connected through a print server, spooling will take place remotely on the print server – thus it will consume remote resources on the print server. Another example would be when we have an active session on a XenApp server. Here we could also have a network-provisioned printer, meaning that from a client perspective spooling will also take place remotely on a print server, as shown in the image below.
When spooling takes place remotely, not only will remote compute resources of the print server be used, it will also generate a certain amount of network traffic between the client (which can be a XenApp server) and the print server with every individual print job. Both need to be taken into consideration when sizing your print architecture set-up. Unlike remote spooling, local spooling does not use any network resources.
Even in a non-Citrix environment, if a WAN has substantial latency, users will have a poor user experience if the print jobs are spooled remotely across the WAN. However, in some situations, for example when the resources on the local computer are needed for other tasks, remote spooling is preferable. In remote spooling, the print job is processed on the print server, which offloads processing from the local computer.
Some history
If we look back a couple of years, and perhaps even today, then most print issues were related to poorly written print drivers – around 80 to 90% even. They were (are) not optimized for multi-user environments; not tested or signed; services would hang (spooler and Citrix Print Manager); blue screens would pop up; the auto-creating of printers would fail; we would experience high CPU loads; and so on.
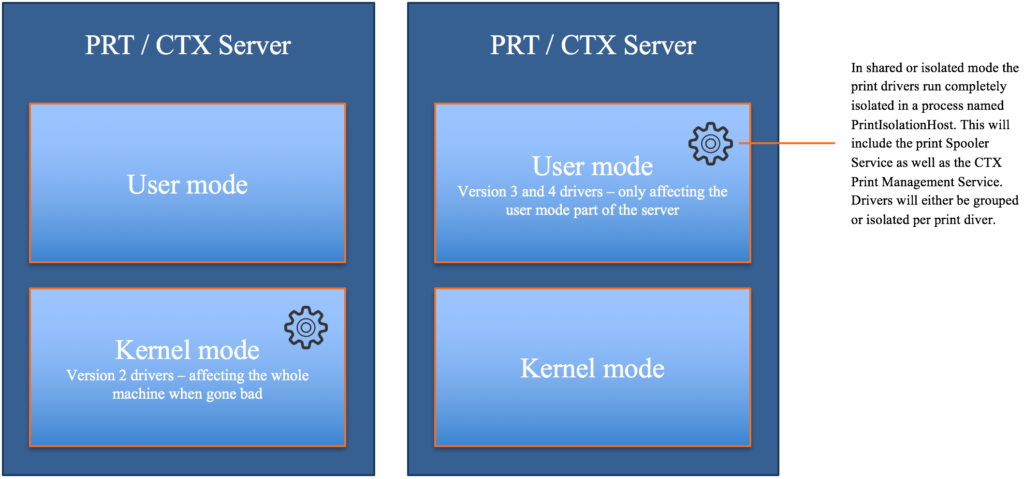
Back in the Windows NT days, all we had were version 2 kernel-mode drivers. It isn’t that hard to imagine what happened if one of those drivers went bad. You would simply lose the whole system and everything on it. Luckily with Windows 2000 came version 3 user mode drivers, which are still widely used today.
Version three print drivers run in user mode, so if something were to go wrong with one of these drivers, it would not affect the system kernel. Although in some cases this can still leave the server useless, the impact is less than with kernel-mode drivers.
With Windows Server 2008 R2 Microsoft introduced a mechanism, which automatically blocks the installation of version 2 kernel-mode drivers: a good thing. They also added a feature named Print Driver Isolation, and it can do exactly as the name implies: isolate your print drivers. Print Driver Isolation, comes in three separate modes: None, Shared and Isolated.
Print Driver Isolation
With the None mode (which will be applied by default) nothing changes, all drivers will still be able to interact, and if one goes bad, it can still potentially bring down the whole machine, or the biggest part of it anyway.
With Shared mode, however, we can group a certain number of print drivers and let them run in a process completely separated from all other print drivers including the Print Spooler and CTX Print Management Service. These print drivers will run isolated in a process named ‘PrintIsolationHost.’ This also means that if something were to go wrong, only the drivers within that isolated process would be potentially affected. And since it also runs separately from the Spooler and CTX Print Management Service, it won’t have an impact on any of the other users on the same system.
The same rules apply to the Isolated mode, only here the isolation part will get used on a per print driver basis. For each print driver, a separate ‘PrintIsolationHost’ process will be created and will run separately from all other drivers and services as mentioned above.
When isolating multiple print drivers on a one to one basis, meaning a separate ‘PrintIsolationHost’ process per print driver, more local resources will be consumed and thus needed (CPU and memory), something to be aware of before implementing. Also, and this is not just me talking, you might want to think about why a particular print driver needs to be isolated from all others in the first place, and if it’s worth implementing such a driver in your production environment, at all – Print driver isolation is often used for troubleshooting and testing purposes.
FMA fact: Perhaps you are better off using None and Shared mode in production and use Isolated for troubleshooting purposes only, which of course could apply to production as well, only temporarily.
As of Windows Server 2012, we also have version 4 mode drivers, which are user-based print drivers and can also be isolated. All of the above applies here as well. They are designed to handle the more modern Metro-style applications and are based on the XPS print file format exclusively. They are supposed to support a larger number of different printer types; they are more stable, support enhanced printer sharing and should be a lot easier to install and maintain.
Citrix Print Management Service
The Print Management Service was first introduced in 2005, which was around the same time as the EMF-based universal print driver. It has multiple responsibilities, capabilities and handles a few different tasks regarding the CTX print process. For one it directly communicates with the Print Spooler service, as you can see in the image below.
It can communicate with the locally installed ICA Client when needed (when the client printing pathway is used, which will be explained as well) and compresses data before it is sent over the ICA channel. It is in charge of the ICA virtual channel for client printer mapping/creation within your CTX session – Which is good to know when troubleshooting auto-create printer failures.
Now that we’ve talked about some of the (Microsoft) print specifics that come into play when dealing with printing on a Citrix-orientated environment, what is wrong today when dealing with Citrix printing? Well, to be honest, not that much has changed. We still have to deal with delayed logons and printing, services that crash, blue screens, CPU spikes, auto-creation failures, and more. And if we can relate these types of issues back to Citrix printing (since there can be dozens of reasons why all this may happen) then in most cases it is still because of faulty print drivers and poorly designed print architecture set-ups. Therefore, make sure you understand how print traffic flows throughout your environment, which components are involved, to test your print drivers when the UPD isn’t enough (even when they are signed and approved by Citrix, for example) and apply isolation where it makes sense.
The Citrix Printing Pathways
A printing pathway defines how print traffic can or will be routed throughout your environment. It also tells us where a job gets processed, spooled and so on. Depending on the types of end points we use, the way we provision printers, including the physical set-up of our XenApp and print servers and physical print devices, we can partly influence how print traffic will be routed, and use it to our advantage. Before we have a look at both pathways, client, and network, I’d like to start with a set-up referred to as server local printers.
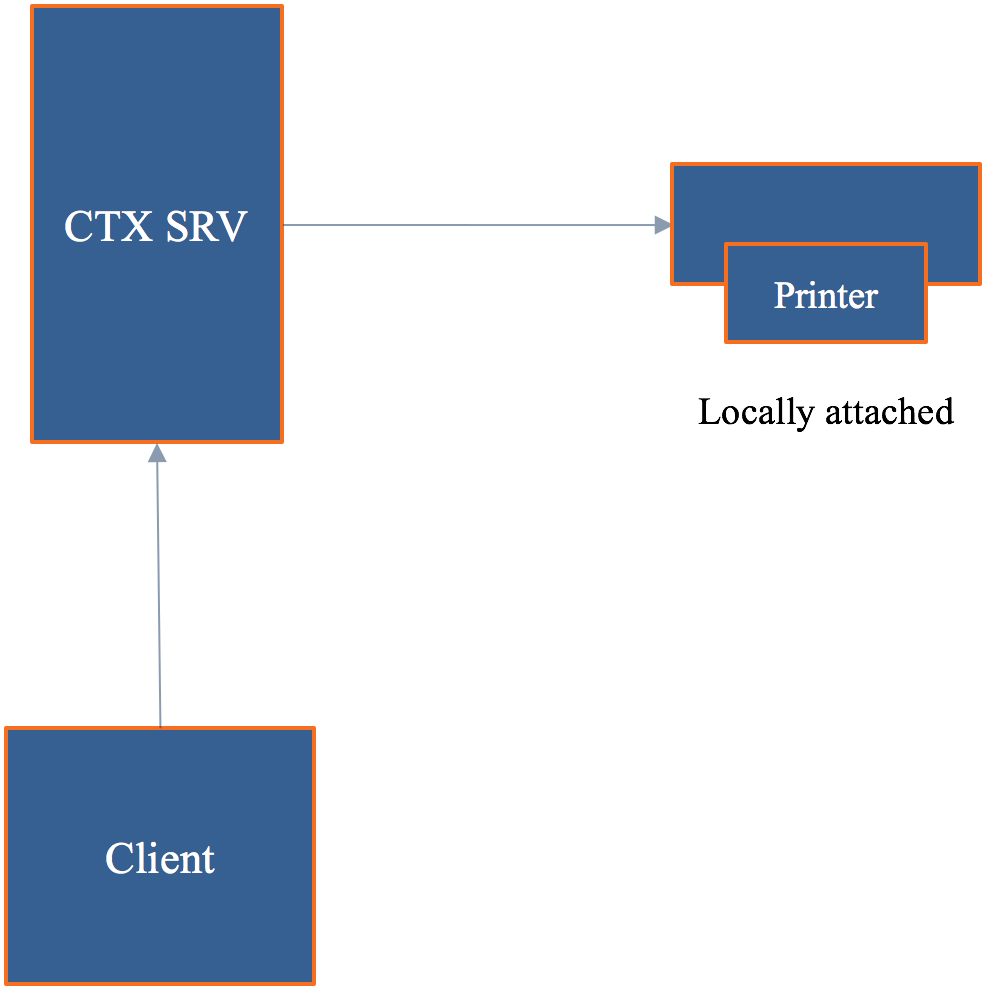
A server local printer’s configuration is nothing more than attaching a physical printer directly to a XenApp server. Probably a set-up you won’t come across that often, but potentially useful nonetheless. From a client perspective, when a document is printed, spooling will take place locally on the XenApp server, leveraging local resources, before sending the output to the print device.
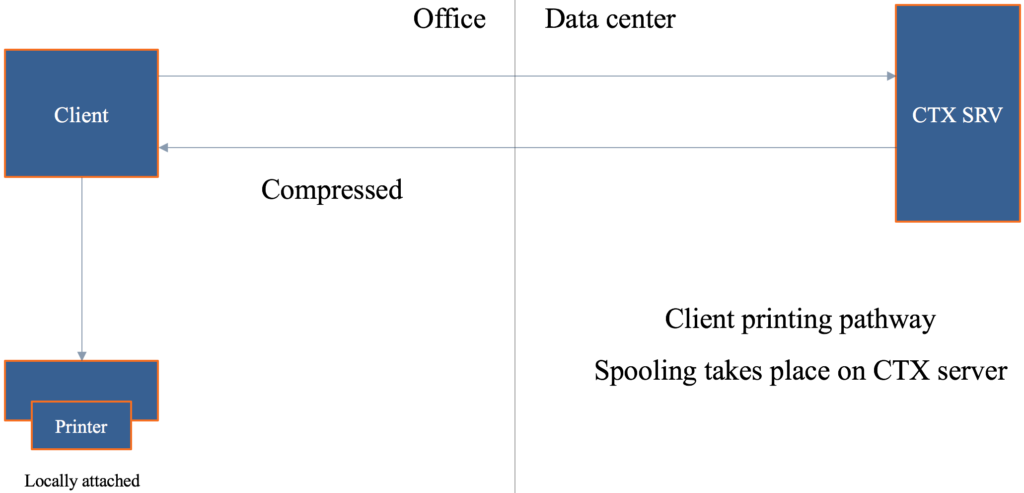
Although you have a few options regarding the configuration of the client printing pathway (we’ll get to those in a minute), the best way to explain and illustrate how it works is by assuming that, on the user’s client device a locally attached printer has been configured. By default, there is no print server involved. The client part refers to print traffic generated on the Citrix (XenApp) server being redirected back to the client device from where it will be forwarded to the physical printer.
This is what happens… A user will have a session on the Citrix (XenApp) server. As soon as he or she clicks ‘print,’ the application print output will be spooled/rendered on the Citrix server (turning it into an actual print job) before sending it back (over ICA) to the client device. From a client/user perspective, this means that spooling takes place locally, again leveraging local resources on the XenApp server.
Here it is important to note that both the client device as well as the Citrix (XenApp) server will have the Citrix Receiver/ICA protocol installed. When the spooled print job is sent back from the Citrix (XenApp) server to the client device this is done using, or over, the ICA protocol/virtual channels, and thus the data sent can be controlled, meaning compressed, limited, etc. Remember the Citrix Print Management Service mentioned earlier, this is where it comes into play. This is very useful, especially when the client device and the XenApp server are physically separated from each other. See the image below.
FMA fact, they will not be able to handle and process the earlier mentioned print jobs locally. Because of this, the client printing pathway will only work with Windows-based (fat) client devices. Consider using/testing the Universal Print Server in these types of scenarios.
Also note that when a locally attached printer is configured, and again this will only work on a Windows (fat) client device the client printing pathway will be enforced – meaning that the application print output/the print job will always be sent back to the client device.
Stay tuned because we have a few more ‘use cases’ to discuss when it comes to the client printing pathway.
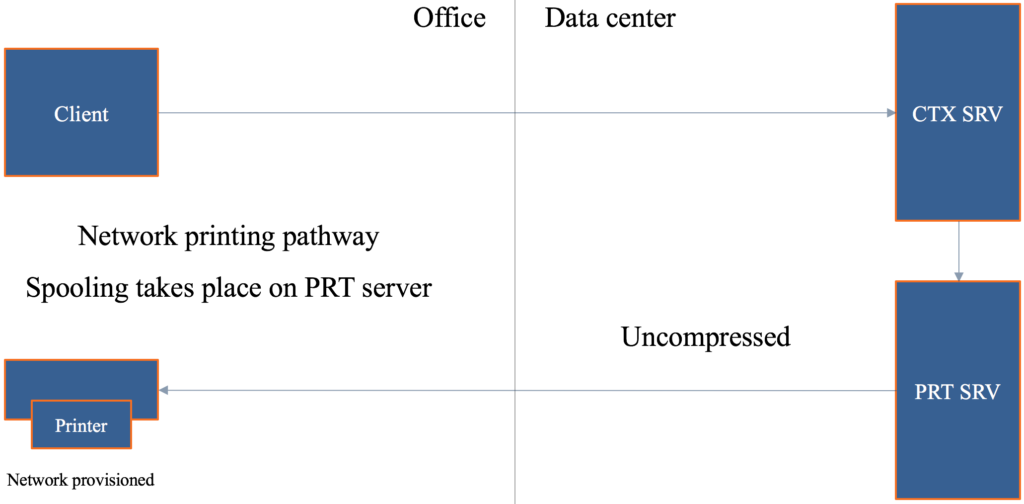
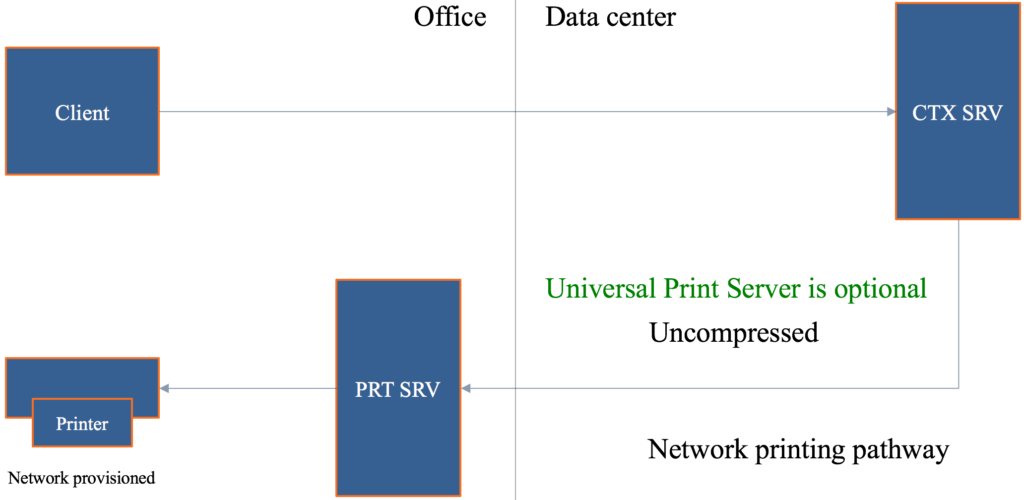
When using network-provisioned print devices (print server) by default, Citrix will try and use the network printing pathway whenever possible. As a user, you will have an active session on one of the Citrix (XenApp) servers. This time, after you hit print, the print output will be sent over to the print server (spooler service) where it will get spooled/rendered into a print job before being sent over to the physical print device. Of course, and this goes for the client printing pathway as well all data will be routed accordingly depending if it’s GDI/EMF or XPS based, as discussed previously.
From a client perspective, spooling will take place remotely, leveraging remote resources. As opposed to the client printing pathway, here only the Citrix (XenApp) server will have the Receiver/ICA protocol installed: the print server does not know how, and is unable to communicate using the ICA protocol/virtual channels. As a result, all traffic sent between the XenApp server and the print server will be unmanageable and thus uncompressed. When the XenApp server and the print server are situated close together, this won’t be too big an issue. But when the XenApp server is in the data center, and the print server is near the users in one
Another thing that needs to be considered is that the print job sent from the print server to the physical print device will also be sent in an uncompressed state. So again, when the print server is located near your users, in the branch office as mentioned above, this won’t be an issue. But if the print server is located back in the data center, near the XenApp server, this is something to keep an eye on as well.
FMA fact: You see that it’s not just one thing, it is everything combined that makes or breaks your print architecture: the types of end points you use, policies configured, including the physical placement of your machines and printers.
It’s the same as before only here I say ‘try.’ This is because with the network printing pathway there are several dependencies before the actual network printing pathway can and will be used. For example, if the Citrix (XenApp) server and the print server are not in the same domain, or are unable to communicate, then, instead of the network printing pathway, the client printing pathway will be used. Keep in mind, that if this happens and you are using thin client devices, the chances are that printing won’t be possible at all.
FMA fact: If for whatever reason the Citrix (XenApp) server and the print server are unable to communicate with each other, again the client printing pathway will be used (forced) instead.
Now you may think, well, that’s not so bad because when the client printing pathway is used my print traffic will be compressed since it will leverage the ICA protocol. And, although that might be true, this approach can also work against you, as you will soon find out.
Forcing the client printing pathway
As we’ve seen, when Citrix is involved, and you are using network-provisioned printers, it will always try to use the network printing pathway first. However, there might be situations where, although a print server is involved, you would prefer to use the client printing pathway instead.
Let’s assume that your Citrix (XenApp) server is located back in the data center and that the print server is located near your users, as I’ve already specifically mentioned a few times. Since traffic sent between the two will be unmanaged/uncompressed, you want to be careful with this type of set-up, especially when the branch office and the data center are geographically separated.
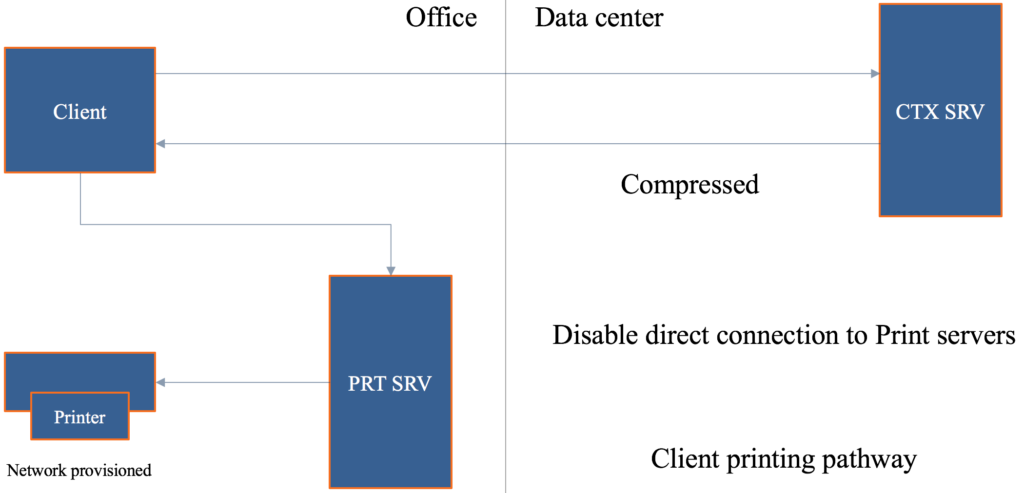
What we can do here is force the system to leverage the client printing pathway instead of the network printing pathway by disabling the ‘Direct connection to print server’ policy. By disabling this policy, all traffic will be routed through the client printing pathway by default. Interesting, right?
Now, instead of sending the application print output over to the print server, it will first be sent back to the client device over the ICA channel and thus making it manageable (compressed) from where it will be handed over to the print server, which will take over from there. And since those three, the client, the print server, and the physical print device are all close together, this will be a much more efficient approach, as you can see in the overview below as well.
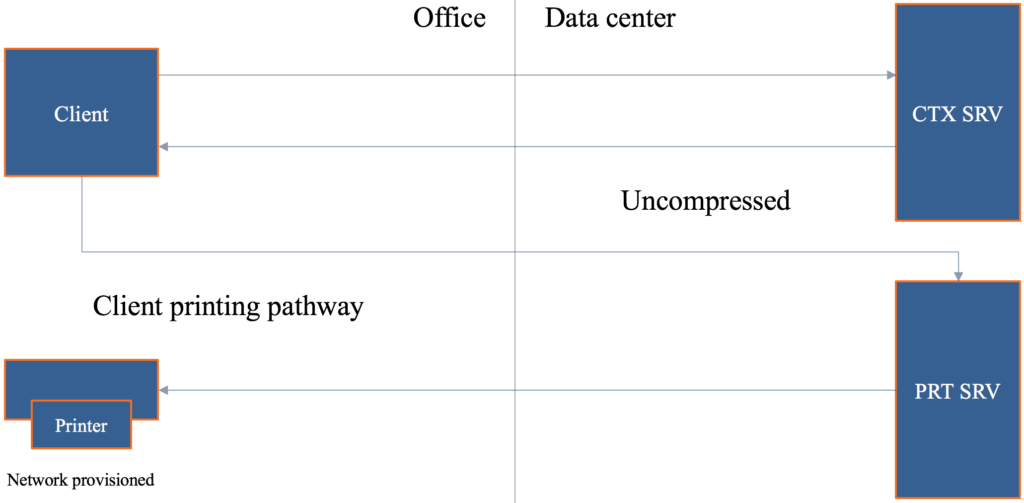
And there always is. When the print server is back in the data center, as mentioned and shown in one of my previous examples, this set-up, using the client printing pathway I mean, will only make things worse. Have a look at the image below.
Imagine you have a session on the Citrix (XenApp) server. You click ‘print.’ First, the print output will be sent back to the client device, over ICA, compressed and so on. From there it needs to find its way over to the print server, and since it is located back in the data center: it will again need to traverse the WAN. Even more importantly, it will do so in an uncompressed state. Finally, when rendered, the print job needs to be sent to the physical print device back in the branch office. Again, generating uncompressed traffic over the line. You can see the inefficiency, right? Try to avoid this setup/configuration.
As of XenDesktop version 7.13 Adaptive Transport, also known as Enlightened Data Transport, or EDT, is available for production purposes. EDT refers to the policy that needs to be configured to enable Adaptive Transport. This new transport layer above UDP improves data throughput for all ICA virtual channels, including printing. It optimizes data traffic by applying a new Citrix protocol called Enlightened Data Transport (EDT) in preference to TCP whenever possible, but with a fall-back to TCP when UPD is not available, whatever the reason may be.
The Universal portfolio
The ‘Universal portfolio’ consists of the Universal Print Server, the Universal Print Driver and the perhaps lesser-known Universal Printer. Let’s start with Universal Print Server. If you think back to my network printing pathway example where the print server was located in the branch office and the Citrix (XenApp) server in the data center, you probably recall that traffic sent from the XenApp server to the print server was in an uncompressed state. The Universal Print Server can help us to compress that data.
Next to compression it is optimized for network printing scenarios and works with (Linux based) thin client and tablet devices as well. It supports both the EMF as well as XPF print file formats and makes use of the Universal Print Driver (UPD), which can be paired/combined with any number of native print drivers – when needed for more advanced print features, for example – see the section on the UPD as well.
The Universal Print Server (UPS) is built up out of a server and client component. The server component gets installed on the print server. Insert the DVD in the drive or mount the ISO file. Once the installer launches and after you select XenApp or XenDesktop on the first page, you can select the Universal Printer Server for installation (UpsServer). The UPS client component is installed on the XenApp/XenDesktop server/VDI VM, and can be found as part of the stand-alone VDA installation package (extractable).
The server component of the Citrix Universal Print Driver is installed as part of the XenApp or XenDesktop VDA and (also) includes the following drivers: Citrix Universal Printer (EMF driver) and the Citrix XPS Universal Printer (XPS driver) for use with the Universal Printer – discussed in more detail a couple of paragraphs down.
The client component of the Citrix UPD is installed as part of the Citrix Receiver. It fetches the incoming print stream for the XenApp or XenDesktop session and forwards it to the local printing subsystem of the Universal Print Server (the UPS does not support client side rendering) where the print job is rendered using the device specific printer drivers. The Universal Print Server is supported on Windows Server 2016, 2012 R2 as well as Windows Server 2008 R2 and requires Microsoft Visual C++ 2013 Runtime, 32- and 64-bit.
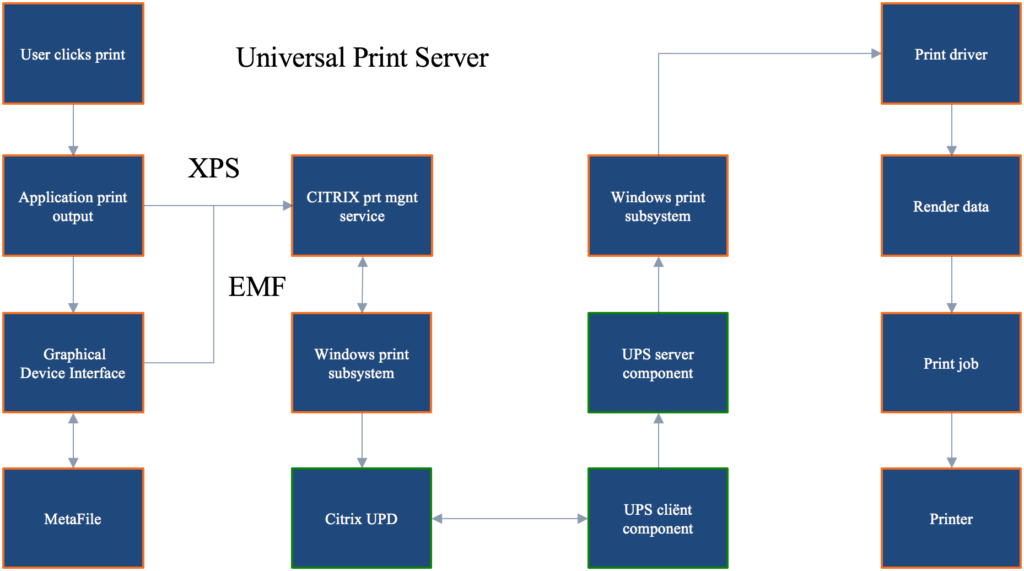
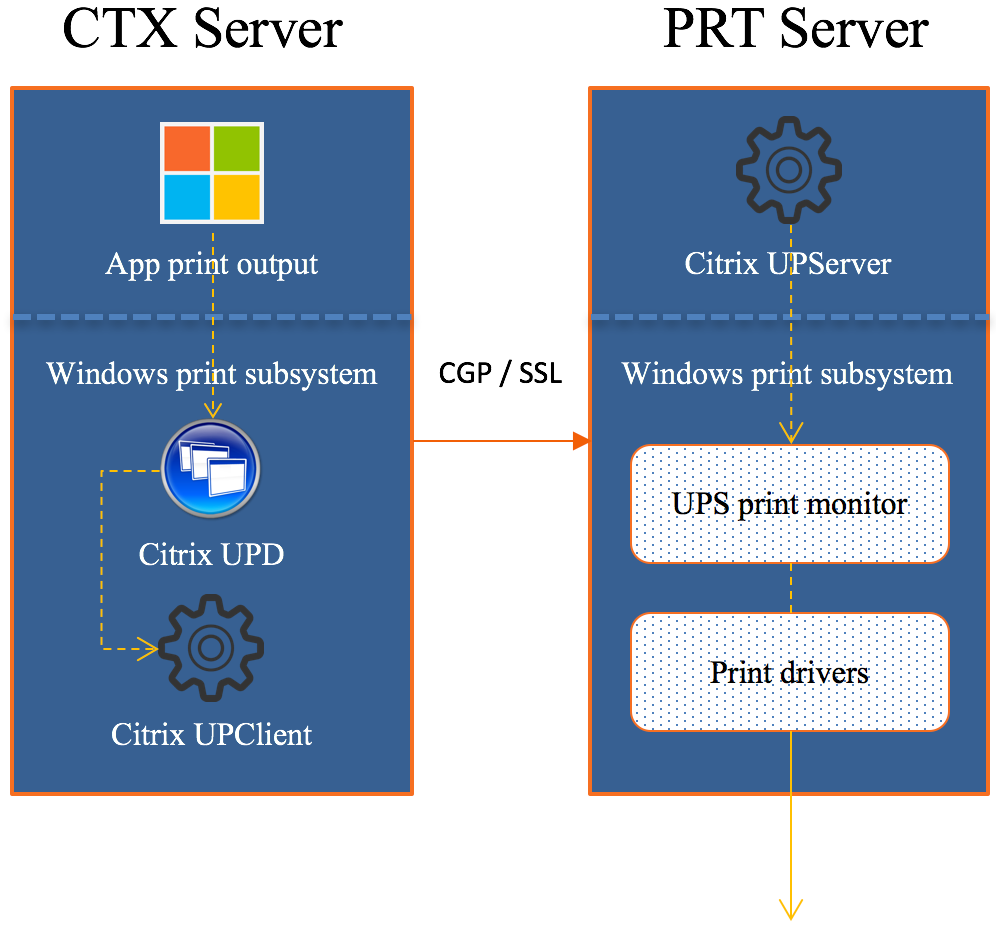
In simple terms, this is what happens. After a user clicks ‘print’ the application produces some form of print output (EMF/XPS), which will be handed over to the local (Windows) print subsystem (UPD) on the XenApp server. Note that if it’s EMF based data, the GDI will still sit in between to do its magic – see the image above as well.
Since the Universal Print Server does not support any form of client side rendering, the print output will be directly sent over to the Citrix UPClient component as highlighted earlier UPServer component (instead of sending it straight to the print server spooler service) – This is the part where the print data can be compressed. Finally, the Windows print subsystem on the (Universal) print server will handle (render, spool) it from there on.
Note that the Universal Print Server will be disabled by default, it needs to be enabled through policy – configure the ‘Universal Print Server Enable’ policy. While it works with the UPD by default, if paired with one or multiple native print drivers it will try and use the Windows native print driver first. If a proper one is not available it will use the UPD instead, of course, you can configure it to use the UPD right away as well. Any configured network printers you might have will leverage the UPS automatically through a method referred to as Auto discovery.
Historically the Citrix Universal Print Server (UPS) combined with the Citrix Universal Print Driver (UPD – see the section below) have long been considered to (preferably) fit smaller to mid-sized companies, where printing was important, but not business critical per see. One of the (main) reasons for this was that before version 7.9 the UPS was a single point of failure. There was no way to setup and configure multiple print servers and apply HA and/or Load balancing.
Luckily that all changed with the introduction of XenDesktop and XenApp 7.9. Today we do have the option to configure multiple Universal Print Servers in an LB and/or HA set up, sweet, right? Note that you will have to be on a Current Release (no LTSR – 7.6 at the time of writing) version to be able to make use of this functionality, since updating your base XenDesktop/XenApp opponents will be necessary, VDA’s included.
UPS load balancing in more detail
This is (roughly) how it works. At login time, session (network) printers are mapped to different print servers. Each VDA has a separate (built-in) load balancer service responsible for distributing the print load to all configured print servers as part of the HA/LB setup, and policy. If one of the print servers should fail or become unresponsive for whatever reason (checks are performed periodically) and it does not respond within a certain (configurable) time frame, set to 180 seconds by default, it will be removed from the VDA load balancing scheme.
The load balancer service also has a fail-over mechanism built-in, which will make sure that any failed print connections will automatically be redistributed to the still healthy and active print servers. It is not HA as in active/passive, but as part of the load balancing policy.
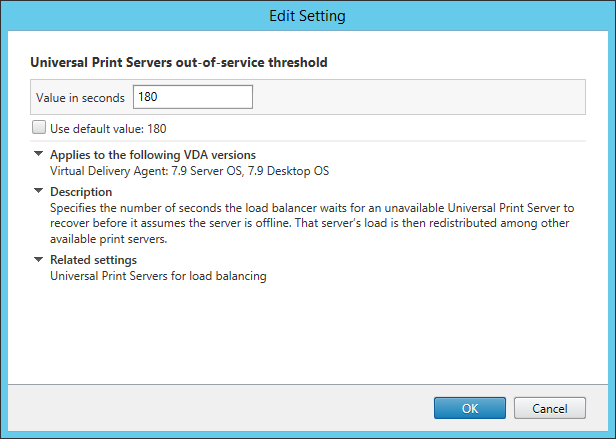
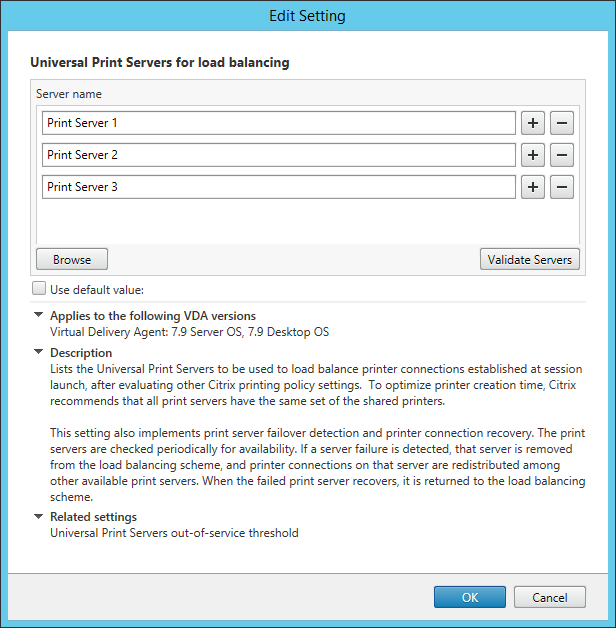
For the above-mentioned functionality, you need to configure the following policies: ‘Universal Print Server for load balancing’ and ‘Universal Print Server out-of-service threshold.’ The latter (see above as well) is to configure a default time-out value after which a failed, or unresponsive print server is permanently offline and thus cannot be recovered within the specified amount of time; the earlier mentioned 180 seconds by default.
As mentioned, checks between the VDAs and the print servers are performed periodically to see if they, the print servers, are online and active. When a VDA is unable to establish a network connection to one of the print servers, or if a print server fails to respond to PING messages it is considered down and/or unresponsive.
This is also where the above mentioned ‘Out-of-service threshold’ policy comes in. If the print server does not respond within the time-out window configured as part of this policy, it will be considered permanently offline, and it will be removed from the load-balancing scheme part of the VDA, as highlighted earlier. The PING interval is configurable through a registry key (not sure which one), no policy just yet.
When configuring a UPS load balance policy, as shown above, you also have the option to validate all print servers involved manually. After clicking the ‘Validate servers’ button the configured print servers are first queried for their printing queue names, which will be verified on the Delivery Controller as part of the Load Balance policy or on the VDA when the Citrix Management Service starts.
It will check to see if all servers are indeed print servers and if they are configured identically. Citrix recommends configuring each print server identically to optimize the printer creation time as part the XA and/or XD session. Again, this is just a validation, nothing more. Besides an event log entry, no other action is taken.
Additionally, when the Universal Print Server is used, you can configure a feature named ‘proximity printing,’ which is based on session (network) printers. With proximity printing, session printer policies are filtered on IP address or subnet: based on your IP address or the subnet that you are in, specific printers, within the same range can/will be assigned. This way, your users will always have the printer that is closest – when configured correctly, of course.
Proximity printing cannot be used without the Universal Print Server. As stated, proximity printing works with session printers. Session printers are network printers that can be assigned and mapped to a specific user or user groups. Since these types of printers will generate a certain amount of network traffic, you’d do good to only use and configure them on fast (er) networks.
When you install and configure the Universal Print Server, or multiple as part of an LB/HA setup, you will automatically be enrolled in the Citrix Experience Improvement Program (CEIP). While this is nothing to worry about, it’s still worth a mention so you, as a customer know what is going on. In fact, I would encourage all customers to participate in the CEIP since all data send is unanimous, encrypted and only used by Citrix for analyses purposes – to improve their products. By the way, the first upload of data occurs after seven days from the date and time of installation, assuming you stay opt-in.
Since the customer is king, you always have a choice. While you are automatically opt-in, you can opt-out just as easy. To opt out of the CEIP (UPS specific) edit the registry key HKLM\Software\Citrix\Universal Print Server\CEIPEnabled and set the DWORD value to 0. Change it back to 1 to opt-in again.
If you would like to enable Always-On logging for the print server and printing subsystem on the VDA, you can do so by applying the following: to collate the logs as a ZIP for emailing, or to automatically upload logs to Citrix Insight Services, use the Start-TelemetryUpload PowerShell cmdlet.
FMA fact: Throughout the last couple of years’ multiple scalability and stability enhancement to the XenApp and XenDesktop printing subsystem have been made. As a result, the caching of printer data on the VDA for both network and directly attached client printers has improved and helps in optimizing the overall user experience and to reduce network traffic. Resource consumption on the UPS, and by the VDA have been reduced as well, think: the number and amount of threads, memory, and handles. Enhancements to multithreading algorithms make that the UPS is now capable of processing up 80+ print jobs per minute.
The health of the printing subsystem can be evaluated for the UPS and/or XenApp/XenDesktop VDA by leveraging performance counters exposed in PerfMon for both Client and network print devices.
The following got introduced as of XenApp and XenDesktop version 7.11: The Crash detection feature for all Citrix printing modules fully automates the detection of crashes, the generation of an associated crash dump file, and the safe and automatic upload of the crash dump files to the customer’s Citrix Insight Services (CIS) account. This results in higher product quality and faster fixes for customer-reported issues. I’m sure we’ll see similar functionality in Citrix Smart Check going forward since CIS will be slowly phased-out in the future, though I have no idea on how, when, etc. just an educated guess.
This one is well known and has been around for a while now. It’s primarily meant as a one driver to rule them all kind of scenario, but we all know that is near to impossible. It does do a good enough job in most cases, though. One of the biggest things missing, and the main reason why we use it combined with other native drivers is the lack of enhanced printing capabilities, which also differ per printer type, like ink-jet, laser, multi-functional’s, label printers and so on.
As mentioned throughout the Universal Print Server section as well, The UPD is build up out of two components, a client, and server component. The client component holds the print drivers and is installed as part of Citrix Receiver. The server component is installed as part of the XenApp/XenDesktop VDA and (also) includes the following drivers: Citrix Universal Printer (EMF driver) and the Citrix XPS Universal Printer (XPS driver) for use with the Universal Printer.
Both the XPS and EMF based Universal Print Driver (EMF is used by default, though this can be changed through policy) have been enhanced with a couple of more advanced printing features like stapling and print draw selection (next to sorting, which it already offered), including the ability to use secure PIN printing when available.
If the physical print device and the accompanying native print driver both support it, users can now select their paper draw of choice, next to that, the stapling of documents is also supported. The above functionalities, for both UPD’s, are available as XenDesktop version 7.12. You do need to enable the UPD since it will be disabled by default.
FMA fact: Enhanced print features can be used if the native driver makes them available using the Microsoft Print Capability technology. The native driver should use the standardized Print Schema Keywords in the Print Capabilities XML. If non-standard keywords are used, the advanced printing features will not be available using Citrix Universal print driver.
While the UPD can be used exclusively (give this a try if you can, it will save you a lot driver update and potential conflict issues) it can also be paired with Windows native print drivers, which might be needed because of more advanced features supported by the print device. With this type of set up, as an example, you can configure the system to first look for any native drivers that might be installed, before falling back to the UPD, or vice versa – By default, if a Windows-native driver is not available, the system falls back to the Universal print driver. The following print formats are supported by the UPD:
- Enhanced Metafile Format (EMF), which is the default.
- XML Paper Specification (XPS). The XPS driver uses XML, as discussed earlier.
- Printer Command Language (PCL5cand PCL4). PCL is a printing protocol developed originally by Hewlett-Packard for inkjet printers. It is used for printing basic text and graphics and is supported on most HP LaserJet and multifunctionals.
- The Citrix PDF Universal Printer Driver generates PDF format files and enables printing to Citrix Receiver for HTML5 and Receiver for Chrome.
- PostScript (PS). PostScript is a computer language that can be used for printing text and vector graphics. The driver is widely used in low-cost printers and multifunction peripherals.
The print driver on the Server OS or VDI VM and client device must match for printing to succeed. Here it is important to note that, while the print driver names might be the same, if the version numbers are different the print drivers will not be seen and thus treated as equal. Nice to know when troubleshooting these types of issues. You’ll read a bit more on this in the ‘How to speed things up, keep it clean and healthy’ section coming up shortly.
Typically, when a user logs in and successfully establishes a session on a Citrix (XenApp) server, no default printers, or all printers known to the client, will be mapped into the session (default behavior).
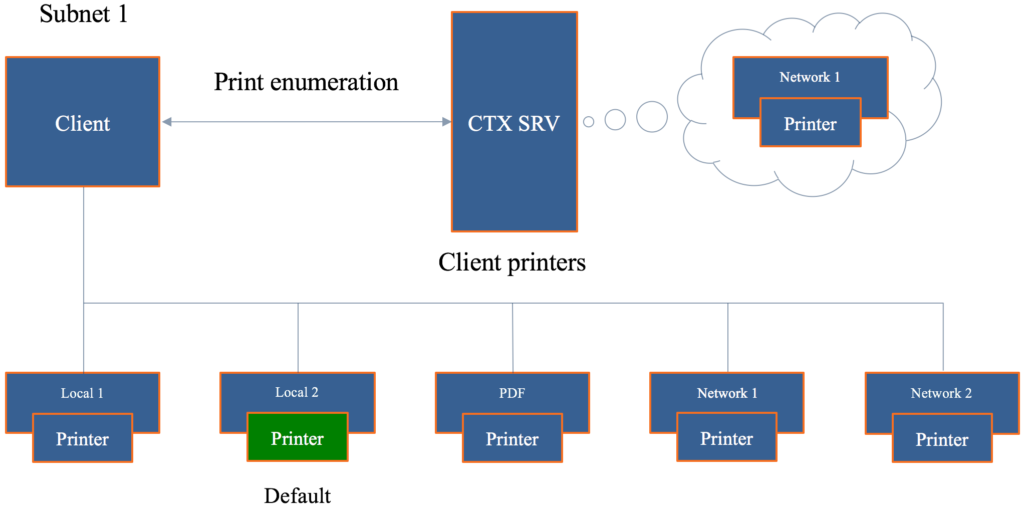
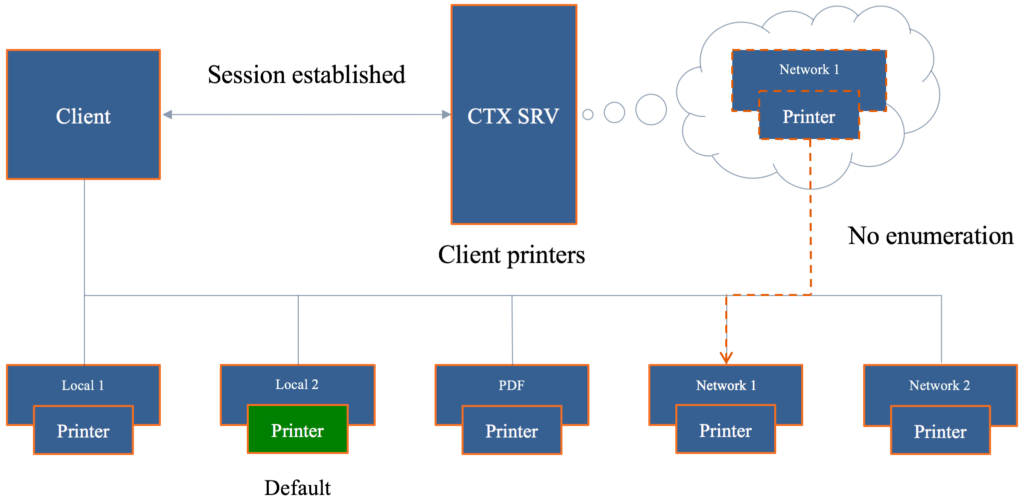
When you enable and configure the use of a Universal Printer, instead it will create a generic, or logical, print object at the beginning of the session. This means that no printer enumeration will take place at all, which will speed up the user login process. Potentially useful when the ‘Wait for printer to be created’ policy is used or when you need access to multiple printers, local & network.
This logical object is virtually mapped to the client’s default configured printer, although this can be set to any printer known to the client device. In the above example/image, the ‘Local 2’ printer is set as the default printer for the user (green), though in this case the ‘Network 1’ printer has been configured for use with the Universal Printer.
The Citrix Universal Printer is part the Universal Print Driver (UPD), which is installed as part of the XenApp and/or XenDesktop VDA and will only work with Windows based clients. As highlighted, the VDA installs the following drivers with Citrix UPD: Citrix Universal Printer (EMF driver) and the Citrix XPS Universal Printer (XPS driver). As a result, the Universal Printer will use the UPD as its default print driver.
How to speed things up, keep it clean and healthy
There are a couple of ways to speed up or improve Citrix printing, and additional (configurations) steps you can take to keep you printing architecture up to date, clean and healthy. Some steps are reasonably straightforward and obvious, while others might need some additional consideration and planning – like when editing the registry, for example.
- Configure and apply true QoS through Multi Stream ICA.
- Give the ICA virtual print channel a higher priority (be careful with this).
- Use the Universal Print Driver and configure:
- Universal printing image compression limit. Defines maximum quality and minimum compression lever available for images printed with the UPD.
- Use the Universal Print Server for additional compression and QoS options.
- Universal printing print quality limit.Specifies the maximum dots per inch (dpi) available for generating printed output in the session.
- We can allocate, limit and control print bandwidth/traffic through policies, which can then be applied per user or for the whole Site.
- To prevent degradation/interference of other virtual channels, you can limit the bandwidth used by printing. By limiting the data transmission rate for printing, you make more bandwidth available in the HDX data stream for transmission of video, keystrokes, and mouse data.
- ThePrinter redirection bandwidth limit percent setting limits the bandwidth available for printing to a percentage of the overall bandwidth available.
- ThePrinter redirection bandwidth limit setting specifies the bandwidth available for printing in kilobits per second (kbps).
- We can configure session (network) printers. Here you specify a bunch of specific network printers (could be only one just as easily) to be mapped within a session and assign them to users. Use on fast (er) networks only.
- The XenApp server (as an example) will try to match the print driver (s) found on the client device. If the print driver cannot be found (remember that they must be named the same, version numbers included) the system will attempt to install a corresponding native driver from the Windows operating system. If the driver is not available in Windows, it will (try and) use the Citrix Universal Print Driver (it will need to be enabled for this to work). Configure the ‘Automatic installation of inbox printer drivers’ to change this behavior – keep things clean and manageable.
- In addition, think about implementing ‘printer driver mapping compatibility.’ Print driver mapping is useful in situations where the print driver on the client is named differently than the print driver on the server but offers the same functionality.
- You can use wildcards. For example, to force all HP printers to use a particular driver, specifyHP* in the policy setting.
- It can also be used/configured to create a whitelist: this way you can tell the XenApp server that it is ok to auto-install print drivers when not found on the system, but only if those drivers that are on the (white) list.
- To ban a printer driver, select the driver name and choose the‘Do not create setting’.
- Print driver mapping can also help to reduce the number of printer drivers needed/installed, minimizing the administrative overhead and potential print issues that come with it.
- This way you can also instruct certain printers to make use of the Universal Print Driver, while others do not.
- You can allow or restrict certain printers to be created with a specific driver.
- The Universal Printer helps eliminate printer enumeration while users log in. Other things you can configure include:
- Configure desired image quality.
- On top of the desired image quality, you can set bandwidth reduction by enabling heavyweight compression – without losing image quality.
- Image and font caching.
- Make use of the client printing pathway where it makes sense. Sometimes, depending on the physical set up of your environment, and even when network printers are used on a fast-internal network, sending the print output back through the client device (making use of the ICA protocol) can help a great deal, performance wise.
- Printing preferences (user) and properties will be stored on the client device by default. If this is not supported, they will be kept in the user profile within the server Operating System. Configure the ‘Printer properties retention’ policy to change this. Again, you have multiple options. Citrix advises maintain the default settings.
- Map the default client printer only. By default, all printers known to the user’s device will be mapped as part of the session, this can take forever.
- Avoid upgrading print drivers. Always uninstall the old driver and install the new one. Keep your machines as ‘clean’ as possible.
- Limit the number of print drivers installed – less is more!
- Use ‘signed’ drivers exclusively and always thoroughly test your print architecture set-up, no matter how convinced you may be that it will work.
- The ‘simpler’ the print driver, the less traffic will be generated. Use vendor print drivers only when specific functionality is needed.
- Apply print driver isolation where it makes sense. Isolating multiple print drivers will demand more of the available local resources (CPU and memory).
- Only make use of version 3 and 4 printer drivers.
- To determine if a printer model is supported, contact the manufacturer or see the Citrix Ready product guide atcitrix.com/ready.
- Match the print server OS to that of the XenApp server OS.
- To obtain real-time information about printing bandwidth, use Citrix Director.
- All this, and this applies to all the other chapters in this document as well applies to XenApp as well as XenDesktop, and most isn’t IMA- or FMA-specific.
FMA fact: Remember that it isn’t just about the bandwidth exclusively. Make sure to check for congestion and latency.
Printing related troubleshooting and verification
Throughout the years, Citrix has released various troubleshooting tools specifically aimed at Citrix printing as well as print driver certification/verification and so on. In the below list, you’ll find that some are, as mentioned specifically meant to troubleshoot specific print issues while others provide general information on your XenApp and/or XenDesktop Site, which could assist in finding particular print issues as well.
- Citrix Director: can be used to view real-time information on the bandwidth used by printing operations.
- Print Detective: Print Detective is an information gathering utility that can be used for troubleshooting problems related to print drivers – CTX116474.
- All-purpose troubleshooting tool: Run Citrix Scout from a single XenDesktop controller (DDC) or XenApp server to capture key data points and CDF traces for selected computers followed by a secure and reliable upload of the data package to Citrix Technical Support – CTX130147.
- Citrix Printing Tool: Citrix Printing Tool 3.1 helps configuring and troubleshooting the Citrix Printing subsystem on XenApp and XenDesktop – CTX122962.
- StressPrinters 1.3.2 for 32 bit and 64-bit platforms: This tool can be used to simulate multiple sessions auto-creating printers using the same printer driver – CTX109374.
- UPD Finder: This program is a troubleshooting aid, and it does not modify the system. It calls standard Windows print spooler APIs to find the directories where the Citrix Universal Printer Driver is installed – CTX141351.
- UPS Print Driver Certification Tool: The Citrix UPS Print Driver Certification Tool can be used to test the compatibility of a print driver with the Citrix Universal Print Server – CTX142119.
- All-purpose troubleshooting tool: proactively run Citrix Smart Check to verify the general health of your environment and any patches, and so on that might be missing.
- Crash Detection Feature: the generation of an associated crash dump file, and the safe and automatic upload of the crash dump files to the customer’s Citrix Insight Services (CIS) account. This results in higher product quality and faster fixes for customer-reported issues
- PerfMon: The health of the printing subsystem can be evaluated for the UPS and/or XenApp/XenDesktop VDA by leveraging performance counters exposed in PerfMon for both Client and network print devices.
- Event Viewer: Do NOT forget about this one. In fact, this is probably the best place to start your troubleshooting quest.
- Citrix Health Assistant: Focuses on VDA registration issues for both XenDesktop and XenApp. A series of health checks will be run in an automated fashion to identify any potential root causes for common VDA registration issues. It is a GUI based tool but also supports the use of command line commands – CTX207624.
General troubleshooting tips and tricks
When it comes to troubleshooting our XenDesktop and/or XenApp environments, printing architectures included there are a lot of (free) tools that can be of assistance. Some are aimed at solving specific issues, while other tools are more generic and can be helpful in multiple ways – as we’ve seen in the above-mentioned list as well. However, while this is all great, I do think that a lot of IT administrators forget about the basics: you need to know and understand the products that you are working with before anything else, here’s my list of things to think about when it comes to troubleshooting, and note that these bullets apply to all sorts of technologies/products, not just Citrix:
- You need to understand the architecture you are dealing with: the FMA, its main components and services, communication paths, and so on. Including the printing pathways, the UPS/UPD set up, architecture and traffic flow.
- Expected behavior and interaction: how does it all work under ‘normal’ circumstances? One of the main reasons why I came up with this paper as well.
- Assemble a personal tool kit. As mentioned, we have a lot of instruments at our disposal, see the above list as well: sometimes it can be hard to find out what the exact purpose of a tool is or how it should be operated. By doing some research beforehand, this will potentially save you valuable time when things do go wrong. And we all know this is going to happen sooner or later, right? In other words: prepare at times of ‘peace.’
- Know where to find information. This may sound a bit silly, but it doesn’t hurt to go over some of the options you have when it comes to finding useful information. Which forums do you visit? Think about (ex-)colleagues or community folks you can contact. Perhaps make yourself a top 10 of blog authors and so on. Give this some thought. And don’t forget about social media.
Conclusion
While from a print architectural point of view not that much has changed throughout the years, like the printing pathways, for example, it still does tend to confuse a lot of people. Hopefully, this guide/cheat sheet has helped in clearing up one or two questions you might have had regarding the Citrix print portfolio. I really enjoyed putting in the research needed to come up with this. It doesn’t make me an expert, but I do like to think that this paper holds some valuable information, which goes beyond the basics – hopefully, you agree. If you feel I left anything out or perhaps explained incorrectly, please do let me know. I’m here to learn as well. As always, thank you for reading.
