In this article (part two) I’d like to focus on the Citrix printing pathways, how they differ and when one or the other will, or can be used. I’ll also highlight the universal print driver, server and printer together with a whole bunch of CTX defaults, best practices including some of the most common troubleshooting tools and a BIG list of takeaways. However, knowing what happens after a user hits print and how traffic flows throughout our infrastructure is probably the best place to start. I have also included a BIG list of takeaways, which is available as a separate download as well.
If you prefer to read the cheat sheet as a whole, combining both parts, download the .PDF document by clicking the download button below. If you are only interested in my list of takeaways, tips, tricks and best practices (available as a separate download as well) I suggest you scroll right down.
The Citrix Printing Pathways
A printing pathway basically defines how print traffic can or will be routed throughout our environment. It also tells us where a job gets processed, spooled and so on. Depending on the types of endpoints we use, the way we provision printers, including the physical setup of our XenApp and/or Print servers we can partly influence how print traffic will be routed, and use it to our advantage. Before we have a look at both pathways, client and network, I’d like to start with a setup referred to as server local printers.
Server local printers
Server local printers is nothing more then attaching a physical printer directly to a XenApp server. Probably a set up you won’t come across that often, but potentially useful nonetheless. From a client perspective, when a document is printed, spooling will take place locally (as mentioned in part one) on the XenApp server, leveraging local resources, before sending the output to the actual physical print device.
If you prefer to read part one first click here
The client-printing pathway
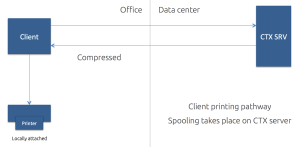
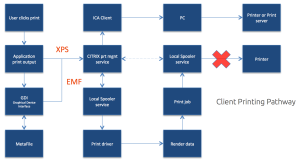
Although you have a few options with regards to configuring the client-printing pathway (we’ll get to that in a minute) the best way to explain and illustrate how it work is by assuming that a locally attached printer has been configured. By default there is no print server involved. The ‘client’ part refers to print traffic generated on the Citrix (XenApp) server being redirected back to the client device from where it will be forwarded to the actual physical print device.
This is what happens… A user will have a session on the Citrix (XenApp) server, as soon as he or she clicks print the application print output will be spooled / rendered on the Citrix server (turning it into an actual print job) before sending it back (over ICA) to the client from where it will be forwarded to the physically attached print device. From a client / user perspective this means that spooling takes place locally, again leveraging local resources.
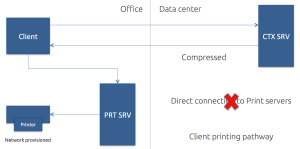
Here it is important to note that the client device as well as the Citrix (XenApp) server will both have the Citrix Receiver / ICA protocol installed. When the spooled print job is send back from the Citrix (XenApp) server to the client device this is done using, or over, the ICA protocol / channels, and thus the data send can be controlled, meaning compressed, limited etc. Which is very useful, especially when the client device and the XenApp server are physically separated from each other. See image above.
As a side note, most thin client devices are based on Linux, they will not be able to locally handle and process the earlier mentioned print jobs. As a result of this, the client-printing pathway will only work with Windows based (fat) client devices.
Note… When a locally attached printer is configured, and again, this will only work on a Windows (fat) client device, the client-printing pathway will be enforced. Meaning that the application print output / the print job will always be send back to the client device.
Stay tuned because we have a few more ‘use cases’ to discuss when it comes to the client-printing pathway.
The network printing-pathway
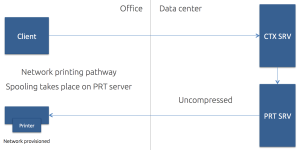
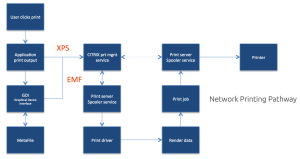
When using network provisioned print devices (print server) by default, Citrix will try and use the network-printing pathway whenever possible. The process…
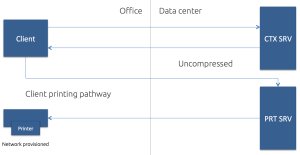
Again as a user you will an active session on one of the Citrix (XenApp) servers. After a you hit print the print output will be send over to the print server (spooler service, see part one for an overview on this) where it will get spooled / rendered into a print job before being send over to physical print device. Now this time, from a client perspective, spooling will take remotely leveraging remote resources.
As apposed to the client-printing pathway, here only the Citrix (XenApp) server will have the Citrix Receiver / ICA protocol installed, the print server does not know how, and is unable, to communicate using the ICA channels. As a result all traffic send between the XenApp server and the print server will be unmanaged and thus uncompressed. When the XenApp server and the print server are situated close together this won’t be too big of an issue.
But when the XenApp server is located in the data center and the print server is near the users, in one of the branch offices for example, this might cause a potential problem, as we will see in another example coming up.
Another thing that needs to be taken into account is that the print job send from the print server to the physical print device will also be send in an uncompressed state. So again, when the print server is located near the users, in the branch office as mentioned above, this won’t be an issue. But if the print server is located back in the datacenter, near the XenApp server, this is something to keep an eye on as well.
So you see that it’s not just one thing, it’s all elements combined that make or break your print architecture. The type of end points you use, the physical placement of your machines, the print drivers used and so on…
Note that it’s the same as before only here I say ‘try’. This is because with the network-printing pathway there are several dependencies before the actual network-printing pathway can and will be used. For example, if the Citrix (XenApp) server and the print server are not in the same domain and are unable to communicate, then, instead of the network-printing pathway, the client-printing pathway will be used.
Keep in mind, that if this happens and you are using thin client devices, chances are that printing won’t be possible, at all.
Also, if for whatever (other) reasons the Citrix (XenApp) server and the print server are unable to communicate with each other, again, the client-printing pathway will be used in stead.
So now you may think, well, that’s not so bad because when the client-printing pathway is used my print traffic will be compressed since it will leverage the ICA protocol. And although that might be true, this approach can also work against you, as you will soon find out. You may remember the below overview from part one.
Forcing the client printing pathway
As we’ve seen, when Citrix is involved and you are using network-provisioned printers, it will always try to use the network-printing pathway first. However, there might be situations where, although a print server is involved, you might prefer the client-printing pathway instead.
For example, let’s assume that your Citrix (XenApp) server is located back in the data center but your print server is located near your users, as I’ve already mentioned a few times.
Since traffic send between the two will be unmanaged / uncompressed you want to be careful with this type of setup, especially when the branch office and the data center are geographically separated over longer distances.
What we can do here is force the system to leverage the client printing-pathway instead of the network printing-pathway by disabling the ‘Direct connection to print server’ policy. By disabling this policy all traffic will be routed (forced) through the client printing-pathway even though network provisioned print devices are configured. Interesting right?
So now, instead of sending the application print output over to the print server it will first be send back to the client device over the ICA channel and thus manageable (compressed) from where it will be handed over to the print server, which will take over from there. And since those three, the client, the print server and the physical print device, are all close together, this will work like a charm.
Exception to the rule…
And there always is. When the print server is back in the data center, as mentioned and shown in one of my previous examples, this setup, using the client-printing pathway I mean, will only make things worse. Have a look below.
Here we go again… Imagine you have a session on the Citrix (XenApp) server. You click print. First the print output will be send back to the client device, over ICA, compressed and so on. From there it needs to find its way over to the print server, and since it is located way back in the data center it will again need to travers the WAN.
And even more importantly, it will do so in an uncompressed state. And finally, when rendered etc. the print job needs to be send to the actual physical print device back in the branch office. Again generating uncompressed traffic over the line. So you can see the inefficiency here right? Try to avoid this setup at all times.
I case you might be wondering what happens when you manually add a printer (fat client scenario), also referred to as TCP/IP printers, I can tell you that, from a Citrix perspective, it will also use the client printing-pathway. When adding / configuring a TCP/IP printer it is seen and treated as a locally attached printer. While I say add ‘manually’, which (if you have proper rights) is literally possible of course, this can also be done by making use of Group Policy Preferences.
The Universal portfolio
This consists out of the Universal Print Server, the Universal Print driver and the perhaps lesser-known Universal Printer. Let’s start with Universal Print Server. If you think back to my network printing-pathway example where the print server was located in the branch office and the Citrix (XenApp) server in the data center, you probably recall that traffic send from the XenApp server to the print server was in an uncompressed sate.
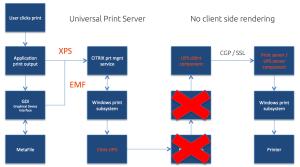
The Universal Print Server can help us to manage / compress that data. It is optimized for network printing scenarios and also works with thin client and tablet devices. It supports both the EMF as well as XPF pint file formats and uses the Universal Print Driver by default, which can be paired / combined with any number of native print drivers if and when needed.
The UPS is build up out of a server and client component. The server component gets installed on the print server and the client component is installed on the XenApp server. As of FP3 for XenDesktop 7.6 the Universal Print Server is now officially supported on Windows Server 2012 R2 as well.
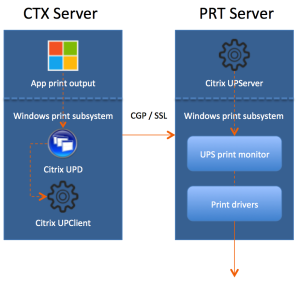
In simply terms this is what happens. After a user clicks print the application produces some form of print output (EMF / XPS), this will be handed over to the local print subsystem (UPD) on the XenApp server. Since the Universal Print Server does not support any form of client side rendering, the print output would be immediately handed over to the Citrix UPClient component from where it is be forwarded UPServer component. Finally the so-called Windows print subsystem on the print server will handle (render, spool) it from there on.
Due not the following blog post by Citrix. Testing will be necessary to guarantee that compression will actually take place.
Additionally, when the Universal Print Server is used you can also configure a feature named ‘proximity printing’, which is based on session (network) printers. With proximity printing, session printer policies are filtered on IP address or subnet. Based on your IP address or the subnet that you are in specific printers can be assigned. This way you will always have the printer that is closest mapped within your session.
The Universal Print Driver
This one is well know and has been around for a while now. It’s basically meant as a ‘one driver to rule them all’ kind of scenario, but we all know that is next to impossible. It does do a good enough job in most cases though. One of the biggest things missing, and the main reason why we use it combined with other native drivers is the lack of enhanced printing capabilities.
As it stands today it only supports stapling and sorting, that’s about it. It is available in both EMF (default) as well as XPS and comes installed as part of the VDA installation. All you need to do is enable it since it will be disabled by default. Once enabled you might want to have a look at the ‘Universal print driver usage and preference’ policies. You have a bunch of options to select from.
The Universal Printer
When the Universal Printer is enabled, once a user logs in and successfully establishes session on the Citrix (XenApp) server, a generic, or logical, print object will be created as part of that session. This means that no printer mapping or enumeration will take place at all, which will speed up the login process. This logical object is then mapped to the default configured printer, although this can be changed / configured to match any printer known to the client device. As a side note, this solution will only work for Windows based clients.
Let’s speeds things up a little
There are a couple of ways to speed up, accelerate or improve Citrix printing. Some are reasonably simple and obvious while others might need some additional consideration and planning. I’ll start by listing a few options.
- Give the ICA virtual print channel a higher priority.
- ICA traffic (in general) can be accelerated by implementing a CloudBridge or an F5 appliance for example. And there are a few more ‘tastes’ of course.
- We can allocate, limit and control print traffic through policies, which can then be applied per user, server or for the whole Site.
- We can configure session (network) printers on fast(er) networks. Here you basically specify a bunch of specific network printers (could be only one just as easy) to be mapped within a session and assign them to users etc.
- Use the Universal Print server for additional compression and QoS options.
I think most speak for them selves, so for now I would only like to discuss option number one, since this is sort of a special one.
Virtual channels
As you might know, the ICA protocol is build up out of multiple ICA virtual channels (VC’s) each with a different purpose, which we can control / manage using policies. It goes without saying that there is also a virtual channel for printing.
Within the ICA protocol there are 4 different priorities, which can be assigned to the virtual channels, ranging from 0 to 3. The higher the number the less relevance is given to the specific VC, meaning, in the case of a priority 3 VC it will be handled as a background process. The printing virtual channel has a priority of 3 by default. By the way, the priority 0 virtual channels are also known as Thinwire (there it is again).
Is printing slow? Remember that it isn’t just about the bandwidth exclusively. Make sure to check for congestion and latency.
So simply put, if you can locate the virtual print channel (in registry) and give it a lower number (equals a higher priority) you basically change it from a background service to a more critical channel.
Although the above sounds easy, be careful. Assigning a higher priority to the print virtual channel also means that you are taking away priority somewhere else. This needs to be thought trough.
Key (ok, maybe a bit more) takeaways
Since the list turned out a bit bigger then anticipated on forehand I decided to make it available as a separate download as well. Of course it’s also included in the Cheat Sheet document combining both parts. Click (right) on the image to the left to open or download the Key Takeaways list.
- There are two main (Microsoft) print file formats, EMF and XPS.
- EMF print output is first rendered by the GDI – Graphical Device Interface – before being handed over to the spooler service.
- XPS was introduced as of Windows Vista. EMF development ended with Windows XP and Server 2003.
- EMF data is not compressed. XPS data does get compressed.
- With EMF each image needs to be redrawn over and over again, even if the same image is used multiple times. XPS can reference a single image multiple times, think company logo’s, watermarks etc.
- To be able to use XPS both your print device as well as the print driver need to support the XPS print file format. If not, it will fall back to EMF.
- High level Print Spooling: Print output is received by the spooler service, print driver renders Meta file into raw data readable by print device (the actual print-job), spooler service sends print-job to physical print device.
- When spooled locally, local resources (CPU, Memory) are leveraged. No network traffic generated.
- When spooled remotely (print server) remote resources are leveraged. This will also produce additional network traffic between the XenApp and print server. Might be something to consider depending on your print architecture.
- Most print issues can be lead back to badly written drivers. Not tested and/or optimized for multi user environments.
- Main problems used to be (or still are): Spooler service crashes, CTX print manager service crashes, blue screens, auto print creation failures, high CPU loads and more.
- Do NOT make use of kernel mode (version2) print drivers.
- Use user mode (version 3 and 4) print drivers exclusively.
- Consider isolating your print drivers a.k.a. Print Driver Isolation introduced with Windows Server 2008 R2.
- But.. only apply Print Driver Isolation where it makes sense.
- There are three isolation modes available: None, Shared and Isolated.
- When the Isolated mode is used a separate isolated run-space (PrintIsolationHost) on a per driver basis will be created, completely isolating the driver from all other drivers on the same machine, including the print and spooler services.
- The same happens with the Shared mode, a separate isolated run-space will be created but this ‘space’ will be shared with multiple (selectable) drivers.
- When Isolation mode gets applied to multiple drivers (isolating each driver separately) it will demand more resources (CPU, Memory) from the local machine when compared to ‘Shared’ and ‘None’.
- If a isolated driver fails or get corrupted it can only affect itself or the other drivers as part of Shared isolation model for example. All other drivers on the same machine would be unaffected including the print and spooler services.
- Use isolated mode for testing purposes only, use shared mode in production.
- Version 4 modes print drivers: Designed for Metro style applications (XPS), enhanced printer sharing, easier to install, maintain, manage etc.
- When a Citrix session starts, the user logs in, it will, by default, try to map all printers known to the client device within that session.
- Change this behavior to map the clients default printer only. Configure the ‘Auto-create client printers’ policy for this. Of course you have multiple options to choose from.
- The system will use the Windows version of the printer driver if it is available on the Server OS machine (it will try to match the driver found on the client device). If the printer driver is not available, the system attempts to install the driver from the Windows operating system. If the driver is not available in Windows it will try and use the Citrix Universal print driver (it will need to enabled for this to work).
- Configure the ‘Automatic installation of in-box printer drivers; to change this behavior.
- Think about implementing ‘printer driver mapping compatibility’. Print driver mapping is useful in situations where the print driver on the client is named differently than the print driver on the server (these need to match) but do offer the exact same functionality. It can also be configured to create a whitelist, this way you tell the system that it is ok to auto install print drivers when not found on the system, but only if those drivers are on the list.
- Use ‘signed’ drivers exclusively and always thoroughly test your print architecture setup, no matter how convinced you may be it will work.
- Limit the number of print drivers installed, less is more!
- When comparing print drivers (client / server) make sure to look at the version numbers as well, they need to match a 100%.
- Avoid upgrading print drivers. Always uninstall the old driver and install the new one.
- Contact the print driver vendor if and when needed. For example, if they only have version 2 print drivers, or their drivers are not tested / signed for multi user environments.
- Always try to match the print server OS to that of the XenApp server OS.
- The Citrix Print Management Service was introduced around 2005, which is around the same time as the EMF based UPD.
- It communicates with the spooler service and the local ICA client, it compressed print data before send over the ICA channel and it also manages the ICA virtual channel for client print mapping.
- Both services, print manager and spooler, can be configured to automatically restart when needed.
- Printing preferences (user) and properties will be stored on the client device by default. If this is not supported they will be stored in the user profile within the server Operating System.
- Configure the ‘Printer properties retention’ policy to change this default behavior. You have multiple options.
- A printing pathway defines how print traffic can or will be routed throughout your environment. It also tells us where a job gets processed, spooled, rendered etc.
- There are two Citrix printing pathways, the client printing-pathway and the network-printing pathway.
- Besides these pathways there is also a setup named ‘Server local printers’, which is basically a physical print device directly attached to a XenApp server.
- With the ‘Server local printers setup’ spooling takes place locally from a client perspective.
- When using the client printing-pathway, application print output is spooled / rendered on the XenApp server (again, local from a client perspective) before it is send back (leveraging the ICA protocol) to the client device. From there the print job will be delivered to the physical print device.
- With the client printing-pathway the traffic send between the XenApp server and the client device is send over the ICA protocol, meaning it can be managed / compressed.
- When a (fat) client device has a local printer provisioned the client-printing pathway will always be used.
- When TCP/IP direct printers are added manually or by using / applying Group Policy Preferences, the printer is seen and treated as a locally attached printer. As such, print traffic will flow through the client printing-pathway.
- Thin client devices (often Linux based) do not support the client-printing pathway. They lack local printing capabilities. The network printing-pathway (session printers for example) will need to be used instead.
- The network printing-pathway will send the application print output from the XenApp server to the print server where it will be spooled / rendered. So spooling will take place remotely. From there it will send the print job to the physical print device.
- Using the network printing-pathway all traffic send between the XenApp server and the Print server will be uncompressed / unmanaged, non-ICA.
- When these machines are physically close together (fast LAN) this won’t be an issue. When, for example, the print server is located in the branch office and the XenApp server is located back in the data center this could form a potential problem. Think about your setup.
- The Universal Print Server can help compress / manage traffic send between the XenApp server and the Print server.
- When a client device has a network provisioned (print server) printer, Citrix will always try and route print traffic over the network printing-pathway.
- I say try, because if the print server and the XenApp server are in different domains and they are unable to communicate, the client printing-pathway will be used instead. The same applies when both machines are unable to communicate for other reasons.
- By disabling the ‘Direct connection to print servers’ policy, we can force the client printing-pathway to be used, even when network provisioned printers are leveraged.
- For example, print server in the branch office and the XenApp server in the data center, clients have network-provisioned printers (so network printing-pathway will be used by default). By forcing the client printing-pathway print traffic will be send back (from the XenApp server) to the client device leveraging the ICA protocol, from the client device to the print server, over to the physical print device.
- If both the XenApp server and print server are located in the datacenter, then do NOT apply / force the client printing-pathway. Traffic will need to travers the WAN / LAN multiple times, in an uncompressed format.
- Before anything, it’s important to understand the differences between both pathways and how they can, and by default will, be applied.
- There is no one size fits all, period!
- Keeping the XenApp and print server close together isn’t always the best solution.
- All this applies to XenApp as well as XenDesktop and isn’t IMA of FMA specific.
- The Universal Print Driver (UPD) is disabled by default.
- The UPD is installed as part of the VDA.
- There is an EMF as well as an XPS print file format UPD.
- EMF was first. It got introduced around 2005.
- The EMF UPD will be used by default. This can be changed through policy.
- Both the Universal Print Server as well as the Universal Printer use the Universal Print Driver by default.
- Ideally you would like to use the UPD exclusively. Remember, less is more!
- It can be used combined with native print drivers. In most cases this is necessary since the UPD only supports stapling and sorting as far as enhanced printing features go.
- Configure the system to use the UPD when no native print driver is available.
- The Universal Printer is a logical / generic object created at the beginning of a session. It will be mapped to the clients default printer but this can be changed to any printer known to the client device.
- When using the Universal Printer no print mapping / enumeration takes place, speeding up the logon / login process.
- The Universal Printer only works for Windows devices.
- It is potentially useful when the ‘Wait for printer to be created’ policy is used or when you need access to multiple printers, local & network.
- The Universal Print Server (UPS) consists out of a client (UPClient) and server (UPServer) component.
- Make sure to check the e-docs pages to see which protocols are used and which accompanying network ports need to be opened.
- Uses the UPD by default but can be paired with Windows Native print drivers, again, for more enhanced printing capabilities.
- It’s optimized for network printers and offers some additional compression and QoS options.
- It supports both EMF and XPS based print drivers.
- It also works for thin client devices and tablets, based on network (session) printers.
- The UPS does not support client side rendering / spooling. Meaning that all application print output will be send over to the print server (which has the UPServer component installed) right away, which will take over from there.
- All traffic send between the XenApp (UPClient component) and print server (UPServer component) can be managed / compressed when enabling the UPS.
- When installed it will be disabled by default. Needs to be enabled by configuring the ‘Universal Print Server enable’ policy.
- Network printer will leverage the UPS automatically through a process called auto-discovery.
- As of XenDesktop Tech Preview 3 (TP3) the Universal Print Server is fully supported on Windows Server 2012 (R2) as well as Server 2008 R2.
- It can handle up to 50 print jobs per minute, max.
- Recommended for remote office scenarios. Please note that testing will be necessary to see if educate compression ratios are achieved.
- Helps in managing a large amount of network printers.
- Can be used for proximity printing. The UPS is a prerequisite.
- The ICA protocol is build up out of multiple (32) virtual channels. Each virtual channel has it’s own purpose. There is also a printing virtual channel.
- ICA channels have different priorities, ranging from 0 to 3, with 0 being the highest / most important.
- The prio 0 virtual channels are also referred to as Thinwire (sound familiar)?
- The printing virtual channel, by default, has a priority of 3, the lowest. It’s treated as a background process.
- Virtual channel priorities can be changed by editing the accompanying registry key and changing the value number.
- Think this through. When giving more, or a higher priority to a specific VC it also means that you are taking away priority somewhere else.
- HKLM\System\CurrentControlSet\Control\TerminalServer\Wds\icawd\Priority is the registry key that goes with the printing VC.
- We can accelerate ICA traffic in general, including print traffic, by implementing a Citrix Cloudbrigde for example.
- Allocate / configure printing bandwidth through Citrix policies and apply them on a per user, per server or per Site basis.
- Use session (network) printers on fast(er) networks.
- Session printers are network printers that can be assigned and mapped to a specific user or user groups.
- With proximity printing session are filtered based on IP addresses or subnets (there are some more options). This way a user will always connect to the closest printer (UPS is needed).
- When dealing with slow printing remember that it’s not all about network bandwidth. Also check for congestion and latency.
- The ‘simpler’ the print driver the less traffic will be generated. Use vendor drivers only when specific functionality is needed.
- Last minute edition from the e-docs pages: XenApp and XenDesktop 7.6 FP3 includes an Always-On logging feature for the print server and printing subsystem on the VDA. In order to collate the logs as a ZIP for emailing, or to automatically upload to Citrix Insights Services, use the PowerShell cmdlet (Start-TelemetryUpload) supplied with the VDA installer in 7.6 FP3.
- Last updated: 15 May 2015. Citrix Printing Tool 3.1 helps configuring and troubleshooting the Citrix Printing subsystem on XenApp, XenApp Online Plugin, and XenDesktop.
- Last updated: 15 May 2015. Print Detective is an information gathering utility that can be used for troubleshooting problems related to print drivers. It enumerates all printer drivers from the specified Windows machine, including driver specific information. It can also be used to delete specified print drivers. It allows for log file capabilities and provides a command-line interface as well.
- Last updated: 13 November 2015: All purpose troubleshoot tool – Run Citrix Scout from a single XenDesktop controller (DDC) or XenApp server to capture key data points and CDF traces for selected computers followed by secure and reliable upload of the data package to Citrix Technical Support.
- Last updated: 31 August 2015. The Citrix UPS Print Driver Certification Tool can be used to test the compatibility of a print driver with the Citrix Universal Print Server.
- Last updated: 15 May 2015. Not sure? Test your print drivers thoroughly using StressPrinters.
- Check out Microsoft’s (MSDN) webpage to find out more about Print Driver Isolation.
- Release data: February 2012, primarily focused on XenApp 6.5: XenApp Printer Driver Manager. Manage your XenApp print drivers. Update the Automatic Printer Replication List with a GUI. Have a overview of what drivers are installed on what servers.
- A collection of Citrix troubleshoot and diagnostic tools. CtxAdmTools.
I hope you found this somewhat informative. Thanks for reading, downloading and hopefully sharing!






4 responses to “The ultimate Citrix printing internals cheat sheet! BIG Takeaway list included!”
great job Bas! Thank you!
Thank you. This is pretty informative..
Thank you. I’m glad you like it. Keep an eye out on basvankaam.com I’m working on a book project, which will include this type of information (and a lot more of course) as well. Again, thanks for reading.
[…] EMF and XPS. For these topics, I recommend you to read Bas van Kaam’s excellent publication: The ultimate Citrix printing internals cheat sheet (version 2.0 to be available […]