There are a couple of reasons why you might want, or need, to use multiple StoreFront stores. One example would be when dealing with a multi tenant environment and you want to be able to apply different configurations per store. You might have an external and an internal store, hiding certain recourses from your users. And what if you want to apply different authentication mechanisms, or you want to give certain stores and individual look and feel? As we can now easily do with StoreFront 3.0, or easier then before anyway.
Hiding resources
As you probably know, users within a Citrix XenApp and/or XenDesktop Site get access to published resources (applications and desktops) by adding them to a Delivery Group. By default, all members of a Delivery Group can see and have access to all resources made available as part of that Delivery Group.
For example, let’s say you publish ten applications and a desktop from a single Delivery Group, you than add 25 users to that Delivery group and as a result all 25 users will see and have access to all ten applications including the published desktop. Now this may, or may not be exactly what you were looking for but fortunately we have a few options to work around this.
Multiple Delivery Groups
For starters, we could configure a single Delivery Group per resource, or groups of resources and then add-in a subset of users per Delivery Group. This could work but there are a few things you need to take into account when choosing this approach. First of all, depending on your environment you might end up with a large number of Delivery Groups.
While this might help with delegated administration, it can also complicate day-to-day administration tasks.
Secondly, you need to be aware that a session host, where the desktop and applications actually run, can only be assigned to a single Delivery Group. So you might need some additional machines fro this to work, not a bad thing per see but worth mentioning.
Limited visibility
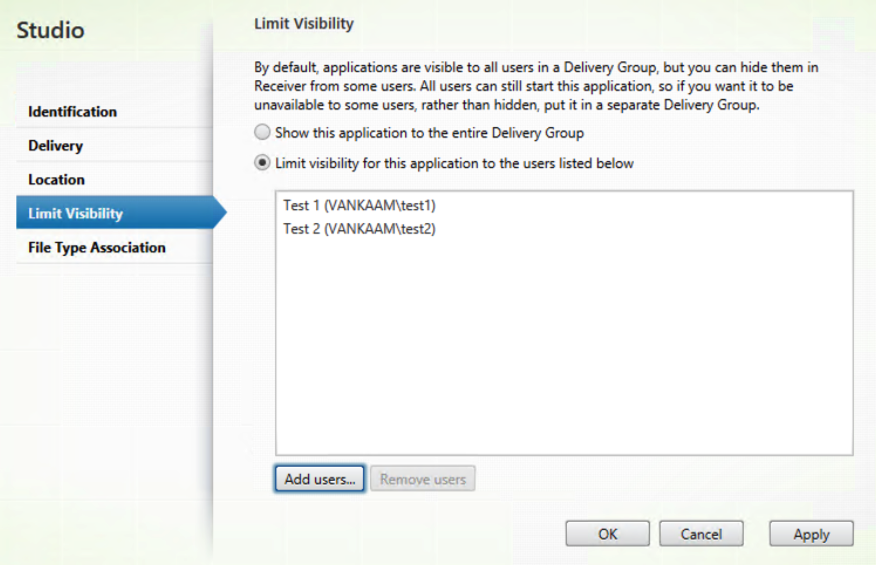
We could also use a feature called Limited Visibility, which is configured on a per application basis within a Delivery Group. It’s relatively simple to implement and if you have a look here, I’ll show and tell you how it’s done (including some nice extra’s). This way you can basically hide any application you would like and specify the users to which this configuration should apply. Just know that while the application won’t be visible from StoreFront, that doesn’t mean that it can’t be started from the actual Windows machine, it’s just hidden, that’s all.
Note that Limited Visibility only works for and applies to applications, you can’t use it to hide a published Desktop resource.
Before I continue
Here I would like to note that besides the above-mentioned methods you could also make use of so called Delivery Group Access Policies (NetScaler needed) and/or Exclusion Filters (PowerShell). However, both get applied at a Delivery Group level meaning they will hide (or show) everything part of that Delivery Groups, so it’s all or nothing.
This basically forces you to configure multiple Delivery Groups per resource, or groups of resources. Which most cases probably won’t be a problem, but if you only want to use a single Delivery Group this type of setup will not work.
A bit more complicated
With limited visibility we can hide applications on an individual basis, which is great, and works very well when using a single Delivery Group for both desktops and applications. The only potential downside to this is that these applications will also stay hidden when accessed from within the published desktop.
Example: when logging in externally we can hide all applications and only show the published desktop using Limited Visibility, applying it to all users. Although it isn’t really meant for that, it’s doable. However, when accessing that same store once we are logged into our Hosted Shared Desktop, these applications will still be hidden.
When using multiple Delivery Groups, as discussed, you can easily hide one Delivery Group, holding a bunch of published applications for example, from external users and another, with the Hosted Shared Desktop(s), when the store is accessed internally, by leveraging Delivery Group Access Policies and/or Exclusion Filters for example.
But again, let’s assume we only want to use a single Delivery Group to access our Hosted Shared Desktop(s) and a few published applications all from the same two or three session hosts, which isn’t that uncommon in smaller shops.
StoreFront SDK filters (PowerShell)
As a third option we can use the StoreFront SDK filters through PowerShell to hide our resources of choice. Now this one works a bit different as filters get applied on store level, though you can still control which applications / resources will be hidden on an individual basis.
Note that as apposed to Limited Visibility, the StoreFront SDK filters do work for both applications and desktops.
There are two types, filters based on recourse type (applications and desktops) or filters based on Keywords. However, you need to aware that once a resource is hidden, it will be hidden for everybody. You can’t configure it on a per user basis like we can with Limited Visibility.
For this to work you will first have to import, or load, the StoreFront SDK PowerShell modules onto the StoreFront server. Secondly you need to do the same for the XenDesktop PowerShell modules on you Delivery Controller. And finally, RemoteSigned Applications need to be enabled on both your StoreFront server as well as your Delivery Controller.
- In most cases the StoreFront SDK PowerShell modules can be found in C:\Program files\Citrix\Receiver StoreFront\Scripts, which is it’s default location. From here you need to run ./ps1
- To load the XenDesktop modules, open up a administrative PowerShell prompt and type: Add-PSSnapin Citrix*
- Configuring the so-called execution policy is done by, again, opening up an administrative PowerShell prompt and type: Set-ExecutionPolicy RemoteSigned and you are good to go.
To give you a quick example on how this might work. First go into Studio and give some of your applications, the ones you would like to hide, a Keyword. Next you open up an administrative PowerShell command prompt and type:
Set-DSResourceFilterKeyword –SiteID 1 – VirtualPath “/Citrix/Remote” –ExcludeKeywords @(“YouKeywordOfChoice”)
The SiteID refers to the Site Id giving to your Receiver for Web webpage in IIS, which will be ‘1’ by default, assuming you don’t have any other website on there already. The ‘VirtualPath’ points to your actual StoreFront Store. Note that you don’t have to include the ‘Web’ part here.
Now all this is great and there are some nice use cases for the above-mentioned feature, but again, if we would apply this using a single store, as with Limited Visibility, once a resource is hidden it stays hidden. So if we were to login remotely, we could easily hide all application based on Keywords or based on resource type, which would be applications in this case, so only the published desktop would be visible. But once we are logged onto that desktop and access that same store… that’s right, no apps.
(Re)enter the tale of two stores
An easy and straightforward way to remedy this is to create a second store. You could name them external and internal for example, or whatever works for you. This way we can hide all applications, as explained above, in the external store, leaving just the published desktop, and do the same only then vice versa for the internal store.
Hide the published desktop, only show the applications and perhaps use Limited Visibility to hide a few specific applications for certain users, if that is what you might need. Now I won’t call it a straightforward way of configuring things, but at least you have options!
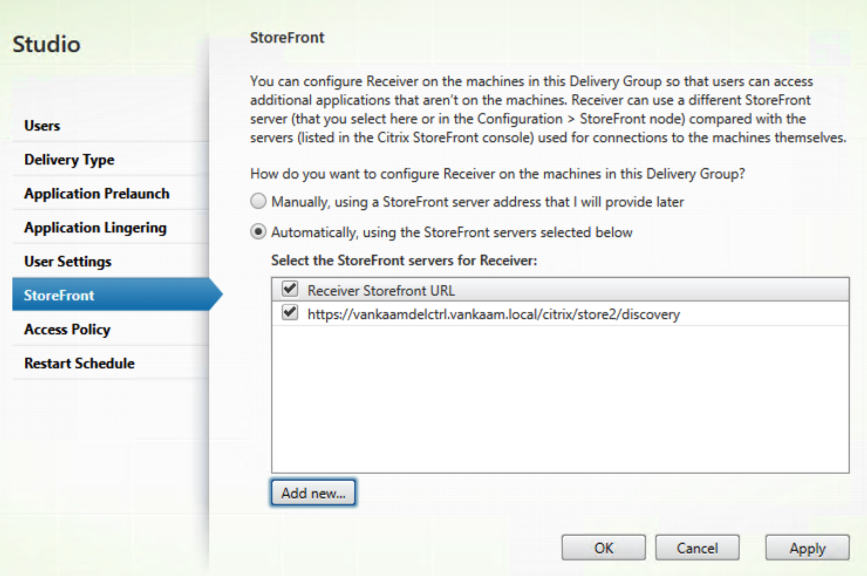
When configuring your Delivery Groups you can specify is you want to use it to publish applications, desktops and applications or just desktops. If you go with desktops and applications or desktops exclusively you will be ably to specify the StoreFront store to use within that published desktop, see below. Don’t forget to put in the /discovery at the end, otherwise it won’t work.
Note that you won’t be able to achieve the same result using Limited Visibility or Delivery Group Access Policies or Exclusion Filters for that matter. Even when using two or more stores. For one, Limited Visibility only works for applications, not desktops. Secondly, when applied it will always hide the application, no matter from which store you will try and open it. As with Delivery Group Access Policies or Exclusion Filters, using this approach the whole Delivery group will be, and stay, hidden, just as with Limited Visibility, sort of.
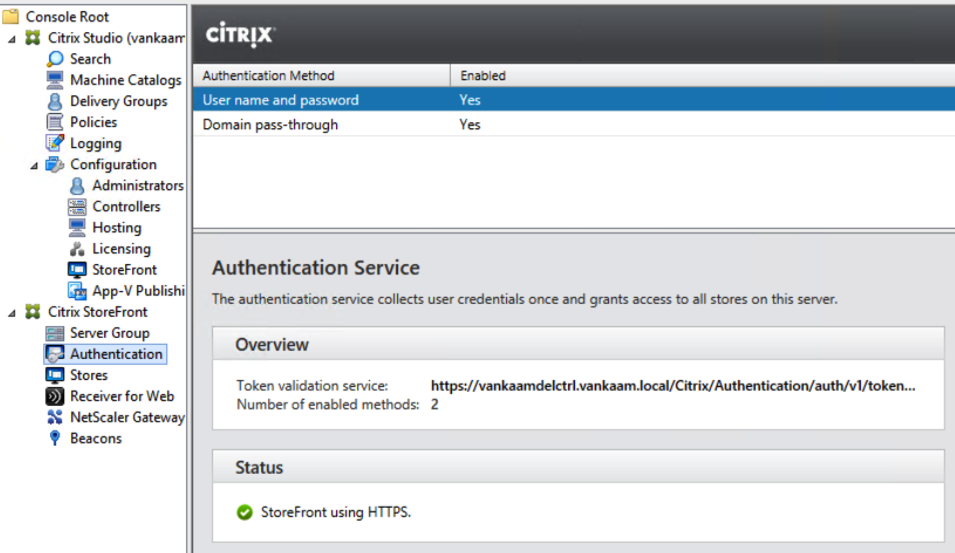
As mentioned, user authentication can be configured on a per store basis as well. To make this happen we must first need to enable, or add, the different kinds of authentication methods we would like to be able to choose from, which is done from the Authentication tab. Check out the screenshot below.
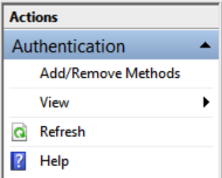
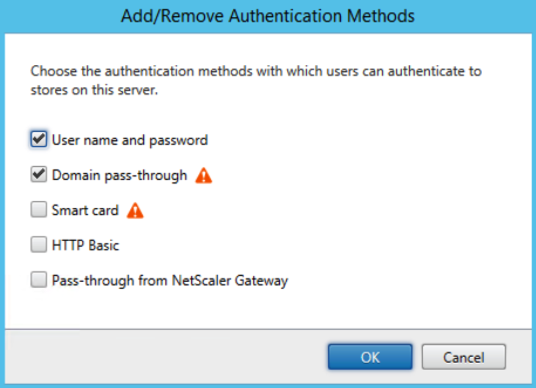
Here we click on the add/remove methods link at the top right-hand side of the screen, see the small screenshot shown above, in the ‘Action’ pane, under ‘Authentication’. You will end up with this:
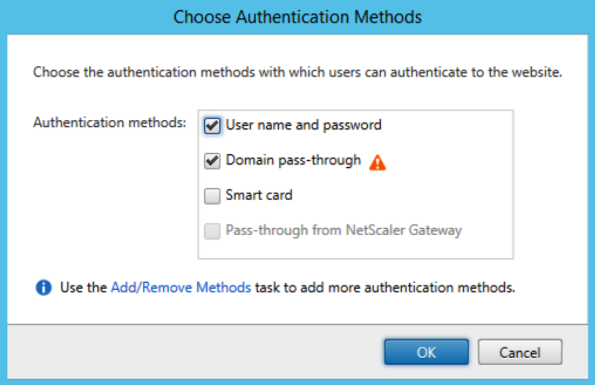
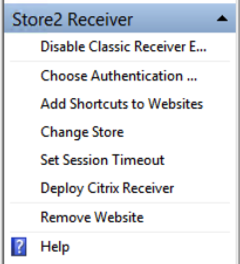 After selecting the appropriate authentication methods we can get a bit more granular and go to ‘Receiver for Web’ page, which you select on the left-hand side of the screen, to actually change the user authentication mechanism on an individual store basis. On the right-hand side of the screen, click on ‘Choose Authentication Methods’, next the below screen will pop up:
Select your user authentication method of choice and you’re good to go. Of course additional steps might be needed depending on the type of authentication you select, though this will be enough to get you started. Also, from a NetScaler perspective, when dealing with the NetScaler Gateway for example, you will be able to ‘bind’ a NetScaler virtual server to a StoreFront store. This offers some additional authentication methods, like two factor (token) authentication for example. Something I’ll discuss in one of my upcoming articles.
The visuals
Most companies spend a lot of time in (re) branding their websites and desktops (think wallpapers and screen savers) so it makes sense that they would want to do the same for their internal (and external) authentication pages and stores. Not that long ago Citrix introduced a new StoreFront 3.0 feature (in combination with the new X1 Receiver) named the Unified Experience.
This makes it really easy to visually adjust the main logon page as well as the so-called post logon page of the Receivers for Web webpage as well as the native Receiver stores. One of the things you need to do is to disable the Classic Receiver Experience on your Receivers for Web before enabling the Unified Experience on your native stores within the StoreFront console. I wrote an article on this a month prior to this one, explaining exactly what you need to do / configure. You’ll find it here.
It is named ‘Unified’ because using this feature ensures that the look and feel of you store(s) will be the same on every device no matter what type of OS it runs, as long as you use the latest Citrix Receiver combined with the StoreFront 3.0 platform.
And there you go
A few examples of how multiple StoreFront stores help you in achieving your goal. If you can think of a few more, do let me know, leave a comment. For now, I’d like to thank you for reading.



8 responses to “Citrix StoreFront… The tale of two Stores. Hiding, authentication and visuals!”
Hi Bas!
Do you know how to hide windows apps when user connect from mobile device using WorxHome through AppController? From inside apps should be visible.
That’s a good question. No I don’t to be honest. I’m on holiday at the moment, but when I find some time I’ll try and look into this. No Delivery Group configs in XenMobile / AppController (I saw you also posted your question on one of the Citrix Blogs I used as reference material as well), keywords I’m not sure, I don’t believe so (I don’t know my way around the XenMobile consoles that well so you probably know better than I do :) There has to be a way I’m sure. Please share any findings you might encounter before me.
Hi Bas, great article.
I just want to know if you configure an Authentication Method on a per store basis. Does this apply to the store as well or just the Receiver for Web store?
Hi Adrian,
Hopefully I’m interpreting your question the right way, but yes it does.
Regards,
Bas.
Thanks for the reply Bas. I will give it a try. I have two stores, and i need different authentication methods for each (Reciever Client) store. We don’t use the Receiver for Web. Thanks again.
Hello Bas
With the introduction of Storefront 3.5, is there a way to restrict login for a user to a specific store only? Like in a multi-tenant Citrix CSP environment. I want to service multiple tenants from a single Storefront server with their own unique stores (linking to separate delivery groups at the backend), and i want to ensure that users from each tenant can only logon to their own stores… any suggestions?
Hi, not sure to be honest. I haven’t had any time to dig in. I know about the Store Centric Authentication model (separate authentication methods on a per Store basis) but those were already introduced with SF 3.1. I assume that won’t be enough.
True.. i guess ill have to make do with it.. users will be able to login to other stores if they discover the URL but they wont get any resources…. Citrix really lacks any documentation on designing a CSP environment!