Citrix Studio is THE management console that allows us to administrate, configure and manage our XenDesktop and/or XenApp Sites from a single pane of glass. It also provides us with access to real-time data collected through the Broker service running on the Delivery Controller.
FMA fact: By default, Studio communicates with the Controller on TCP port 80.
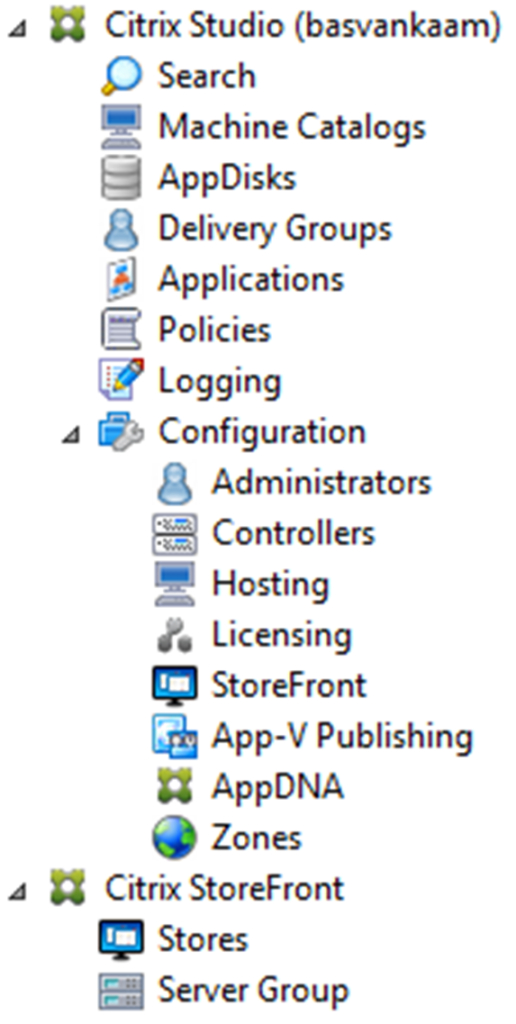
But it doesn’t stop there. From Studio you have full control over your entire Site and everything in it, including but not limited to Zones, Machine Catalogs, Delivery Groups, Delivery Controllers, XenDesktop and XenApp (Session Hosts) machines and a lot more. To give you a better idea of what Studio is all about, have a closer look at the screenshot below. After you have set up your primary Site (something you will always have to do first, assuming there isn’t one in place already) you would normally continue with a Machine Catalog closely followed by a Delivery Group and then on to configuring and publishing applications and/or desktops to your users.
The idea behind this project? Before commenting, read the introduction blog post here
Studio also allows us to integrate StoreFront and App-V, and it is also the place where we add and configure our Host Connection (underlying Hypervisor/cloud platform, or multiple), manage and initiate Machine Creation Services, set up delegated administration, and so on. And as you might know, most features are configured through policies, which are also available from Studio.
Made possible with the support of my sponsor IGEL
So you see there is quite a lot going on from a management perspective. That’s why I thought it might be helpful to go over each object or subject one at a time (as shown in the left-hand side of the Console Root three, see screenshot), starting at the top.
Again, this is meant to provide you with an overview of the configuration and management options you have using Citrix Studio, explaining a few concepts along the way. I am not going into all the ‘per component’ configuration details at this time.
FMA fact: While Studio takes care of most configuration and maintenance tasks, depending on your set-up, it doesn’t cover everything. If you are using Provisioning Services, you will still have a second, separate management console. The same applies to Citrix NetScaler.
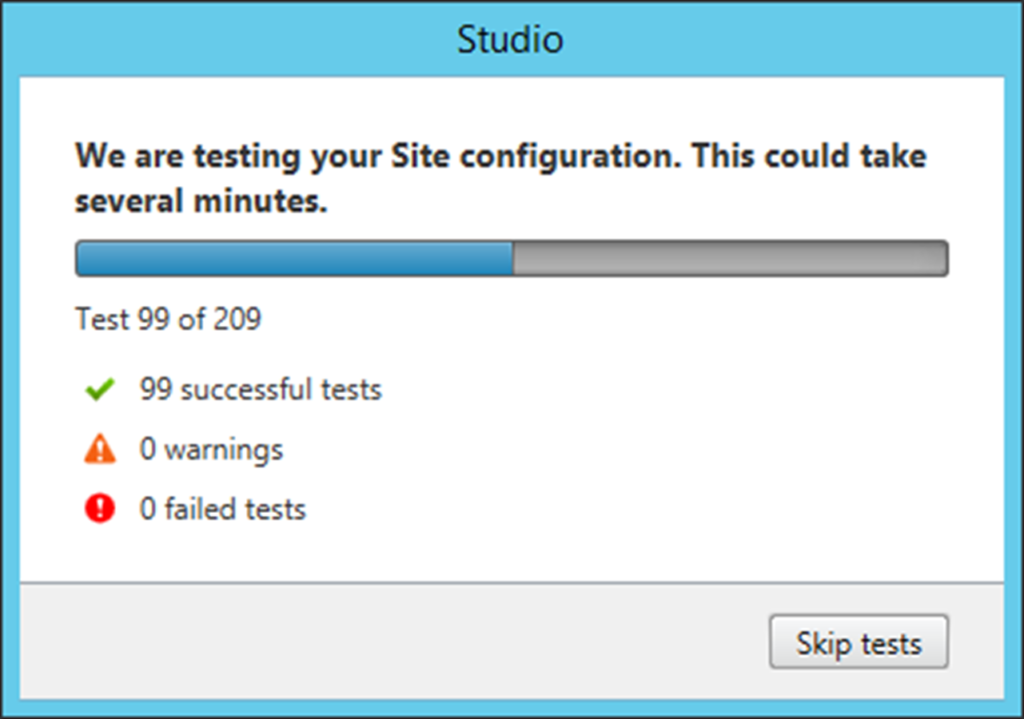
Next to configuring and maintaining our Site, Studio also allows us to execute some basic troubleshooting tasks. From Studio you can run several self-diagnostics tests on your Delivery Groups and Machine Catalogs, for example including a Site-wide test. Depending on the size of your Site, the number of machines, Delivery Groups, policies etc. this will take (at least) a couple of minutes. When done, it will let you know about any issues and/or errors that it might have encountered.
We also have the option to launch PowerShell directly from Studio, which of course is only helpful if you know your way around PowerShell, potentially helpful none the less. And while this isn’t directly related to troubleshooting, you can also use the built-in PowerShell functionality to auto-generate PowerShell scripts on almost everything you can do from Citrix Studio.
As mentioned, Studio is the place from where we configure and manage all, some, or most of our Citrix-related Site-wide policies (something that can also be done using the Group Policy Management Console, or GPMC if installed on your Delivery Controller, or on a separate management server for that matter. Note that for this to work you will also have to install Citrix Studio and the Citrix Group Policy extensions on the same ‘management’ machine). From Studio we have a couple of options we can use to help in the troubleshooting process, so have a look below:
- An overview of all settings available within all policies combined.
- We can configure filters to apply specific policies to specific objects.
- Policy comparison: by selecting one or multiple configured policies and/or templates you can compare the configured settings within the selected objects.
- Group Policy Modelling allows the user to simulate a policy deployment that would be applied to users and computers before actually applying the policies.
- Citrix Group Policy Modelling, specific to Citrix-related policies
Resultant Set Of Policies is only available when using the GPMC approach mentioned above.
We can see the current license usage and overall statistics; how many users are logged onto which machines and Machine Catalogs; we can restart and/or shutdown machines; send out messages to logged in users, and of course we have the ability to log off users if needed. Studio is also used to put machines, or Machine Catalogs, in maintenance mode.
Now that you have a basic understanding of what Studio is about, including some troubleshooting ‘first steps’, let’s continue with the one-by-one feature and concept explanation, following Studio’s console root from top to bottom.
Here we can search for machines, Catalogs, applications, sessions, plug-in versions, Operating Systems, Agents, Delivery Groups, users, IP addresses and so on; the list is almost endless. Searches can also be saved for later (re)use – a very handy feature to have.
Machine Catalogs
Catalogs are collections of virtual or physical machines from where we publish our applications and/or desktops. Catalogs allow us to manage groups of machines as a single entity. We can configure different Operating Systems per Catalog; however, only a single Operating System per Catalog is allowed. During the creation of a Machine Catalog, when adding machines, we also select the mechanism used to manage/provision our machines, which can be either by hand or by using MCS and/or PVS.
Citrix AppDisks are based on application-layering technology and available as of XenDesktop version 7.8. See the ‘Application Delivery’ chapter for more detailed information about application layering in general. AppDisks are created, managed and assigned directly from Citrix Studio; hence no separate management console is needed.
Delivery Groups allow us to assign resources to our users (also see Machine Catalogs two paragraphs back). To be able to create a Delivery Group you must first create one or more Machine Catalogs and at least one machine must be unassigned and free for use. When creating a Delivery Group we add one or multiple machines from a Machine Catalog (note that a machine can only be assigned to a single Delivery Group), we select the resources that we want to publish to our users, AppDisks and App-V-based applications included, and finally we add in the users who will have access to these resources. As with the Machine Catalogs and AppDisks, all management is done from Studio.
From here we can manage all of our published applications. We can add new ones or change and maintain existing ones. We can delete them, have a look at their properties, manage tags, do a search, move applications, rename or disable them and arrange them in folders to further simplify overall management. We can also see which applications are actually being used, if they are enabled or disabled, their source, installation paths, the groups they belong to, and by whom they can be administered.
A great deal of what happens within our XenDesktop / XenApp Site is configured through Citrix policies; the Policy node in Studio is where you will find everything needed to configure and manage your Citrix policies. As highlighted earlier, besides Studio, Citrix policies can also be configured and maintained from a central management server or Domain Controller using the GPMC. Within Studio you will also find seven predefined and configured policy templates; you can create your own template or simply configure policies on an individual basis. Policies and templates can be compared and policy Modelling is also optional from Studio. If you want to be able to do an RSOP you will have to use GPMC-based GPOs instead. Policies can also be exported if and when needed.
The configuration-logging feature enables us to track administrative activities within Studio, including the ability to create custom reports in CSV, HTML or both. It will track everything from image updates to Delivery Group creation and all that is in between. During the initial Site configuration, you can select where the database will be created.
While it will provide you with a Site overview when selected, and the ability to start or stop with the Citrix Customer Experience Improvement Programme, the configuration node is nothing more than a placeholder for some of the more advanced configuration options you have within Studio, which will be covered in the next few sections. By clicking on the Configuration node, new options and features will present themselves.
This is where we configure delegated administration within our Site. Delegated administration is based on three pillars: (1) Scopes, a collection of objects a user is allowed to administer like connections, Catalogs, Delivery Groups etc.; (2) an Administrator, the person responsible for executing the actual administrative tasks; and (3) Roles, a set of permissions which are granted to an administrator. These can be based on the built-in Studio roles or they can be custom-made.
Here we can see all of our active and non-active Delivery Controllers within our Site. Under the ‘Last Updated’ section it will state ‘0 minutes ago’ if everything is ok. This is because your Delivery Controllers will have a continuous connection with the Central Site database through a heartbeat mechanism where a heartbeat message is sent every 20 seconds, which has a default timeout of 40 seconds.
This is where we add, configure and manage our so-called Host Connection, or multiple. A Host Connection is nothing more than your underlying Hypervisor or cloud platform of choice. As you might have noticed at the beginning of the ‘The FMA, main components’ section, the Host Connection is also one of the nine main components that make up the FlexCast Management Architecture as a whole. In fact, it completes the list; needless to say, I will be covering Host Connections in the ‘Hosting’ section in more detail later on.
Citrix Licensing and the Citrix License Server are covered in detail in the ‘Citrix Licensing’ chapter. In Studio it will show us all of our active XenDesktop and/or XenApp licenses, when they will expire, the type of license (Evaluation, for example) and the model used: user/device, or concurrent, plus the Subscription Advantage date and if SA is supported (for example, it will show not supported when in Evaluation mode). You will also find the license server name, the port number used, how many licenses are actually in use and who is allowed to administer the licenses from within Studio. And last but not least, you have the ability to allocate and add licenses, change the license server and edit the product edition.
Here you can add an existing StoreFront deployment. This will allow you to configure the Citrix Receiver installed as part of the machines in your Delivery Groups when publishing hosted shared desktops. Do note that this will not enable StoreFront management from Studio, for this your StoreFront deployment will have to be added in separately.
Used for adding/removing Microsoft App-V Management and Publishing servers. Once done, you will be able to publish virtualized App-V applications. These applications will then be ‘streamed’ over the network using your App-V set-up of choice. Check out the chapter ‘Application delivery’ for some more detailed information on this. As of XenDesktop version 7.8 we now also have the ability to manually add App-V packages directly from Studio. In fact, all you have to do is fill in the accompanying UNC path and you are good to go, no further infrastructural App-V components needed. Ctxappvlauncher.exe will take care of everything.
Before XenDesktop 7.8 AppDNA was only available as a separate product (and it still is). It is now integrated into Studio, although it will still need to be installed as a separate product, in fact, it can be selected when installing or upgrading to XenDesktop 7.8. Citrix describes AppDNA as follows: AppDNA software simplifies the four key areas of application management: Discover application issues with sophisticated testing. Model application outcomes to determine the best plan of action. Automate application remediation and packaging processes. And finally, manage ongoing application evolution after the launch of the migration or virtualization project.
In short, it will tell you if your application is compatible with other applications and/or software you might already be using and the Operating System you would like to install it on. This includes locally installed applications, App-V packages, AppDisk packages, web applications etc. Eventually, it will tell you if any issues are to be expected and what you can do to remedy them. It also offers features like patch impact analyses, which works in sort of the same way. It can also automatically create MSI packages to be used in production environments instantly, a very handy and welcome tool to have in your tool belt: Platinum licenses only, though.
This is a feature that a lot of people have been waiting for. Zones are back! However, you need to be aware that these are not the Zones that we were, or are, used to with XenApp 6.5, or at least not yet anyway. Citrix already announced a phased approach when it comes to reintroducing Zones back into XenApp, which of course now also apply to XenDesktop – something we didn’t have before.
Zones originated in the IMA and worked quite well because of a feature/mechanism named Local Host Cache (LHC), which is available on every machine with the XenApp 6.5 bits and bytes installed (also see ‘Local Host Cache’). It basically caches all static IMA (Farm-wide) database information as well as any dynamic live runtime data with regard to server load, apps running, users connected, and so on. It will check in periodically with the central IMA database and update its cache when needed. Also, whenever a major configuration change on Farm level is made, all Session Hosts and Data Collectors will be notified so that their LHC can be updated right away.
Now as soon as the central IMA database becomes unavailable or unreachable for whatever reason, all machines would continue to function based on the contents stored in their LHC. Existing sessions will continue without any interruption and new sessions can be established as well. However, configuration changes to the Farm itself are not possible as long as the IMA database is down / unreachable. I am not saying it is perfect (the LHC can get corrupted), but it certainly offers some advantages when compared to the first few releases of the FMA, especially with regard to geographically separated locations.
FMA fact: Do not compare FMA-based Zones (7.x) with IMA-based Zones (6.5). There are some distinct differences between the two.
This is where Zones can help. Normally when we deploy multiple Sites these will need to be managed and maintained on an individual basis, meaning that for each Site you will have a separate HA SQL set-up holding all Site-wide configurations’ information, static as well as dynamic, as mentioned earlier. While the FlexCast Management Architecture offers multiple advantages over the Independent Management Architecture, it comes with a few challenges as well. For example, with the FMA the Central Site database still plays a key role, especially when dealing with multiple locations spread throughout the country, or globe even (remember that there is no LHC within the FMA). Of course, Connection Leasing helps but only up to a certain point. And while deploying and configuring multiple separate Sites, including an HA SQL set-up do help, it also makes managing these deployments much more complex.
Imagine having to manage and equally configure up to 5 separate Sites or more, setting up and configuring your Delivery Controllers, Host Connections, HDX policies, Delivery Groups, Machine Catalogs, SQL HA and so on; of course, this is not impossible but most certainly not desirable.
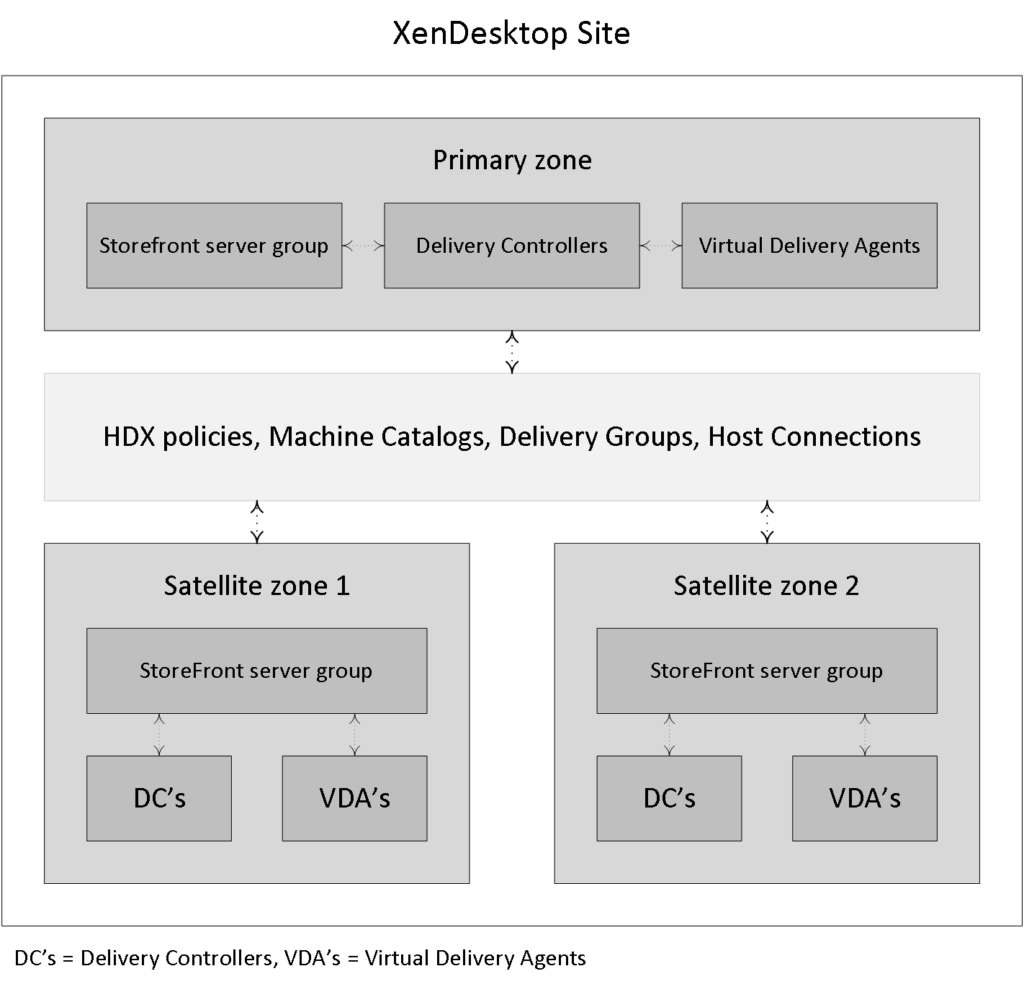
Zones give us the ability to configure up to ten satellite Zones under our primary Zone (which is also where our HA SQL set-up would live). From here we are then able to manage, maintain and configure all Zones, including our primary Zone as a single entity, or Site from Citrix Studio, requiring a single SQL HA set-up. Since all Zone-related static and dynamic data will also be stored in the same Central Site database there are a couple of prerequisites to consider before thinking about implementing and configuring Zones.
FMA fact: If the RRT to and from a satellite Zone is near or above 250 ms, a separate Site deployment, including an SQL HA set-up, is advised.
Also see Citrix’s blog posts on the new Zoning feature:
https://www.citrix.com/blogs/2016/01/12/deep-dive-xenapp-and-xendesktop-7-7-Zones/
When the FMA was first introduced, setting up and configuring separate XenDesktop Sites was basically the only way we had to service geographically separated locations.
This was mainly due to potential latency and congestion issues with regard to the Central Site database since all Delivery Controllers should be able to constantly read and write to and from the database. And while some changes have been made to minimize this SQL interaction, this also imposes some limits on the quality of the link between the satellite Zone and the primary Zone containing the database.
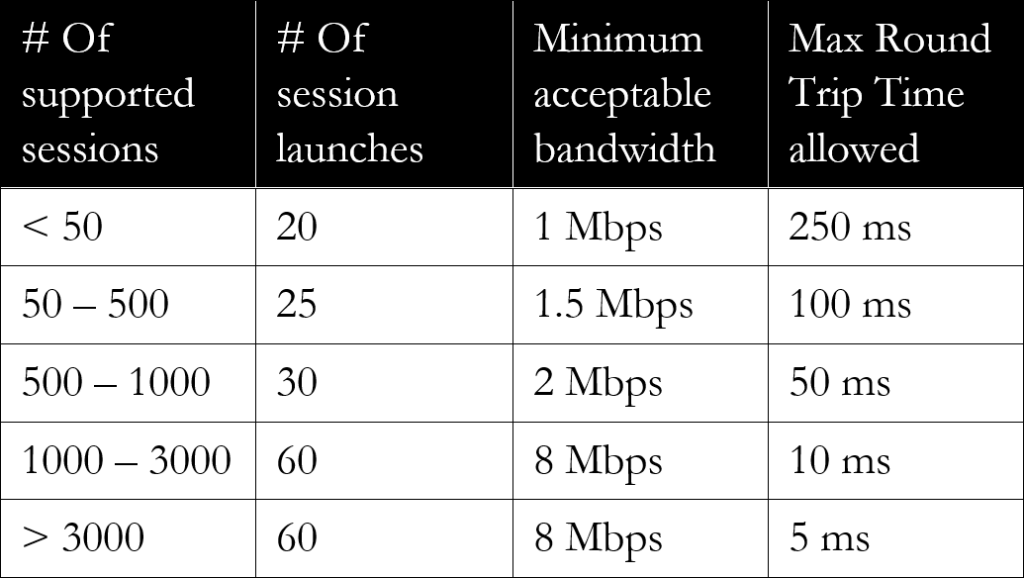
To back this up, Citrix released a detailed overview of the currently recommended connection quality limits regarding the connections between the locations that should be taken into account when setting up remote satellite Zones. The number of VDAs and user sessions in and from a satellite Zone also play an important role in determining the minimal bandwidth and RTT needed.
FMA fact: If you want to limit the number of brokering requests originating from a satellite Zone there is a Registry Key, which can be configured for this.
The above-mentioned Key can be found here:
HKLM\Software\Citrix\DesktopServer\ThrottledRequestAddressMaxConcurrentTransactions. It is set per Delivery Controller. If the key does not exist, then no limit on brokering requests will be enforced.
As highlighted earlier, when thinking about implementing satellite Zones there are a couple of prerequisites, pros, and cons that need to be thought through, I will list most here. Note that these will probably change over time: remember the phased approach mentioned earlier:
- If the RRT is near or above 250 ms, a separate Site is still advised.
- With (satellite) Zones, each Zone is basically a sub Site but without the need for highly available SQL Central Site database.
- You will (always) have one primary Zone/Site (it’s named primary by default but this can easily be changed) and optionally multiple satellite Zones.
- You can name the Zones anything you like, though the name must be unique within the Site itself. Just note that, while spaces in a Zone name won’t be a problem, you cannot use special characters.
- You can set up delegated administration specific to managing and maintaining Zones.
- Citrix Studio is configured only in the primary Zone and from there you will be able to manage each Zone independently from each other, policies included.
- When needed, you can publish Citrix Studio from the primary Zone to other Zones.
- This also applies to Citrix Director.
- Each Zone will have (at least) its own Delivery Controller, StoreFront server, NetScaler (optional) and of course one or multiple VDAs, desktop or server machines.
- Zones enable us to connect users to resources, which are closest to them, keeping traffic ‘local’.
- Traffic flows as usual (resource enumeration and launch) with the Delivery Controllers in the Zones directly communicating with the Central Site database and the license server in the primary Z
- So while you don’t need an HA SQL set-up within each Zone, as we would have with separate Sites, we still need to have at least one additional Delivery Controller and StoreFront server. Yes, one is enough, though this is not recommended.
- This set-up also means we still depend on Connection Leasing once the Central Site database becomes unresponsive or unavailable al And, although Connection Leasing might be a ‘nice to have’ feature up to this point, something tells me this will soon change.
- Delivery Controllers in the primary Zone will store leasing information for all Zones including the primary Zone while Delivery Controllers in the satellite Zones will only store leasing information for the primary Zone and their own Zone, not for any additional Zones.
- New features and functionality will first find their way into CWC (which includes both XenApp and XenDesktop as part of the Applications and Desktop service) before they become available in the on-premises products. The same applies to Zones: long before they became available within XenDesktop and XenApp they were first reintroduced and extensively tested within CWC.
- VDAs within a Zone automatically register with a Delivery Controller in their own Zone (preferred Controller). If none are available, they will attempt to register with a Controller in the primary Z When successful they will stay registered even if a Controller in the Zone it originated from becomes available again. There is no fallback mechanism, at least not today. When a Machine Catalog is moved from one Zone to another, all the registered VDAs will reregister with the ‘new’ Delivery Controller of that Zone.
- VDAs in the primary Zone can and will only register with a Controller in the Primary Zone.
- When a Zone Delivery Controller fails, another one in the same Zone will take over. If none are available, it will auto failover to a Controller in the primary Zone, which makes sense since a Zone’s VDAs will also register themselves in the primary Zone when no local (preferred) controllers are available.
- Make sure to keep your Machine Catalogs close to any host connection they might be using. You can add one or multiple host connections per Zone if needed/desired.
- Provisioning services is not ‘Zone aware’. Configure the Machine Catalogs by hand using Citrix Studio. If you let PVS handle this, the Catalog(s) will be created in the primary Zone by default.
While Zones might not be the Zones we had, or have with XenApp 6.5, we now have Zones for XenDesktop as well, which we didn’t have before!
Zone quality connection limits
- Citrix Studio is THE management console that allows us to administrate, configure and manage our XenDesktop and/or XenApp Sites from a single pane of glass. It also provides us with access to real-time data collected through the Broker service running on the Delivery Controller.
- Studio also provides us with a range of basic troubleshooting tools and options.
- While Zones are not a new concept, you need to be aware that Zones within a 7.x deployment are not the same as with XenApp 6.5 – not yet anyway. There are some distinct differences between the two, as we have clearly seen in this chapter.
- Citrix is working on a phased approach with regard to the reintroduction of Zones; needless to say, this is phase one.
- Zones in the FMA still depend on the Central Site database: there is no LHC.
- The main focus of this first releases is to simplify overall management and keep traffic local.
- Make sure to keep an eye on the RTT between Zones; it needs to be below 250 milliseconds; less is more in this case. Consult the table for recommended values.
