Within a XenDesktop Site, you basically have two points of authentication, one of which is StoreFront, and the other the NetScaler Gateway. The StoreFront server communicates with Receiver, the Delivery Controllers and the NetScaler (STA) when users are authenticated externally.
Next to the above StoreFront can be configured to communicate with App Controller as part of a XenMobile deployment, and/or VDI-in-a-Box is also (still) optional. Like the Delivery Controller, StoreFront also plays an important role in the application enumeration and resource launch process and it functions as the main Store (there can be multiple) from where users (can) subscribe to their desktops and applications.
FMA fact: While XenDesktop and XenApp both support Web Interface (EOL June 2018) Citrix recommends using StoreFront for new as well as existing deployments. It is built for the future and as such has a whole bunch of additional features not available in Web Interface.
User authentication
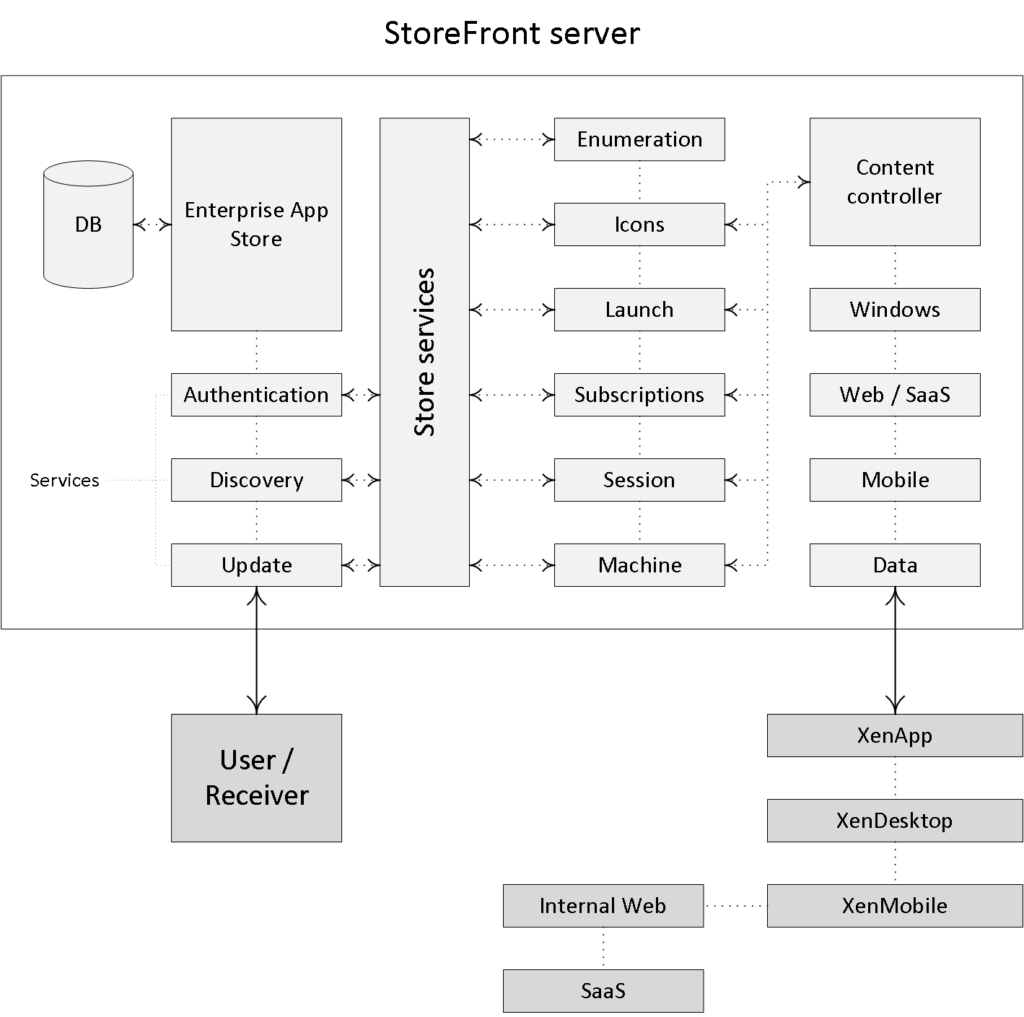
With StoreFront, users are authenticated by the authentication service, which is an integral part of StoreFront. Users can authenticate to StoreFront using different methods: usernames and passwords, Domain pass-through, NetScaler pass-through, using smart cards, or by enabling unauthenticated user access.
The idea behind this project? Before commenting, read the introduction blog post here
As soon as a user logs in by filling in his or her username and password (on the StoreFront web page using the Receiver for website configuration or using a locally installed Citrix Receiver) the StoreFront authentication service will pick up the user credentials and authenticate them with a domain controller. Here the configuration of Kerberos delegation is also optional.
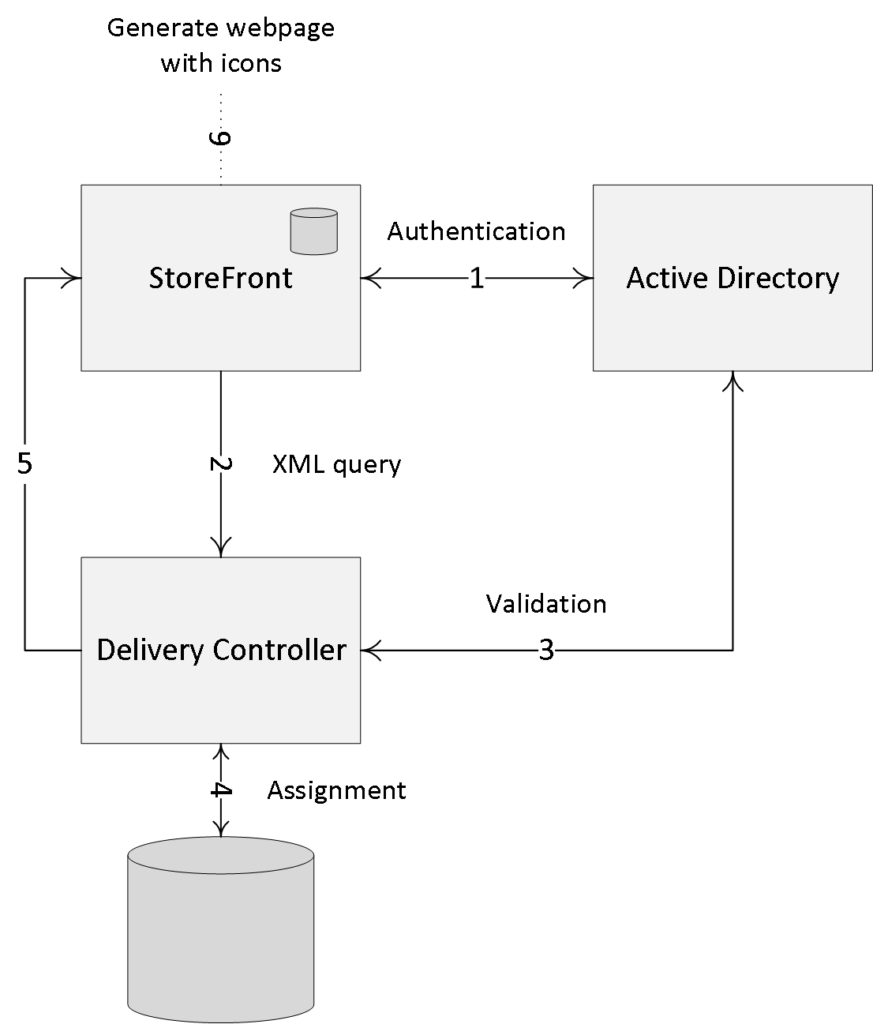
Once authenticated(1), StoreFront will forward the user credentials, as part of an XML query to one of the configured Delivery Controllers(2), assuming you configured at least two of course. In between, StoreFront will check its local data store for any existing user subscriptions and stores them in memory.
The Delivery Controller receiving the credentials will again contact a domain controller, this time to validate the user’s credentials before responding to the StoreFront server(3). During step (4) the Delivery Controller will check with the Central Site database to see which resources have been assigned to the user and send them over to the storefront server (5).
Next, StoreFront will generate a webpage displaying all the resource icons(published applications and desktops) to the user (6). Here I assume that authentication is taking place internally and directly to StoreFront. See the graphical overview below for some more details.
FMA fact: Note how I mention user authentication and user validation. There is a difference. Authentication is to make sure that somebody is who he or she claims to be. Verification is done to find out which resources are assigned (permissions) to the user
WebInterface
If we look at Web Interface, user authentication works a bit differently, it has no internal authentication service. When a user logs in by filling in his or her username and password, Web Interface will immediately forward these credentials, as part of a so-called XML query, to a Delivery Controller where a domain controller will be contacted to authenticate the user before responding to the Web Interface server.
As before, Web Interface can also authenticate users to, and enumerate and aggregate resources from, multiple XenApp Farms and XenDesktop Sites, not App Controller, though.
But wait: as of StoreFront 3.0, Citrix reintroduced XML-based authentication. By simply running a few PowerShell scripts user authentication falls back to the XenDesktop / XenApp XML service, like with Web Interface. Useful when StoreFront is not in the same domain as XenDesktop / XenApp or when it is not possible to set up an Active Directory trust. Again, this method will be disabled by default: at least now you have options.
Made possible with the support of my sponsor IGEL
The StoreFront server plays a vital role when it comes to user authentication, resource enumeration, and launch. If there is no StoreFront server available your users will be unable to launch any resources (as an exception, although not recommended, a direct ICA connection would work and doesn’t need StoreFront). That is why you will always deploy at least two StoreFront servers per Site. By implementing a load-balancing solution, like a NetScaleror Windows NLB, for example, your users won’t notice a thing when one or multiple StoreFront servers become unavailable.
To be able to provide your users with desktops and applications, StoreFront must be configured with at least one Delivery Controller (FQDNor IP address). Since ‘one is none’ as we’ve learned earlier, we will always make sure to configure at least two Delivery Controllers for HA purposes. In the case of a Delivery Controller failure, StoreFront will automatically fail over to the next Delivery Controller in line; this results in an active/passive configuration.
Within large organizations, where the logon load is higher than average, an active/active approach might be a better fit. This can be accomplished by implementing a load-balancing device like the Citrix NetScaler, or you can choose to let the StoreFront server load balance the connections to the Delivery Controller instead.
Up to StoreFront 3.5 you will have to manually edit the web.config file for this, locate the following line: <farm name=”XenApp” xmlPort=”80″ transport=”HTTP” sslRelayPort=”443″loadBalance=”on” farmType=”XenApp”>
Change ‘loadBalance’ to either “on” or “off”.
As of StoreFront 3.5, the above can now be configured by simply placing a checkmark directly from the GUI, you’ll find it under ‘Manage Delivery Controllers’. As far as I know, the built-in LB mechanism used for this is based on RRDNS technology, or at least the result is similar.
Resource enumeration and subscriptions
When a user logs in for the first time, meaning that there are no active and/or disconnected sessions lingering around somewhere, and right after the user is authenticated the resource enumeration process kicks in and will eventually show the user its assigned resources. That’s why the user authentication process and resource enumeration basically go hand-in-hand.
When users log in externally, through a NetScaler Gateway, for example, the StoreFront server and the NetScaler will also exchange vital information like user authentication details, the resources a user is allowed to launch and more. Throughout the ‘User login process’ chapter these steps will be discussed in great detail.
Note that (by default) when using StoreFront, users will first have to subscribe to their resources before they will show up on their main home screen (assuming the Receiver for Web approach with an unconfigured Citrix Receiver is used). Using Keywords, Administrators can pre-subscribe users to certain core applications prepopulating your user’s home screens when logging in for the first time. This also works for assigned Desktops. This approach is referred to as ‘Self Service Store’, which can be disabled from the GUI.
You can use the Keyword: AUTOon a resource of choice so that it will automatically show up in your user’s home screen when they log into the Receiver for Web web page.
This is something that can be configured in Studio: simply open up the configuration details of your application and fill in your Keywords of choice. Multiple Keywords can be used at the same time. Other Keywords include: PREFER, FEATURED, PRIMARY, MANDATORY and more.
FMA fact: Note that besides the Receiver for Web approach, where users log into StoreFront by means of a web page, you can also configure your Citrix Receiver in self-service mode. This way your users will be able to subscribe to their resources directly from the local Citrix Receiver interface. See the ‘The Citrix Receiver’ section for some more detailed information.
When a user subscribes to a resource this information (also referred to as application subscriptions) has to be stored somewhere. Otherwise, users would need to subscribe to the same resources over and over again before they would be able to launch it each time they log in.
Prior to StoreFront 2.x, we needed a separate external database to store all StoreFront-related information: luckily that is no longer the case. StoreFront now uses the Windows Extensible Storage Engine to locally store and index the user subscription information. This is the same technology used by Microsoft Access and Exchange.
FMA fact: Besides using Keywords, as of Citrix Receiver 4.2.100 you can also integrate application and desktop shortcuts into your user’s Start menus or put them onto their desktops, with no resource subscription needed.
StoreFront servers are grouped together in server groups, and all information stored locally on a StoreFront server, as explained above, will be automatically replicated on a peer-to-peer basis to other StoreFront servers within the same server group. This way, a user resource subscription is made highly available.
If your users connect to multiple StoreFront servers residing in different StoreFront deployments, or server groups, and they are able to access similar applications and/or desktops within these deployments, then you might want to consider implementing something called subscription synchronization. This will ensure that all StoreFront servers in both or multiple deployments will exactly know which applications and/or desktops the user is subscribed to, so they won’t need to subscribe to an application again when logging onto one of the other deployments.
You can configure periodic synchronization of users’ application subscriptions between stores in different server groups. However, for this to work, all stores need to have the same name and all server groups must reside within the Active Directory domain containing your users’accounts or within a domain that has a trust relationship with the user accounts’domain.
It is important to note that each store within StoreFront–since you can configure as many as you would like–will have its own datastore where user subscription information will be stored and each subscription datastore is updated independently from each other store.
The same holds true for internal and external access to resources. It is not uncommon to create two separate stores within StoreFront, one for internal and one for external access since different configurations might be preferred. This also implies that for both stores the users’resource subscriptions would need to be stored twice, once for each store.
This also means that your users will have to subscribe to a resource twice, depending on which store they access, internal or external (remember that each store will have its own datastore where user subscription information will be stored). Luckily, we can configure two stores to share a common subscription database.
This is done by manually editing the web.config file (this is the StoreFront configuration file). This way it does not matter if the user logs in externally or internally, his or her subscriptions will be the same.
StoreFront Multi-Site configurations
Another great addition to the StoreFront family is the ability to configure multi-Site configurations. As mentioned earlier, with the FMA your central SQL database is probably one of the most important components of your infrastructure: if it’s down (without Connection Leasing in place) your Site won’t accept any new connections and you won’t be able to make any configuration changes (as with the IMA).
Of course, there are ways to implement additional SQL high availability, like SQL Clustering, Always-On and mirroring, for example, but what if that particular Site becomes unresponsive for other reasons? It happens. Then an alternative or additional Site would be a good thing to have in place, to say the least. Having multiple Sites, for load balancing as well as HA purposes, is always optional.
FMA fact: Going forward, StoreFront multi-site configurations will be a lot easier to configure and implement. Most functionality will be built into the Graphical User Interface of StoreFront.
You may also want to point or map your users as close to their physical data (center) or Site as possible, as we can do with the IMA (XenApp) Zone preference policies. Or perhaps you’d like to configure and assign a (non-active) recovery Site, in case of a disaster?
Because of the change in architecture as far as RDSH solutions are concerned, we will need to rethink our designs when it comes to the FMA vs. the IMA and the replacement of Web Interface with StoreFront. But don’t worry, it’s all (still) there, even without multiple Web Interface / StoreFronts and/or NetScaler(s) configured, although this is probably a set-up which we won’t see that often.
By default, StoreFront will enumerate all resources it can find from all Sites and Farms (remember that with XenApp 6.5 and earlier, Sites are referred to as Farms) configured. These can come from XenDesktop, XenApp and/or VDI-in-a-Box Controllers. So, when we add an extra set of Delivery Controllers from another (load balance, failover or recovery) Site it will automatically enumerate any resources your users will have access to.
Not a bad thing per se, but this will also mean that if an application and/or desktop is available from multiple Sites your users will see an icon for each resource, meaning double icons assuming you have proper permissions on both Sites, that is. This is where Multi-Site configurations, and its aggregation capabilities, come in.
Here I will assume that at least two sites or more are configured. I’m mentioning this because some of the features discussed can also be applied on single Site / Farm configurations.
FMA fact: A XenApp Farm (6.5) or XenDesktop / XenApp Site (7.x) is also referred to as a ‘Deployment’ by Citrix. Especially if you spend some time on their E-docs pages you, will see this term a lot.
Within a StoreFront Multi-Site configuration, when a desktop or application is available from multiple Sites and/or Farms, StoreFront can aggregate all instances of that particular resource and present it as a single icon. For this to work, deployments do not need to be identical per se, but the desktops and/or applications do need to have the exact same name and path on each server: all other configured characteristics need to match as well. Note that XenMobile App Controller applications cannot be aggregated. This comes from the Citrix E-docs website:
When a user starts an aggregated resource, StoreFront determines the most appropriate instance (Delivery Controller) of that resource for the user on the basis of server availability, whether the user already has an active session, and the ordering you specified in your configuration. Now that’s smart, right?
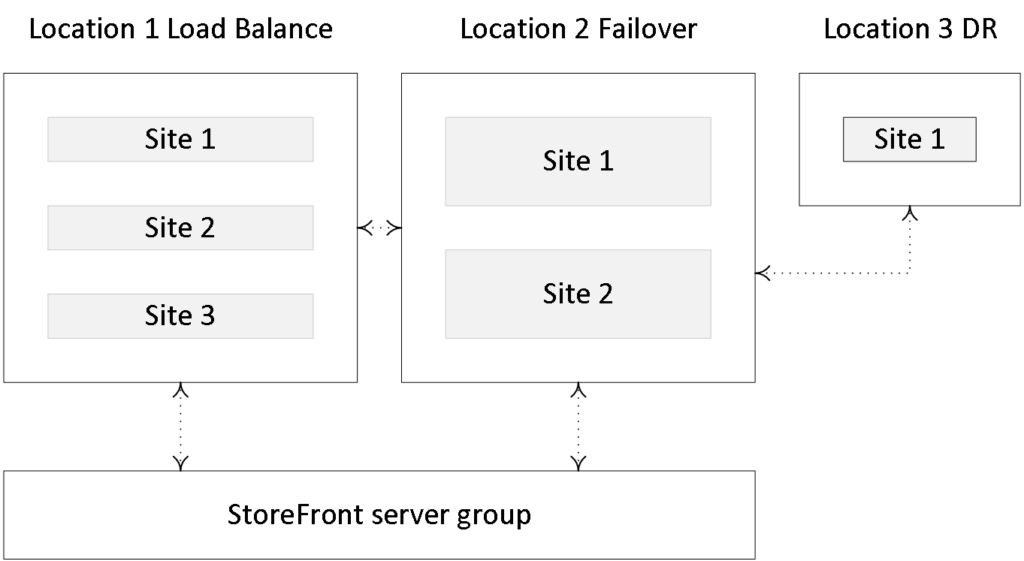
Besides resource aggregation, Multi-Site StoreFront configurations also let us set up highly available deployments. We can configure load balancing, failover or a (non-active) disaster recovery site. You also have the ability to set up something called User Mapping.
This basically means you can set up access to a specific deployment (Site) based on certain user memberships of Microsoft Active Directory groups, like the good old Zone preference policies if you will. This allows you to create multiple Sites, or deployments, offering different resources, still all aggregated through the same Store, simply by adding multiple Delivery Controllers. However, your users will only be able to see what their permissions allow them to.
Another example would be to create two (it can be more, of course) identical Sites and configure one group of users to always connect to Site A, and another group of users to always connect to Site B. This way Site A can also function as a failover Site for Site B and vice versa. Preferably you’ll use at least two separate StoreFront servers, one (or more) per Site. Again, all users will need to have permissions on the same resources, applications and/or desktops at both Sites.
In a multi-site configuration, StoreFront will aggregate all instances of a particular resource from all configured Sites/deployments and will present this to the user in the form of one single icon, so no issues there. Of course, this set-up would also work without user mapping configured, although then it would be active/passive instead of active/active unless you have 2 or more StoreFront servers in combination with a NetScaler configured. Active/passive would also mean you can do with just one StoreFront server if you like.
This same set-up (although configured differently) could also be used to load balance connections between multiple Sites. Instead of contacting one of the ‘extra’ Controllers for redundancy purposes, connections will be randomly spread across the configured controllers, evenly distributing the load, again using just one StoreFront server, although you could, and probably should use more, at least two.
Finally, we have the option to configure and set up something called recovery sites (deployments). A Recovery Site is basically just another XenDesktop / XenApp Site, but it sits idle (passive) until it is called upon. This will happen as soon as all primary Sites, which can be any number from one and upwards, become unreachable.
StoreFront multi-site configuration
Prior to StoreFront version 3.5 all of these features needed to be configured manually within the web.configfile (the StoreFront configuration file) which isn’t all that straightforward. Luckily, Citrix stepped up and with the release of StoreFront 3.5 and onwards some of the abovementioned options are now available right directly from the GUI, like User Mapping and resource aggregation, for example, and more will follow going forward.
The optimal NetScaler Gateway route
If your deployments (Sites) each have a separate NetScaler configured, then StoreFront enables you to define the optimal or preferred NetScaler appliance for users to access each of the deployments.
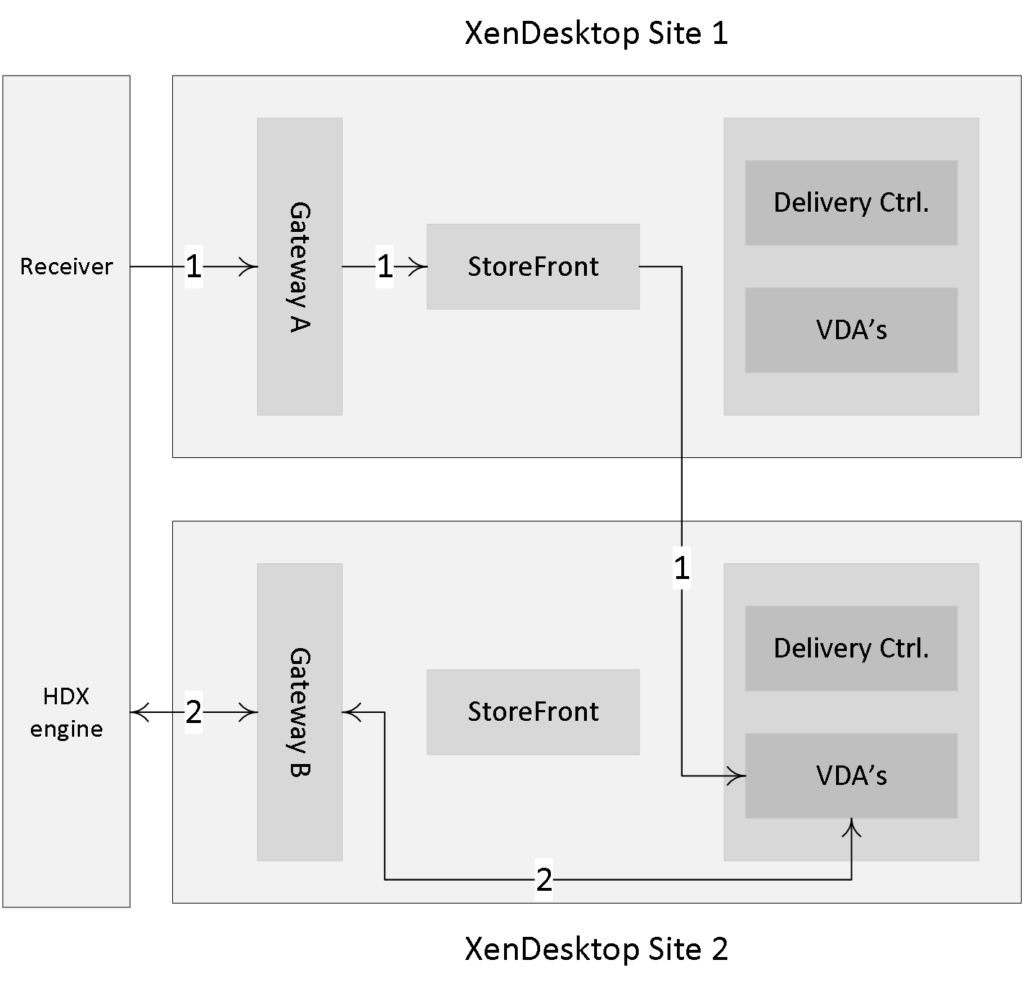
If you create a store that aggregates resources from two geographically separated locations, each with a NetScaler Gateway appliance configured, then users connecting through a Gateway in one location can start a published resource in the other location.
However, by default, the connection to the resource is then routed through the Gateway to which the user originally connected and must, therefore, traverse the corporate WAN. With Optimal NetScaler routing we can change this behavior.
Besides the above, you can also use NetScaler to load balance the connections made from your StoreFront server to your Delivery Controllers, and the same can be done from your NetScaler to multiple StoreFront servers that you might have: the combinations are endless, so to speak.
FMA fact: We can use the Optimal NetScaler Gateway routing feature to route the user’s ICA traffic through the NetScaler most applicable (the one connecting them to their XenDesktop Site in the case of a multi-site deployment) to the user, even if the initial connection was made through another NetScaler.
To be able to contact Citrix StoreFront and to view, subscribe to and/or launch resources you will need to have access to a Citrix Receiver. By default, when you try to log into a StoreFront web page (Receiver for Web) your local system will be checked to see if a supported version of Citrix Receiver is installed, and if not, you can download and install one directly from the StoreFront web page. See the section titled ‘The Citrix Receiver’ for some more details on installing and configuring Citrix Receiver. However, installing the Receiver software is not always possible or allowed.
For this reason, StoreFront also has anHTML5-based Receiver built-in, so that even when you do not have a Receiver locally installed you will still be able to contact StoreFront, enumerate and launch your personal resources. This is referred to as clientless access, and it can also be used as a fallback mechanism if for whatever reason your locally installed Receiver does not work properly or fails completely. Basically, we have three ways to get to our resources; however, they all include the Citrix Receiver one way or the other.
- We can have the Citrix Receiver installed locally. You would then need to fill in your email address (when email-based account discovery is enabled), make use of a pre-configured provisioning file, or manually enter a URL pointing to your StoreFront deployment. Both will need to be provided by your IT department. Note that you will have to use HTTPS for this to work.
- Secondly, we can use the so-called Receiver for Website approach. Here we create a Store accessible using our Internet browser of choice to log into a StoreFront Store. As mentioned during logon your local system will be checked for a supported Citrix Receiver installation and you have the option to install Citrix Receiver from the StoreFront login page if needed or desired.
- And third, since installing software, including Receiver is not always possible or allowed; the previous step could be skipped. You would then contact StoreFront using the built-in HTML5-based Receiver. However, this needs to be enabled on the Receiver for Web section withintheStoreFrontmanagement console; it is not enabled by default. Next to this, you will also have to enable and configure ICA WebSockets through Citrix policies using Studio for example. The same applies to your external users connecting through a NetScaler, a separate HTTP Profile with WebSockets enabled(disabled by default)will need to be When using Provisioning Services these policies will need to be applied at vDisk level.
Internal communication from your web browser or Citrix Receiver to StoreFront will initially contain user credentials, passwords included. When you allow users to log in remotely, to work from home, this same information will need to traverse the insecure Internet. It is therefore recommended to secure and encrypt all traffic using SSL (Secure Sockets Layer). To enable secure remote access, a NetScaler is the recommended approach.
To set up communications using SSL trusted certificates must be installed on all Storefront servers, as well as the NetScaler’s. For companies with high-security standards, the same can be done for traffic sent between your StoreFront servers and Delivery Controllers. You could even take it one step further and also secure traffic sent between and from all installed VDAs. Although this does require some planning and additional work/maintenance, it can certainly be done.
As of version 7.6, SSL has been integrated into the core of the Citrix VDA, making it a lot more straightforward to enable on all machines and connections. This works for XenDesktop as well as XenApp and for persistent as well as non-persistent desktops. There might be a slight performance impact, but it should be negligible.
Beacon-based Receiver connections
Citrix Receiver, combined with StoreFront, uses beacons to determine if a connection is made internally or externally and routes the connection accordingly. In simple terms, beacons are nothing more than basic URLs used by Receiver to determine its location.
When a connection is made, Receiver will try and contact the beacon points (URLs) to determine where the connection originated. It will start with any of the internal-configured Beacons and then move over to external, assuming no match has been found.
Depending on the outcome, the location information will be forwarded to the server providing the actual resources, and the connection will be routed either externally, through the NetScaler Gateway, or internally using StoreFront.
All this makes it much simpler for your users to access their resources. For example, you don’t have to configure two separate URLs for your users to remember, one for internal access and for external access: StoreFront and Receiver will figure this out for you. And if you applied the earlier mentioned email-based discovery feature, all they will need to do is download Receiver, fill in their email address and they are good to go.
FMA fact: By default, StoreFront will use your internal services URL as an internal resolvable Beacon point and it will use Citrix.com as the external Beacon point. But you can change them to whatever you like. Just make sure that your internal Beacon is not resolvable externally.
XenApp Services URLs
Users who are unable to upgrade to Citrix Receiver even today can still access StoreFront stores simply by configuring a XenApp Services URL on a per store basis (see the StoreFront documentation for more details on how to configure and enable). If needed, this also works for domain-joined desktop appliances and repurposed PCs running the Citrix Desktop Lock. When you create a new store, the XenApp Services URL for the store is enabled by default.
While XenApp Services URLs are meant to help out users who are unable to upgrade to one of the latest Citrix Receiver versions, they do come with some drawbacks that you need to be aware of. These come from the Citrix E-docs pages:
- You cannot modify the XenApp Services URL for a store.
- You cannot modify XenApp Services URL settings by editing the configuration file, config.xml.
- XenApp Services URLs support explicit, domain pass-through, smart card authentication, and pass-through with smart card authentication. Explicit authentication is enabled by default. Only one authentication method can be configured for each XenApp Services URL and only one URL is available per store. If you need to enable multiple authentication methods, you must create separate stores, each with a XenApp Services URL, for each authentication method. Your users must then connect to the appropriate store for their method of authentication. For more information about configuring user authentication to XenApp Services URLs, see Configure authentication for XenApp Services URLs.
- Workspace control is enabled by default for XenApp Services URLs and cannot be configured or disabled.
- User requests to change their passwords are routed to the domain controller directly through the XenDesktop, XenApp and VDI-in-a-Box servers providing desktops and applications for the store, bypassing the StoreFront authentication service.
Users with non-domain-joined desktop machines can access their desktops through something called Desktop Appliance sites. Non-domain-joined in this context means devices that are not joined to a domain within the Microsoft Active Directory forest containing the StoreFront servers. Just as with the XenApp services URL, when you create a new store for a XenDesktop deployment using Citrix Studio, a Desktop Appliance site is created for the store by default.
However, be aware that if you are connecting through a NetScaler Gateway, you will not be able to access a Desktop Appliance site. External connections from outside the network are not supported, period. Also, make sure you have the right version of Receiver installed. And, as always, more details can be found on the Citrix E-docs pages.
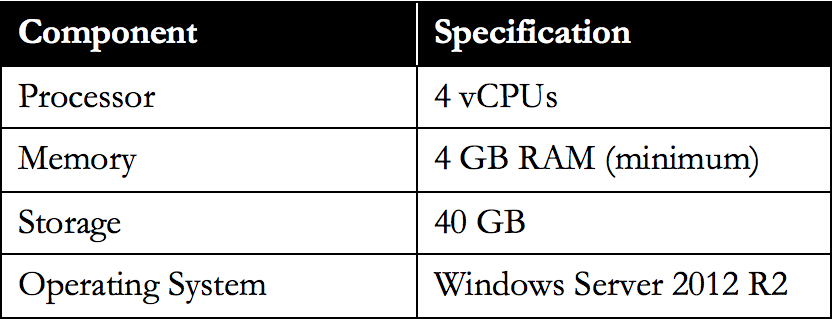
The number of simultaneous activities a StoreFront server can handle depends on the number of resources assigned to a user, including the level of overall user activity. The table below is based on a 2-node StoreFront deployment and it can handle around 600 simultaneous activities per second at 80 to 85% CPU usage. The shown configuration is on a per-node basis.
The following Operating Systems are tested and supported by Citrix to run StoreFront:
- Windows Server 2012 R2 Datacenter and Standard editions
- Windows Server 2012 Datacenter and Standard editions
- Windows Server 2008 R2 Service Pack 1 Datacenter, Enterprise, and Standard editions
When running XenDesktop / XenApp 7.8 you need to install at least StoreFront 2.6 or upwards.
- You basically have two points of authentication within a XenDesktop / XenApp Site: StoreFront and NetScaler.
- When working with Zones always make sure to deploy at least one StoreFront server per Z Needed in the case of a WAN link failure.
- Users may need to subscribe themselves to resources they are allowed to start. These user subscriptions are synchronized between all StoreFront servers within the same StoreFront server group.
- The above is also referred to as the ‘Self Service Store’ setup, which is enabled by default. A bit more on this in the ‘The Citrix Receiver’ chapter.
- The ‘Self Service Store’ can be disabled, leaving you with the ‘Mandatory Store’ configuration. Using this setup all resources for which a user has proper permissions will be displayed by default, no subscriptions needed.
- Combined with the ‘Self Service Store’ approach you can configure Keywords in Citrix Studio to automatically subscribe your users to certain resources, like a standard desktop, for example. When a user logs in, the resources will be directly displayed on his or her welcome screen.
- If email-based discovery is enabled and configured, you have the option to either advertise the Store or to hide the Store. When advertised the Store is presented as an option for your users to add. When you hide it, the user will need to configure the Citrix Receiver him or herself using a setup URL or provisioning file, for example.
- When configuring and modifying your StoreFront deployment, especially when editing the web.conf file, make sure you are doing this only using one StoreFront server at the same time. Preferably the one you installed and configured first.
- You can manually propagate any changes you have made to StoreFront to your other StoreFront servers within the same server group.
- When dealing with multi-site deployments, you can configure specific user groups to be mapped to a preferred site.
- StoreFront multi-site configurations let us configure a Recovery site. This site will sit idle until all other StoreFront deployments stop accepting connections, whatever the reason may be.
- When using a Citrix NetScaler think about using it to load balance all external incoming traffic to your StoreFront servers.
- If you only publish a single desktop to a user, StoreFront will automatically launch it directly after the user successfully logs in to StoreFront. This behavior can be changed by manually editing the web.conf file. Have a look at the following CTX document: CTX139058.
- StoreFront plays an important part in configuring Citrix Receiver pass-through authentication a.k.a. Single Sign-on. Look for the support document
