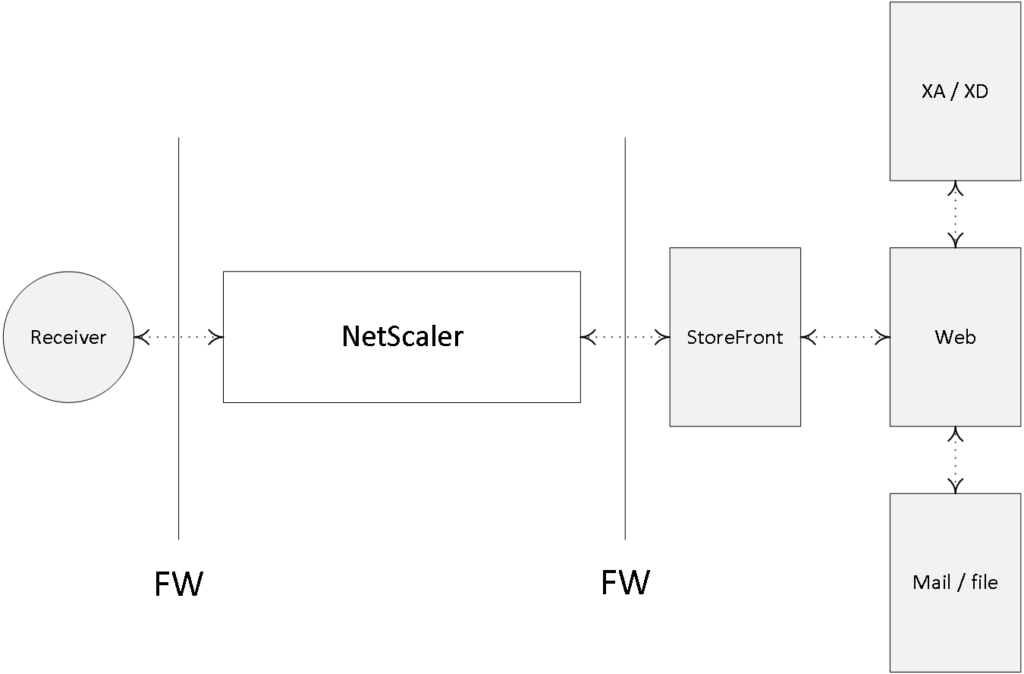
Although considered as an optional component to the FMA, you rarely see a full-blown Citrix environment without one. It is often referred to as Citrix’s personal Swiss Army knife because of its flexibility and numerous capabilities when it comes to handling inbound and outbound network traffic. The Citrix NetScaler Gateway is by far the best-known ‘edition’ of the NetScaler. But what most people do not realise is that the Gateway functionality built into the NetScaler is only about 5% (well, maybe 10) of what it is capable of. In fact, the Citrix NetScaler is often used for very large-scale deployments, which do not even include Citrix XenDesktop and/or XenApp. Let me elaborate a bit more on this.
Most of the confusion starts with the terms Citrix NetScaler and Citrix NetScaler Gateway. Although they sound very similar, and they do have overlap, there are multiple differences depending on the licenses used.
Citrix NetScaler refers to their Application Delivery Controller, or ADC, line of products, while the NetScaler Gateway, formerly known as the Citrix Access Gateway, or CAG, is primarily used for secure remote access to XenDesktop and/or XenApp environments.
You basically buy a ‘normal’ NetScaler but with limited functionality due to the NetScaler Gateway License you upload. NetScaler ADCs are capable of doing much more than ‘just’ remote access: they can be used for load balancing and HA, content switching, application offloading, application firewalling, cloud connectivity, hybrid cloud solutions, and much more.
The idea behind this project? Before commenting, read the introduction blog post here
Multiple books have been written on each of these subjects independently. In fact, you might want to give Marius Sandbu a Google, or look him up on Amazon: he has written some very exciting stuff around NetScaler.
Physical and virtual appliances
A NetScaler (ADC or Gateway) appliance can either be physical or virtual. If you decide to go virtual, be aware that the underlying Hypervisor, or virtual machine, that it runs on needs to have sufficient resources to handle your external connections, SSL offload, and whatnot. As far as the physical appliances are concerned, Citrix offers a whole range to choose from. Depending on the physical model you choose, your network throughput will increase (this goes for the virtual platforms as well), as does the amount of RAM and/or dedicated SSL chip capabilities.
FMA fact: Just recently, Citrix introduced the CPX model, which is Citrix’s containerized version of NetScaler; mainly used for testing and development use cases. It is still in tech preview at the time of writing.
A NetScaler VPX is a virtual appliance which runs on your Hypervisor of choice; a NetScaler MPX is a physical appliance; and last but not least, a NetScaler SDX is a physical appliance (running a customised edition XenServer) which is capable of running multiple VPX appliances, up to 80 in total, depending on your underlying physical resources. It comes with a (branded) XenServer pre-installed. Check out the main Citrix NetScaler products page over at Citrix.com: it will provide you with an overview of all physical as well as virtual models available.
Typical NetScaler Gateway setup
No matter which type or model of ADC NetScaler you pick, you have three different edition licenses to choose from (a.k.a. as platform licenses): Standard, Enterprise or Platinum. Depending on the edition you purchase, different functionality becomes available after you upload your license file. NetScalers are upgraded using the so-called pay-as-you-grow model.
FMA fact: While there is a separate NetScaler Gateway license available, also know that each ‘normal’ ADC NetScaler (Standard, Enterprise or Platinum license) includes the Gateway functionality by default: no additional licenses needed.
Let’s say you start out with a Standard NetScaler license, never mind the physical or virtual underlying platform, and after a while, it turns out you need certain functionality not available within the Standard license portfolio. Next, you simply buy an Enterprise license providing you with the feature(s), you need (like Dynamic content caching, for example) and all you have to do is upload the license file and you are good to go.
Other NetScaler licenses include Internal, Partner use, Demo, Evaluation, Express, Developer and/or VPX. Licenses are assigned to physical and virtual appliances. NetScaler SDX appliances require licenses for each physical appliance and each virtual instance. Although NetScaler VPX edition licenses are handled and purchased separately, they work in the same way as the ADC MPX and SDX licenses as far as feature enablement goes; the same applies to ‘Burst Packs’, by the way, read on…
Citrix also offers ‘Burst Pack’ licenses. When applied these will temporarily increase the network throughput capabilities of your NetScaler appliance (physical and virtual). This way you can handle sudden, and perhaps unforeseen, traffic spikes without having to heavily invest in new hardware.
Make sure you check out the Citrix NetScaler data sheet: it will show you all the different features available per edition. It’s a lot to take in, so take your time and if you’re not sure about what you’re reading, it’s probably best to contact one of your Citrix sales representatives.
From a high-level perspective, when purchasing a Citrix NetScaler follow these steps:
- First, you need to decide which physical or virtual model to go with: think about the amount of network throughput you may need, SSL offloading capabilities, that sort of thing.
- Next, depending on specific features or functions you would like to use, you choose your edition (platform) license. So if it is the Gateway functionality you are looking for, go with the Gateway license.
- Finally, you may want to purchase a maintenance contract with Citrix: they come in gold, silver or bronze, representing three, two or one year (s) of support. Contact your Citrix representative for more information.
FMA fact: The virtual NetScaler (VPX) can handle up to 1500 concurrent ICA connections (supported by Citrix, theoretically it can handle more). If you need more, then you’ll have to upgrade and purchase a physical MPX appliance, which, depending on the model, can handle anything ranging from 10,000 to 35,000 concurrent ICA connections at a time.
Next to the Access Gateway Edition, or platform license, you might also need an Access Gateway universal license, a.k.a. a Concurrent User license (CCU). This license enables the Access Gateway Enterprise edition appliance to support a specific number of concurrent users to make use of features like full SSL VPNs, Smart Access Endpoint Analysis, Clientless Access to the websites or Micro VPNs in the case of Citrix XenMobile. Note that the total number of concurrent user sessions logged onto a NetScaler Gateway virtual server cannot exceed the license count defined in the NetScaler Gateway universal license.
FMA fact: There’s a lot of overlap between the two (ADC and Gateway): it basically all comes down to the license you purchase and upload, with the NetScaler Gateway license being the most ‘basic’ one.
Note that these licenses also apply to the ADC NetScaler family highlighted earlier, and that they are optional: you don’t necessarily need them. The NetScaler Gateway is available as a virtual appliance as well as physical and upgrading, if it’s more than standard Gateway functionality that you need; also works by uploading a Standard, Enterprise or Platinum (ADC) license.
NetScalers can be hard to get: if it is not the licensing that will get your head spinning, then it will be the terminology used within NetScaler configurations to get things up and running. Here I will provide you with the basics that you will need to know to get started.
The NetScaler uses vServers (virtual servers) to deliver different kinds of services and they come in several different tastes; for example, you can have a virtual server for secure gateway purposes, handling secure remote access for your users. You can have a virtual server to load balance traffic, one to handle content switching or VPN access etc. Needless to say, you can, and probably will have, multiple virtual servers on your NetScaler at any given time. A vServer is what they call a logical object.
However, it doesn’t really matter what kind or type of virtual server we want to implement: there are a few basic steps, which will (almost) always need to be taken care of.
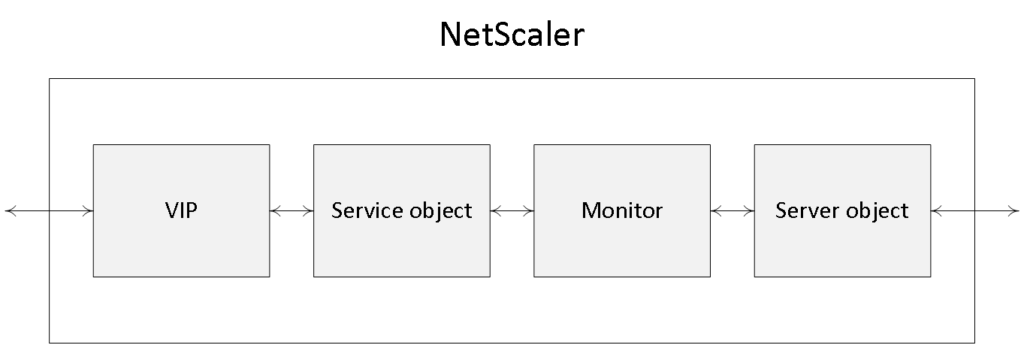
Think of the NetScaler virtual server as the first point of contact (though a firewall will probably sit in front) from an external user perspective when trying to access resources from your internal network: it is where the external connection terminates and the NetScaler takes over. A virtual server will have a VIP, or virtual IP address, which will be ‘known’ on the outside. Besides a VIP, it will also have a name (primarily used for administration purposes), including a definition of the protocol and port it will support.
Once a virtual server has been configured, one of the next steps will include the set-up and configuration of a so-called service object. A service object basically represents an application running on one of your back-end systems, like HTTP, when dealing with web server requests. This is how it would work. First we create a service object and give it a name, again primarily for administration purposes; then within the service object we tell it to what type of protocol and port number it should apply its magic and last but not least, to which physical or virtual back-end server it should forward the actual requests, HTTP in this case. Once done, the service object and the virtual server will be bound together, a process referred to as binding.
To help the service object in actually finding the physical or virtual back-end system, as mentioned above, we will also need to create and configure a server object (don’t get confused, yes, we have server and service objects) which we will then need to bind to the earlier created service object. The server object will also have a name within the NetScaler configuration, just like the virtual server and service object, and it will point to the IP address or FQDN of the actual back-end system handling the HTTP requests, one server object per back-end web server.
We have our virtual server, which has a VIP or virtual IP address, a name, protocol and port number. The virtual server is then bound to a service object, while the service object is bound to a server object, which points to the actual physical or virtual back-end server handling the HTTP requests. Are you still with me?
Load balancing, when implemented / configured, will take place at a virtual server / service object level. Obviously there will need to be a way for the virtual server to monitor the service objects on the back-end system it is load balancing to. Also see the image on the next page.
Otherwise, if one or multiple of those services become unavailable (down), because the accompanying back-end system has crashed, and the virtual server doesn’t know about it, it will keep load-balancing requests to those service objects resulting in 404 errors, the requested resource is not available. Enter monitors…
Made possible with the support of my sponsor IGEL
A monitor is another logical object that sits in between the service and the server object (note that it is bound to the service object) and constantly monitors the overall health and availability of the physical or virtual back-end systems (the services on it) handling the actual HTTP requests. As soon as a monitor notices that a back-end system, or the services on it, becomes unresponsive it will show the accompanying service, that it has been bound to, as down within the NetScaler management console, and it will stop sending traffic its way.
The NSIP address (NetScaler IP Address) is the IP address which is used by the Administrator to manage and configure the NetScaler; it is also referred to as the Management IP Address. It is mandatory when setting up and configuring the NetScaler for the first time: there can only be one NSIP address, it cannot be removed and when it’s changed you will have to reboot the NetScaler.
A SNIP (Subnet IP Address) is used for server-side connections, meaning that this address will be used to route traffic from or through the NetScaler to a subnet directly connected to the NetScaler. The NetScaler has a mode named USNIP (Use SNIP), which is enabled by default, this causes the SNIP address to be used as the source address when sending packets from the NetScaler to the internal network.
When a SNIP address is configured, a corresponding route is added to the NetScaler’s routing table, which is used to determine the optimal route from the NetScaler to the internal network. If it detects the SNIP address to be part of the route it will use it to pass through the network traffic using the SNIP address as its source. A SNIP address is not mandatory. In a multiple subnet scenario, you will have to configure a SNIP (or MIP: I’ll discuss this in a minute) address for each subnet separately. Also, when multiple SNIP addresses are configured on the same subnet, they will be used in a round robin fashion. By default, a SNIP address is not bound to a NetScaler interface; all network traffic is transmitted on all interfaces. So you could say that it’s closer to a network hub than anything else. Fortunately, you have a few options in binding SNIP addresses to a NetScaler interface, or multiple, when needed.
FMA fact: A NetScaler SNIP address is probably best compared to a layer 3 routing table entry. Not only does it tell the NetScaler that it has a connection to a specific network, so it is ‘known’, it also tells it how and where to reach it so that it is able to route network traffic its way.
Mapped IP Address
The NetScaler has a feature referred to as USNIP, use Subnet IP, which is enabled by default. If this ‘mode’ is disabled, then no SNIP addresses can or will be used. Ok, so what then, you ask? Or what if you have a subnet connected to the NetScaler without a SNIP address configured? This is where the Mapped IP Address comes into play.
If a MIP (Mapped IP) address is configured it would be used as the source IP address if the abovementioned USNIP mode is set to disabled or when no SNIP addresses are available.
Also, when used in conjunction with a SNIP address, if they both reside on the same subnet, for example, a MIP address might also be used as a source IP address when routing traffic from the NetScaler. However, only if the MIP address is the first address on the subnet will a route be added to the NetScaler routing table.
When configuring a NetScaler from scratch it will also ask you for a default route, which will function as the default gateway for the NetScaler. Without any internal routes known to the NetScaler, in the form of a SNIP or MIP address, it wouldn’t know what to do with the received traffic or where to send it. It will then send out all traffic over its default route, back onto the Internet where it probably came from to begin with.
FMA fact: You can also configure a SNIP address as a management IP, instead of, or better said, alongside the NSIP address used to manage your NetScaler.
When traffic is routed using one of the NetScaler’s SNIP addresses, the source address of the IP packets changes into that of the SNIP address, which makes sense since it will route traffic to subnets directly connected to the NetScaler. When multiple SNIP addresses have access to the same subnet, the SNIP which sits closest to the actual target will be used.Note that internal network traffic can also be sent through the NetScaler: this is not uncommon when load-balancing traffic destined for StoreFront and/or Delivery Controllers using a load balance virtual server.
A SNIP address is not mandatory when setting up and configuring your NetScaler. The use of so-called net profiles is also optional; they can be used to predefine which SNIP should be used for back-end communication. When firewalls are in place this also helps in simplifying the creation of ACL rules, since only one address will need to be defined.
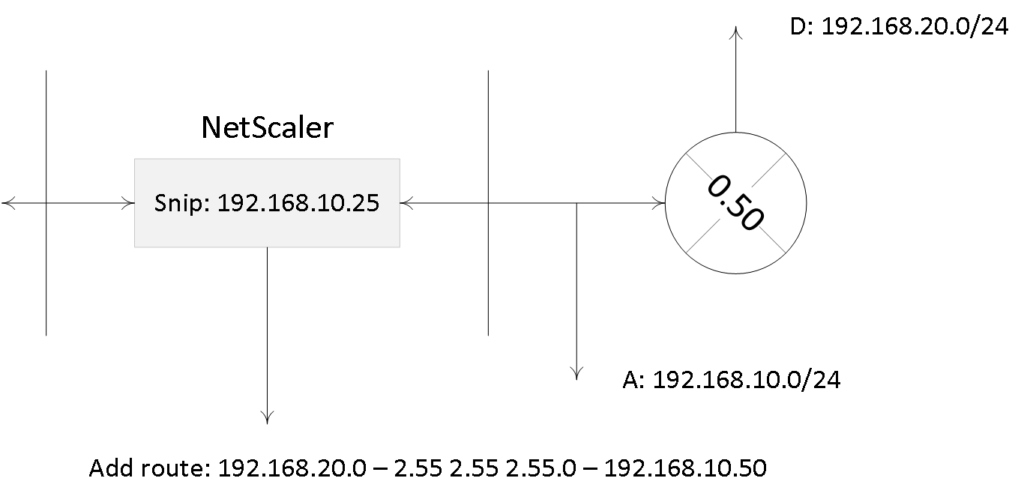
Let me give you an example to try and explain what a static route might look like. Let’s say you need access to a resource which is located on network D, but you will have to go through, or contact, network A to get there. Well, that’s basically it. You give the NetScaler a specific path to follow when a certain network or resource needs to be addressed. It will be listed as a static route.
Let’s say you have a SNIP configured on your NetScaler connecting you to subnet A. On your internal network you also have a subnet D, but it isn’t directly reachable from the NetScaler. Traffic will have to travel over, or through, subnet A, which is connected to a routing device connecting it to subnet D. SNIP addresses only work with directly reachable subnets / networks, so adding an additional SNIP for subnet D won’t work.
Instead you need to configure a static route (add route) telling the NetScaler to route network traffic destined for subnet D over, or through, subnet A, including the IP address of the routing device connected to subnet D. Here the same rules apply as before, if no ‘known’ route to subnet D is configured, the NetScaler will forward all traffic to its default route highlighted earlier.
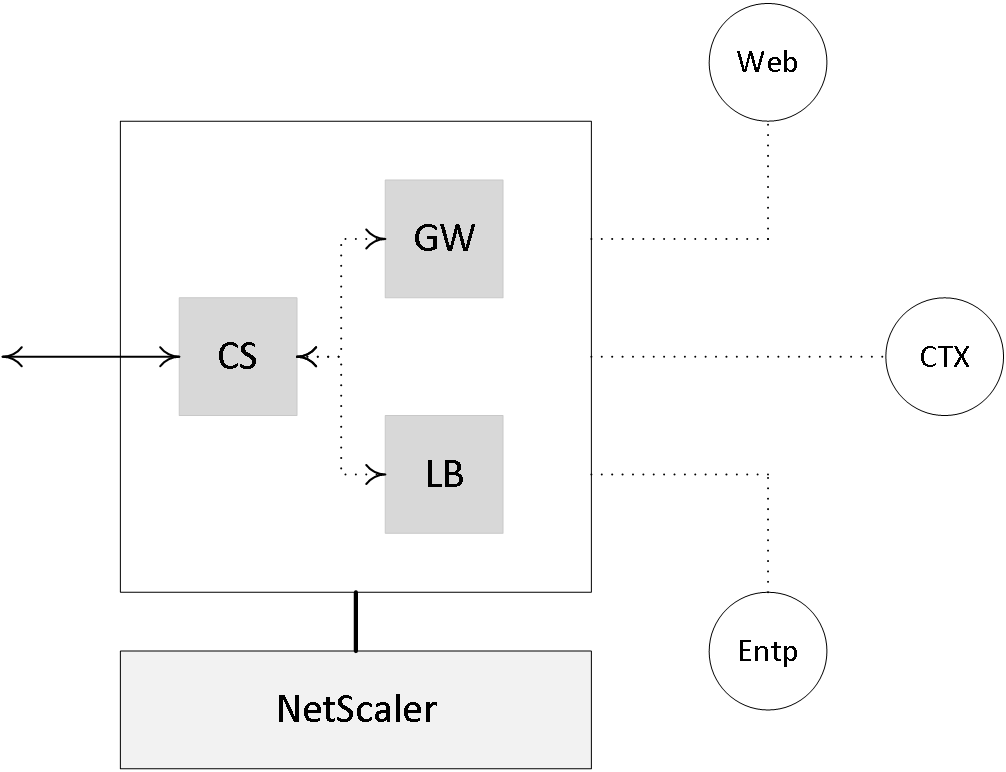
Not too long ago, as part of the NetScaler 11.0 release Citrix, announced the NetScaler Unified Gateway. In simple terms it comes down to a single vServer receiving all inbound traffic, which will then be routed to the appropriate virtual servers that are bound to the Unified Gateway virtual server, making it possible to access multiple services (as configured on the internal virtual servers) by using just a single IP address / URL. And while the technologies behind it aren’t really new (they basically made use of existing technologies like Content Switching, Client Access and Bookmarks) it does offer some additional benefits. The Universal Gateway virtual server can be paired with a NetScaler Gateway virtual server, to secure remote access where and when needed, including one or multiple load-balancing virtual servers. Some of the added advantages include:
- A single IP address / URL to access multiple back-end services like: XenDesktop / XenApp applications and desktops, mobile and web applications hosted by XenMobile and access to cloud resources. Freeing up the need for additional IP addresses.
- All known features of the NetScaler and XenDesktop platform can now be applied on one single platform while offering multiple back-end services, like: Single Sign-on, HDX and NetScaler Insight Services, End Point Analyses, RDP proxy, Content Switching, Smart Access Control etc.
- Triple A (AAA) support, which allows integration with cloud services Office 365 and SSO against existing NetScaler Load Balance servers.
FMA fact: You can configure as many Unified Gateway virtual servers as you like or need.
Securing NetScaler connections
When connecting from a remote location we want to make sure that we are connecting to the trusted company network and that it isn’t being spoofed in any way.
In our case we would set up the Citrix NetScaler to function as a remote secure gateway (virtual server) as the first point of access, authenticating and authorising our users. However, the question remains, how does the user know, after filling in the external facing URL of the NetScaler, that it is connecting to the actual (trusted) company network and that the machine answering the request is who it says it is? This is where certificates come into play.
The NetScaler will have an SSL certificate installed, which it uses to identify itself to the remote user / machine, convincing them that it is who it says it is, the certificate is (or should be) proof of that. Now I know, anyone can forge or counterfeit a digital certificate, so there needs to be a mechanism in place which tells the end-user / machine that it can trust the certificate presented by the NetScaler during the set-up and negotiation of the remote connection. Enter the Certificate Authorities (CA).
Certificates can be acquired, generated or purchased in multiple ways. You can set up your own internal domain-based PKI, Public Key Infrastructure, and start handing out certificates. This way you create your own internal Certificate Authority.
This can also be done on the NetScaler, by the way. You can also generate self-signed certificates, which are issued by the machine itself. This basically means that the machine generating and signing the certificate trusts itself. This can be done on the NetScaler as well. Or, last but not least, you can purchase a certificate from a well-known, respected and, most importantly, trusted external third-party Certificate Authority.
Let’s resume, shall we? A certificate is always issued and signed by a Certificate Authority of some sort. This can be a private CA when you set up and configure your own internal PKI, for example, a self-signed certificate as mentioned above, where the machine issuing the certificate is basically its own CA (it can’t assign certificates to other machines), or the CA can be external, a third party as I also highlighted.
When a user / machine connects to an external resource like a NetScaler (Gateway), the external resource will present a certificate to try and prove that it is who it says it is. As mentioned, certificates are issued and signed by so-called CAs. And here it comes, the CA who originally issued (and signed) the certificate to the external resource needs to be trusted by the user / machine (or client) connecting to that resource. If the CA is trusted all is fine and you will end up on the web page you requested. If the CA who issued the certificate of the external resource is not trusted by the client you will end up with a security warning where you need to decide to continue or not. These may differ slightly, depending on the browser type and version used.
Another example would be when the NetScaler communicates with one of your StoreFront servers (or vice versa): here SSL encryption can be applied as well. In this case the NetScaler will connect up to the StoreFront server requesting a secure connection to exchange information. The StoreFront server will show the NetScaler its SSL Certificate to prove that it is who it says it is. In this case the NetScaler will need to trust the CA which issued and signed the StoreFront certificate. The same rules apply.
The advantage of purchasing certificates from a well-known third-party CA is that all major web browsers, by default, already trust these companies / CAs. So when you connect to a website / resource showing you a certificate issued and signed by a well-known third-party CA, you will not have any issues getting onto the actual web page you requested.
Internal Certificate Authority
If you don’t use a trusted third-party CA, you will need to come up with a way to make all of your users / devices trust your internal CA. Of course this is doable, but it involves some extra effort which, depending on the number and types of external users / clients, can be a daunting task. The same applies to self-signed certificates: you will need to make sure that your users / clients trust the machine (CA) that issued the self-signed certificate.
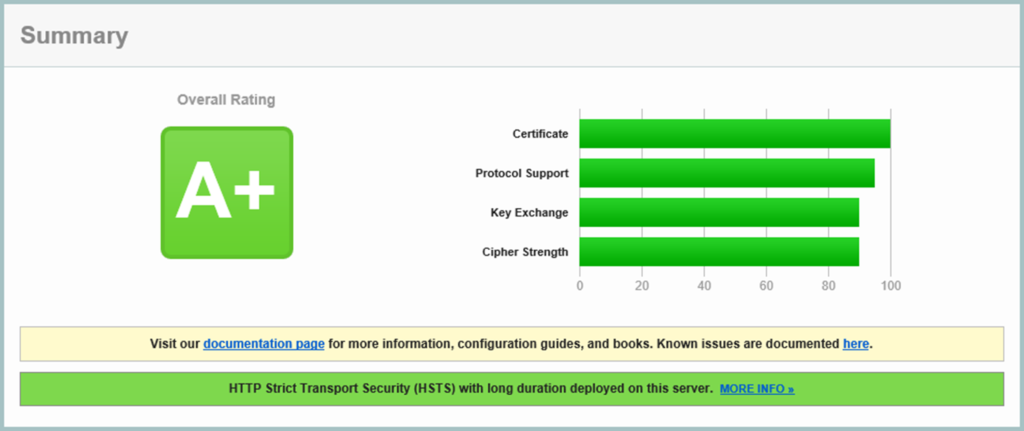
SSL Labs online security check
External CAs have a very extensive and intensive authentication and verification programme you will need to go through before they give out one of their certificates. This is one of the main reasons why these CAs are trusted within most major web browsers, as mentioned earlier. The cost per certificate can greatly vary per vendor, as well as the type of certificate you want to purchase. Also, the time a certificate will be valid will have an influence on the overall costs as well. Some well-known CAs are: GoDaddy, Verisign, GlobalSign and DigiCert. If you give it a Google you’ll come up with a few more, I’m sure.
Different types of certificates
When creating or requesting a digital SSL certificate you have a few options. Of course you can decide on the lifespan of the certificate, 2 years, five years and so on and so forth, the number of bits used for encryption etc., but there are some other variables you may want to consider, two in particular.
We could make use of a wild card certificate. A wild card certificate can be used on multiple devices / machines without having to purchase or generate multiple separate certificates. So instead of generating or purchasing two separate certificates for your NetScaler and your StoreFront server, like, external.vankaam.local and internal.vankaam.local, we could do with just one in the form of *.vankaam.local. It supports an unlimited number of subdomains.
Another one I’d like to highlight is the SAN, or Subject Alternative Name, certificate. A SAN certificate can be used to secure multiple domains like vankaam.com, basvankaam.org, mydomain.com etc. I think you get the point.
The device responsible for offloading all SSL traffic, the Citrix NetScaler in our case, can live within our DMZ. And the web server(s) for which SSL traffic is being offloaded can be safely placed on our (more secure) internal network (although this doesn’t apply to all use cases of course) without having to worry about unsafe connections since, next to user authentication (when applicable) which can be handled by the NetScaler as well, all traffic can be checked, inspected, decrypted and possible re-encrypted by the NetScaler before finally ending up on the web server. Next to SSL offloading, the NetScaler is also capable of SSL and TCP multiplexing and supports features like HTTP caching and compression or front-end optimizations to optimize various web applications for a much more responsive website.
- The NetScaler can do more than ‘just’ provide secure remote access to XenDesktop and/or XenApp environments.
- All NetScalers are (almost) equal with regard to the functionality and features that they can deliver. Depending on the type of license you upload, certain functionalities and/or features will become available. Pay as you Grow.
- The main differences between the physical appliances can be found in the compute resources and the type of Cavium SSL accelerator card that they hold. This card is used to decrypt and encrypt SSL traffic. The more powerful the card, the more SSL transactions it will be able to handle.
- NetScalers can be physical (MPX and SDX), virtual (VPX), virtual on physical (VPX on SDX) and containerised (CPX).
- While not mentioned earlier (except for the license type) there is also a NetScaler Express edition. It is free of charge and a potential great resource for smaller deployments, PoC’s and test environments. The VPX Express edition offersthe same features as the VPX standard edition. However, there are a few limitations to keep in mind like:no SSL Offload capabilities, max 5 Mbps throughput, licensed per year. Other than that it is definitely worth having a look at.
- There are three main ADC platform licenses available: Standard, Enterprise and P There is also a separate NetScaler Gateway license and a universal license.
- If you need to temporarily increase your network bandwidth think about purchasing and applying a Burst P
- Remember the one is none rule? Well, it applies to NetScalers as well.
- NetScaler HA (2 nodes) is always set up as active-passive, with one NetScaler being the primary node of the two, and thus the active one. The secondary node(s) will send a continuous stream of heartbeat messages (interval is configurable), checking to see if the primary device is active and accepting connections. If it fails to respond, and after multiple retries, a secondary node will take over, which is referred to as a failover. NetScaler clustering, which is Active / Active using ECMO, can grow up to 32 nodes in total.
- When applying NetScaler HA be aware that different NetScaler models cannot be paired: the model and make of both NetScaler appliances must be equal and both NetScalers must run the same software version, licenses included.
- The NetScaler can also provide secure remote access to XenMobile web, SaaS and mobile applications. The latter is referred to as Micro VPN In fact, you need a NetScaler for this.
- Always start small and contact your Citrix sales representative when in doubt. Remember the Pay as you Grow model: you can’t go
- When dealing with larger and more complex environments, consider having a look at the NetScaler Unified Gateway set-up.
- Make sure to apply SSL certificates to secure your in- and outbound connections.
- It is thought of as a best practice to use third-party certificates when dealing with external, inbound connections, and to use internal CA certificates for all internal SSL traffic, from your StoreFront Server to your Delivery Controllers, for example.
- When setting up a test lab or PoC environment, self-signed certificates can be helpful.
- NetScaler can secure remote access for both StoreFront as well as Web Interface.
When implementing a Citrix NetScaler certain firewall ports will need to be opened. Always check the Citrix product documentation before implementing.

